
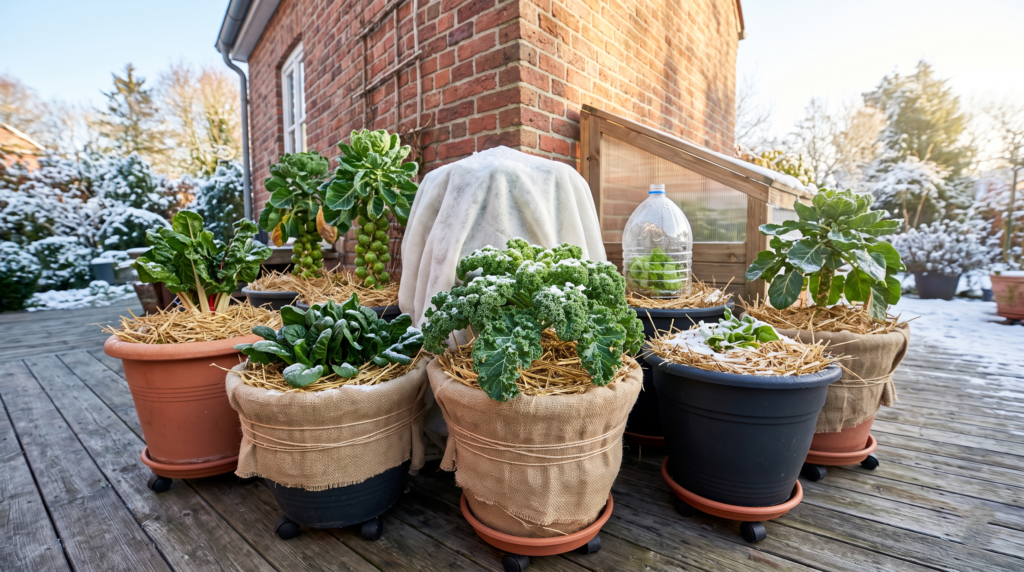
We’ve all been there: you’re sipping your evening tea, half-listening to the local news, when the meteorologist casually drops the words “sudden frost advisory.” Panic sets in. You look out the window at your thriving patio garden—your beautiful potted kale, robust Swiss chard, and lingering cherry tomatoes—and realize they are completely exposed to the incoming freeze.
When you grow crops in pots, they lack the earth’s deep, natural insulation. If you don’t take action, a single hard freeze can wipe out months of hard work. But don’t grab the compost bin just yet! Winterizing container vegetables is entirely possible, and with the right techniques, you can keep your potted harvest alive—and even thriving—well into the snowy season.
Over the years of cultivating balcony and patio gardens through unpredictable, deep freezes, I’ve tested countless methods for overwintering potted plants. I’ve lost crops to frozen roots, and I’ve successfully harvested fresh spinach in the dead of January. Through trial and error, I’ve developed a foolproof, science-backed system to extend the growing season. In this comprehensive guide, we will break down the exact steps to insulate roots, create microclimates, and maintain the vital soil health needed to keep your winter crops resilient.
🎥 [Embed your YouTube Video Here: “Emergency Frost Protection: Saving Your Potted Veggies”]
II. Why Container Vegetables Freeze Faster Than Ground Crops 🧊
To effectively protect your plants, you first need to understand the unique physics of a container garden during winter. Why does a kale plant in a raised bed survive a snowstorm, while the same kale in a patio pot perishes?
The Science of Pot Temperatures
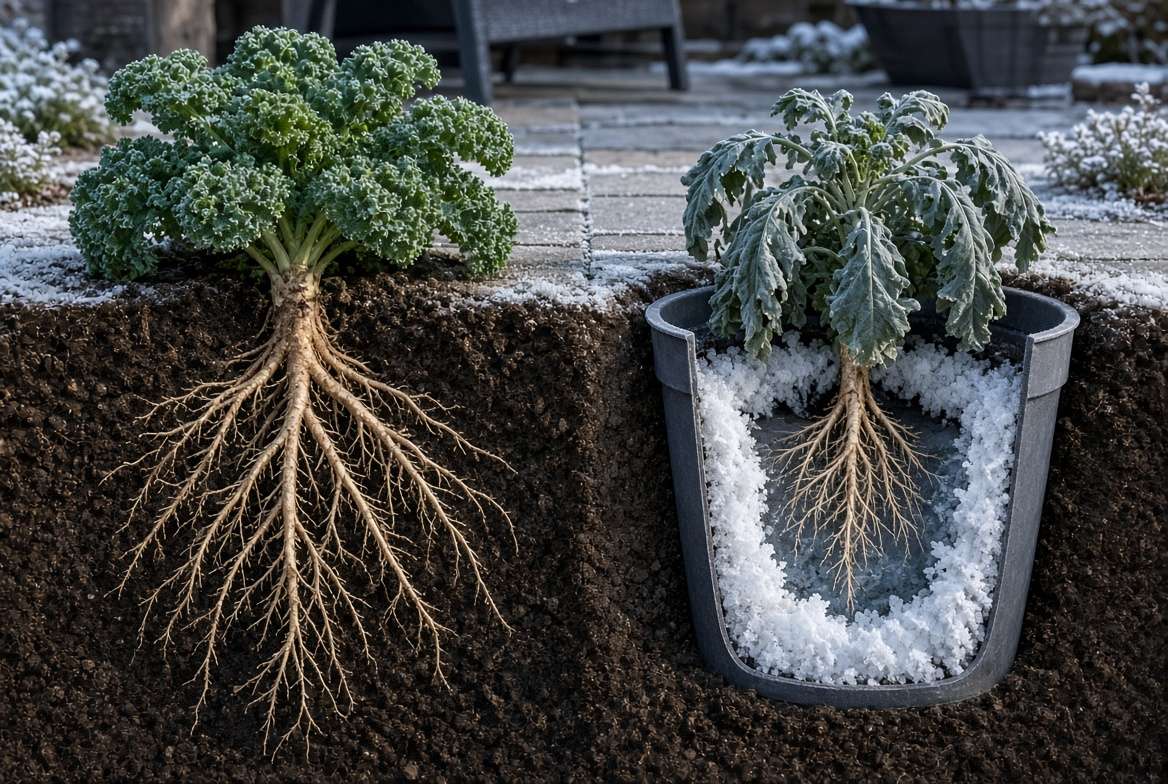
In a traditional in-ground garden, the soil acts as a massive thermal heat sink. The earth absorbs solar radiation during the day and slowly releases it at night, keeping the root zone at a relatively stable, insulated temperature.
Container plants do not have this luxury. A potted plant is surrounded by ambient air on all sides. When the air temperature drops to 20°F (-6°C), the soil inside that container quickly drops to 20°F as well.
Root Vulnerability
Plant foliage is often much more cold-hardy than plant roots. A plant whose leaves can survive a light frost (like lettuce or broccoli) might have roots that are severely damaged if the soil freezes solid. When roots freeze, the cells burst, making it impossible for the plant to uptake water. Even if the leaves look fine the morning after a freeze, the plant will slowly die of dehydration over the following week because its root system has been destroyed.
Material Matters: Choosing the Right Winter Pots
The material of your container drastically impacts how quickly cold penetrates the soil.
-
Terracotta and Unglazed Clay: Highly porous. These will absorb moisture, and when that moisture freezes and expands, the pot will crack and shatter. Move these indoors.
-
Plastic: Offers zero insulation, but it won’t crack as easily as clay. Plastic pots leave roots highly vulnerable to temperature swings.
-
Fabric/Grow Bags: Excellent for summer aeration, but terrible for winter. The cold wind whips right through the fabric, freeze-drying the roots.
-
Wood and Thick Resin: The best options for overwintering. Half-whiskey barrels or thick cedar planters offer a decent barrier between the root ball and the freezing air.
III. Triage: Which Vegetables to Save and Which to Harvest 🥦🥕
Before you spend hours insulating pots, you need to perform garden triage. Not all vegetables are equipped to survive a freeze, no matter how much bubble wrap you use. Divide your potted crops into three categories.
🍅 Tender Crops to Harvest Immediately
Warm-weather lovers cannot survive frost. Their cell walls are thin and lack the natural sugars required to prevent ice crystals from forming inside the plant tissue.
-
The Culprits: Tomatoes, peppers, eggplants, cucumbers, basil, and squash.
-
Action Plan: Harvest everything immediately. If you have unripe green tomatoes, bring them indoors and place them in a paper bag with a ripe banana to speed up the ripening process. Pull the plants and compost the foliage.

🥬 Semi-Hardy Crops to Protect
These vegetables can easily survive a light frost (temperatures dipping to 28°F / -2°C for a few hours) but will succumb to a deep, sustained freeze.
-
The Culprits: Lettuce, radishes, Swiss chard, arugula, and peas.
-
Action Plan: These are prime candidates for heavy winterizing. With proper root insulation and a protective frost blanket, you can keep these growing for several more weeks.
❄️ The Winter Warriors (Frost-Hardy Veggies)
Nature has given these plants a brilliant defense mechanism. When temperatures drop, these crops convert their internal starches into sugars. This sugar acts as a biological antifreeze, lowering the freezing point of the water inside their cells. As a bonus, this makes the vegetables taste incredibly sweet!
-
The Culprits: Kale, spinach, carrots, collards, Brussels sprouts, and winter cabbage.
-
Action Plan: These require minimal above-ground protection, but you must still insulate their pots to protect the vulnerable root systems.
📌 [Insert your Pinterest Pin Graphic Here: “Tender vs. Hardy: Which Veggies Survive Frost?”]
IV. 4 Essential Steps to Winterizing Container Vegetables 🛠️
Now that you know which plants are staying outside, it’s time to fortify them. Think of this as putting a winter coat and boots on your garden.
Step 1: Relocation and Creating Microclimates 🏡
Location is everything in winter gardening. The middle of an exposed patio is a death sentence for a potted plant. You need to leverage “microclimates”—small areas in your yard that stay marginally warmer than the surrounding environment.
-
Cluster Your Pots: Push all your containers close together. Grouping pots creates a shared thermal mass, reducing the total surface area exposed to freezing winds. Place the hardiest plants on the outside of the cluster to act as a windbreak for the more delicate greens in the center.
-
Hug the House: Move your clustered pots up against a South-facing or West-facing brick, stone, or stucco wall. The wall will absorb heat from the winter sun all day and gently radiate it back onto your plants at night.
-
Get Them Off the Ground: If your pots are sitting on concrete, they are losing heat through the bottom. Elevate them slightly on wooden planks or specialized “pot feet” to break the thermal bridge.

Step 2: Insulating the Roots (The “Coat” Method) 🧥
Because the container walls offer no protection, you must manually insulate the root zone. Your goal is to trap dead air space around the pot.
-
The Bubble Wrap Technique: Wrap the outside of the container in two or three layers of thick bubble wrap, securing it with twine. For a more aesthetically pleasing look, wrap a layer of burlap over the bubble wrap.
-
The Pot-in-Pot Method (Highly Recommended): Find a container that is two to three inches wider than your current plant pot. Place your planted pot inside the larger container. Stuff the empty gap between the two pots tightly with straw, dried autumn leaves, or crumpled newspaper. This mimics the earth’s natural insulation perfectly.
Step 3: Top-Mulching for Crown Protection 🍂
Insulating the sides of the pot is useless if you leave the top soil exposed. The “crown” of the plant (where the stem meets the root system) is highly susceptible to frost heave—a process where freezing and thawing soil expands and contracts, literally pushing the plant out of the dirt and tearing its roots.
-
How to Mulch: Apply a thick, 2-to-3-inch layer of organic mulch directly onto the top of the container soil.
-
Best Materials: Clean straw, shredded hardwood bark, or pine needles. Avoid using whole, unshredded leaves, as they can mat down into a solid, impenetrable layer that suffocates the soil.
Step 4: Managing Winter Soil Health 🪱
This is the step most container gardeners completely overlook, yet it is crucial for overwintering success. A plant’s resilience to cold is directly tied to the biological health of its soil ecosystem.
-
The Microbial Slowdown: As temperatures plummet, the beneficial bacteria and fungi in your container soil go dormant. Because microbial activity halts, the breakdown of organic matter stops.
-
Stop the Fertilizer: Do not apply heavy liquid or synthetic fertilizers during the winter. Your cold-stressed, slow-growing vegetables cannot process these nutrients. Adding them will result in a toxic buildup of fertilizer salts in the confined space of the container, which will chemically burn the roots.
-
Focus on Structure: Instead of feeding the plant, protect the soil structure. The thick layer of mulch you applied in Step 3 will protect the topsoil from compaction caused by heavy winter rains and snowmelt, ensuring that when spring arrives, your soil is aerated, alive, and ready to support new growth.
V. Hydration in the Cold: The Winter Watering Rules 💧
One of the most common—and deadly—misconceptions about winter gardening is that cold weather means you no longer need to water. In reality, dehydration is just as big of a threat to your container vegetables in January as it is in July.
The Winter Drought Myth
While the sun might not be beating down, winter air is notoriously dry. Combine low humidity with harsh, freezing winter winds, and moisture is rapidly stripped away from the foliage of your plants in a process called desiccation. Because the soil in containers drains faster and dries out quicker than garden beds, your potted vegetables are highly susceptible to this winter drought.
When to Water
Timing is everything. Never water your plants in the evening or late afternoon during the winter months. If the water hasn’t had time to drain thoroughly, the residual moisture trapped in the soil pockets will freeze overnight, expanding and severing the fragile root hairs.
-
The Rule: Only water during the warmest part of the day (usually between 10:00 AM and 2:00 PM). This allows the plant time to absorb the moisture and gives excess water plenty of time to drain out of the bottom of the pot before dusk.
The Finger Test
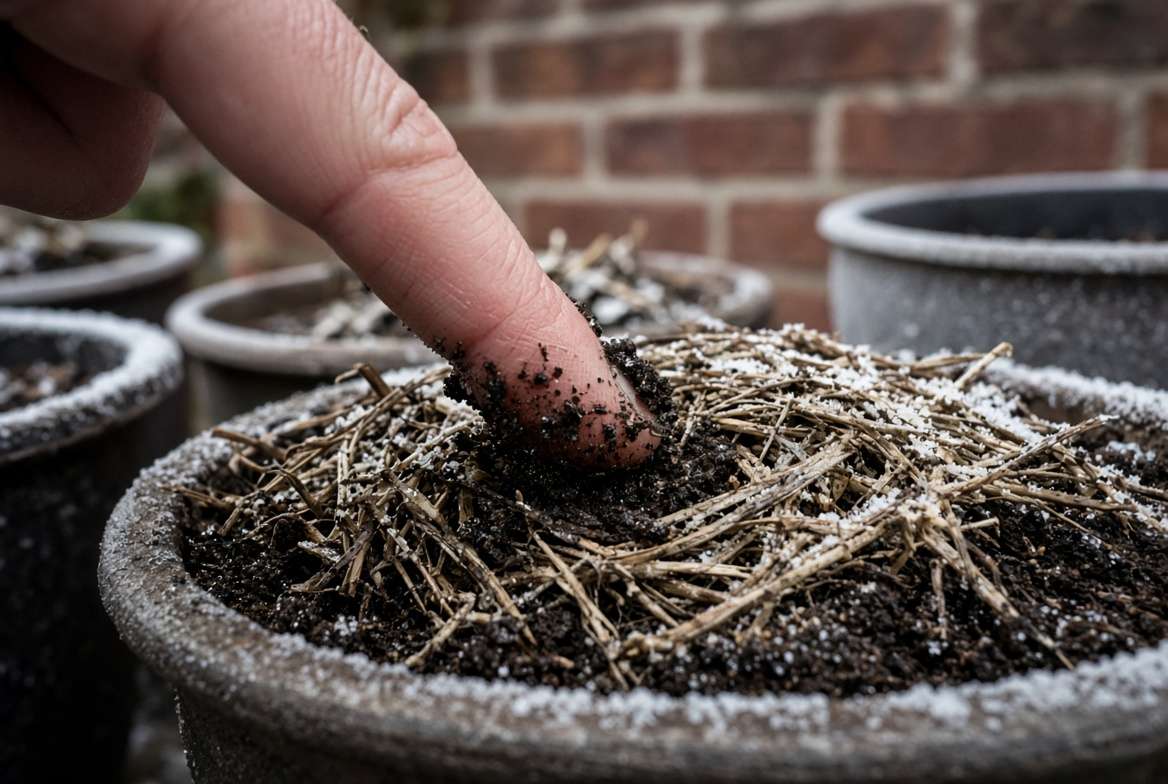
Determining when a winter container needs water can be tricky, as the top layer of soil might feel hard, crusty, or slightly frozen.
-
How to Check: Push your finger about two inches down into the soil beneath the mulch layer. If it feels completely dry at your fingertip, it’s time to water. If it feels even slightly damp, wait a few more days. Overwatering in winter is a recipe for root rot.
💡 Expert Insight Box: Never water a container vegetable when the soil inside the pot is frozen solid. Pouring water over a frozen root ball will simply create an ice slick inside the pot, suffocating the roots through “ice logging.” Wait for a mild day when the soil thaws before giving them a drink.
VI. DIY Frost Protection: Covers, Cloches, and Cold Frames ⛺
While root insulation protects the bottom half of the plant, you still need a strategy for defending the above-ground foliage from frost, snow accumulation, and freezing winds.
Using Horticultural Fleece & Frost Blankets
A heavy-duty frost blanket (often called horticultural fleece or floating row cover) is a container gardener’s best friend. Unlike plastic tarps, agricultural fleece is breathable, allowing light and moisture in while trapping the heat radiating up from the soil.
-
The Technique: Drape the fleece loosely over your clustered containers. Do not wrap the fleece so tightly that it crushes the leaves. Secure the edges securely around the base of the pots with bungee cords, twine, or heavy rocks to prevent winter gusts from blowing it away.
The “Cloche” Trick
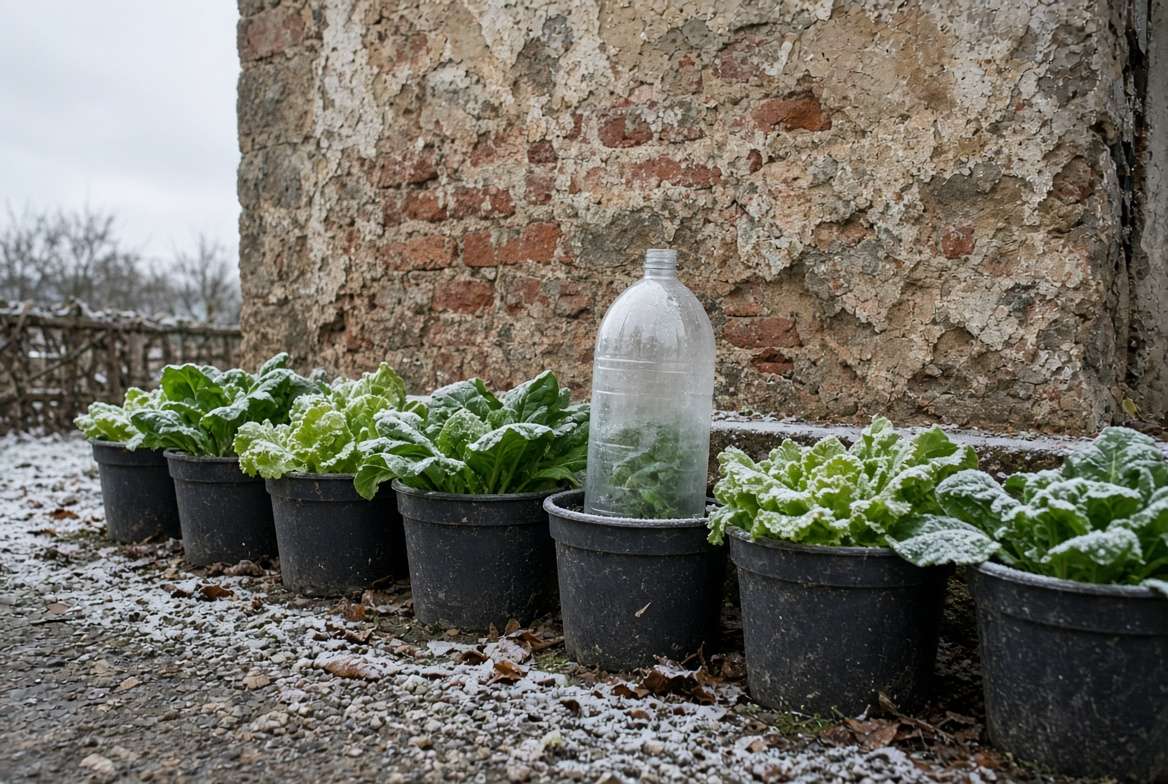
For individual pots or single delicate plants, a DIY cloche acts as a customized mini-greenhouse.
-
The Technique: Repurpose clear plastic milk jugs, large soda bottles, or water jugs by cutting the bottom off. Remove the cap to allow for ventilation, and press the plastic dome firmly into the soil over your plant. This traps heat beautifully and shields the plant from biting winds.
Mini Cold Frames
If you have a dedicated balcony or patio corner, consider setting up a temporary cold frame for your containers.
-
The Technique: You can easily build a simple lean-to using a few pieces of scrap wood or PVC piping draped with heavy, clear greenhouse plastic. Place this frame over your clustered pots to create an insulated bubble. Just remember to vent the frame on sunny days to prevent the interior from overheating!
VII. Troubleshooting Common Winter Container Mistakes 🚫
Even with the best preparation, winter gardening has a learning curve. Avoid these three common pitfalls that trip up many well-intentioned gardeners.
Mistake 1: Ignoring Drainage
During the summer, you probably kept saucers under your pots to catch excess water. Remove them immediately in the winter. If a saucer fills with winter rain and freezes, your pot will be sitting on a block of ice. Worse, the ice will plug the drainage hole, causing the soil above it to become waterlogged and freeze solid. Always elevate pots on pot feet or bricks to ensure water flows freely away.
Mistake 2: Leaving Terracotta Unprotected
As mentioned in the triage section, unglazed clay and terracotta are highly vulnerable. If you absolutely must leave a plant in a terracotta pot outside, you must wrap the entire pot in industrial bubble wrap or heavy burlap to prevent the clay from absorbing external moisture. Otherwise, you will find your beautiful, expensive pots shattered on the patio after the first hard freeze.
Mistake 3: Removing Covers Too Late
Frost blankets and plastic cloches are excellent at trapping heat—sometimes too excellent. If you leave a plastic cover tightly secured over a plant on a bright, sunny winter afternoon, the interior temperature can quickly spike to 90°F (32°C) or higher. You will literally cook your cold-hardy greens. Always open vents or pull back heavy covers on sunny days when the temperature rises above freezing.
VIII. Frequently Asked Questions (FAQs) ❓
Can potted plants survive freezing temperatures? Yes, but it depends heavily on the plant variety and how well the container is insulated. Frost-hardy vegetables like kale, spinach, and carrots can survive freezing temperatures in pots if their root systems are insulated with bubble wrap or the pot-in-pot method, and if the container is moved to a sheltered microclimate.
Should I wrap my vegetable pots in plastic for winter? You should wrap the outside of the pot with bubble wrap or plastic to insulate the roots, but you should never wrap the plant’s foliage tightly in non-breathable plastic. Foliage requires breathable covers, like horticultural fleece, to prevent moisture buildup and fungal diseases.
How often should I water container vegetables in winter? Significantly less than in the summer. Check the soil every 7 to 10 days. Only water when the top two inches of soil beneath the mulch are completely dry, and only water during the warmest part of the day when the soil is completely thawed.
Do roots freeze faster in pots than in the ground? Yes. In the ground, roots are insulated by the surrounding earth. In a container, the root ball is exposed to the freezing ambient air temperatures on all sides. Without added insulation, roots in pots freeze much faster and suffer higher mortality rates.
IX. Conclusion: Enjoying Fresh Greens in the Snow 🥗
Winterizing container vegetables requires a bit of upfront effort in the late autumn, but the payoff is immensely rewarding. There is nothing quite like the satisfaction of stepping out onto your frosty patio in December, brushing a light dusting of snow off a protective cloche, and harvesting incredibly sweet, crisp kale or fresh spinach for your evening dinner.
By understanding the physics of cold weather, selecting the right frost-hardy crops, insulating those vulnerable root zones, and mastering winter watering rules, you can transform your potted garden from a summer fling into a year-round provider. Don’t let the threat of frost intimidate you—bundle up your pots, embrace the season, and keep growing!
Have you successfully overwintered potted vegetables on your balcony or patio? What insulation methods worked best for your climate? Drop your tips and experiences in the comments below! 👇











