
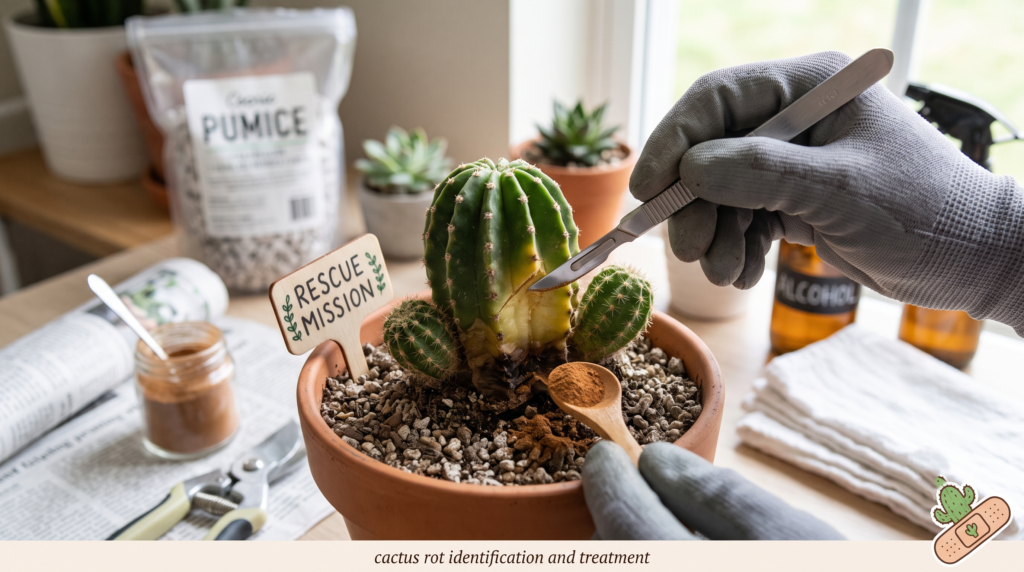
Touching your favorite cactus and feeling a squishy, deflated, or wrinkly mess is enough to send any plant parent into a panic. We tend to view cacti as invincible desert warriors, but inside our homes, they are highly susceptible to a silent, mushy killer: overwatering. If you are staring at a sick, leaning plant right now, take a deep breath and don’t throw it in the compost bin just yet.
Mastering cactus rot identification and treatment is an essential skill that can bring your beloved succulent back from the brink of death. While cacti have evolved to survive months without a drop of rain, they lack the defenses to cope with soggy, poorly draining potting soil.
In this comprehensive, expert-led guide, we will break down exactly what causes this devastating issue, how to spot the earliest warning signs, and the step-by-step surgical techniques required to save your prickly companion. Let’s scrub in and save your plant! ✨
II. What Exactly is Cactus Rot? (The Science Made Simple) 🔬
To understand how to treat rot, we first need to understand how a cactus functions. Cacti are succulents, meaning they have adapted to store massive amounts of water in their fleshy stems and areoles. Their root systems are typically shallow and widespread, designed to rapidly absorb flash floods in arid environments.
When a cactus is placed in a standard indoor pot with soil that stays wet for days or weeks, its roots begin to suffocate from a lack of oxygen. This anaerobic, waterlogged environment is a breeding ground for opportunistic fungal and bacterial pathogens.
There are two primary ways rot attacks your plant:
-
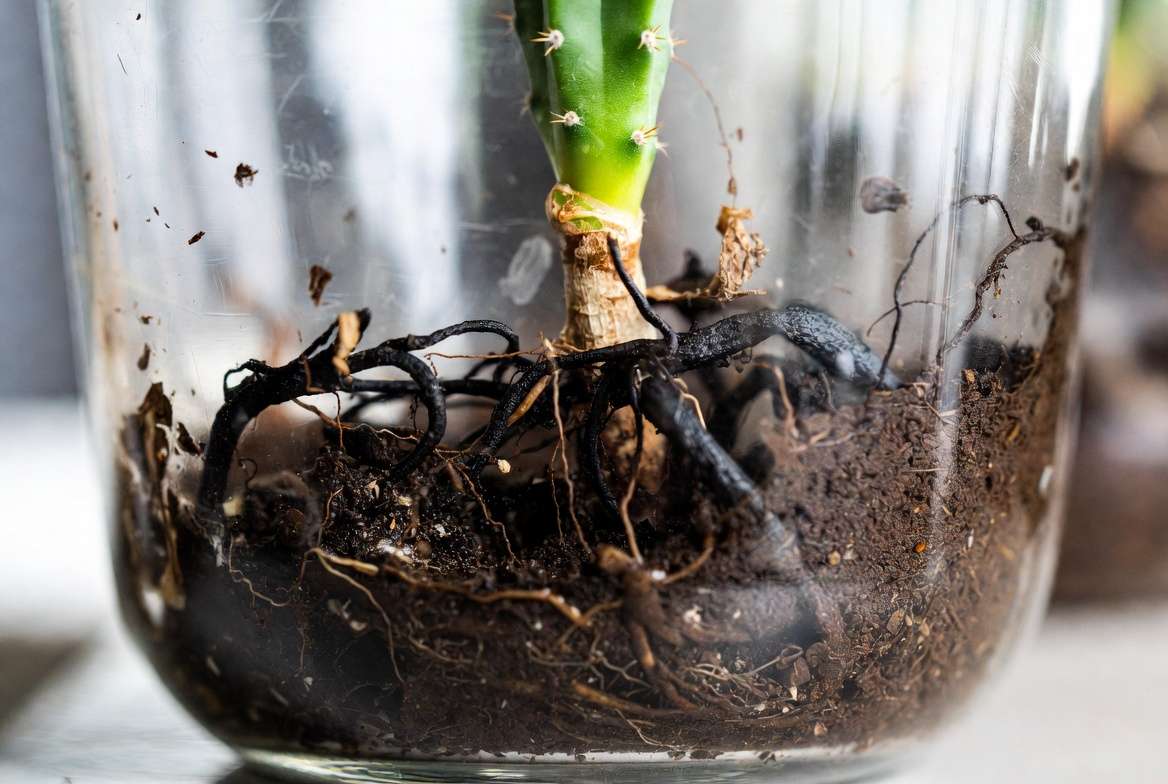
Root Rot: The decay begins below the soil line. The roots die and rot away, meaning the plant can no longer take up water or nutrients. Ironically, a cactus with severe root rot might look dehydrated and shriveled because its root system has been completely destroyed.
-
Stem or Crown Rot: The decay starts at the base of the plant (where it touches damp soil) or enters through a wound on the fleshy stem, rapidly turning the plant tissue into a soggy mush.
III. 🕵️♀️ Early Signs & Symptoms: Cactus Rot Identification
Accurate diagnosis is the most critical step in saving your plant. Because different ailments (like sunburn or natural corking) can sometimes look like rot, you need to know exactly what to look, feel, and even smell for.
Above-Ground Symptoms (Visual and Tactile Cues)
-
The “Mushy” Texture: Healthy cactus tissue should feel firm, like a crisp green apple. If the stem feels soft, squishy, or hollow to the touch, rot is actively eating away the internal tissue.
-
Discoloration: Watch for skin that turns yellow, dark brown, black, or bizarrely translucent, especially near the soil line.
-
Structural Collapse: If a previously upright cactus begins to heavily lean, tip over, or buckle under its own weight, the internal structure has likely rotted away.
-
The Sniff Test 👃: This is a surefire diagnostic tool. If you lean in close to the base of the plant and detect a foul, musty, or rotting-fish odor, you are dealing with a severe bacterial or fungal infection.
Below-Ground Symptoms (The Root Check)
If you suspect rot but the top of the plant looks relatively okay, you must examine the root system.
-
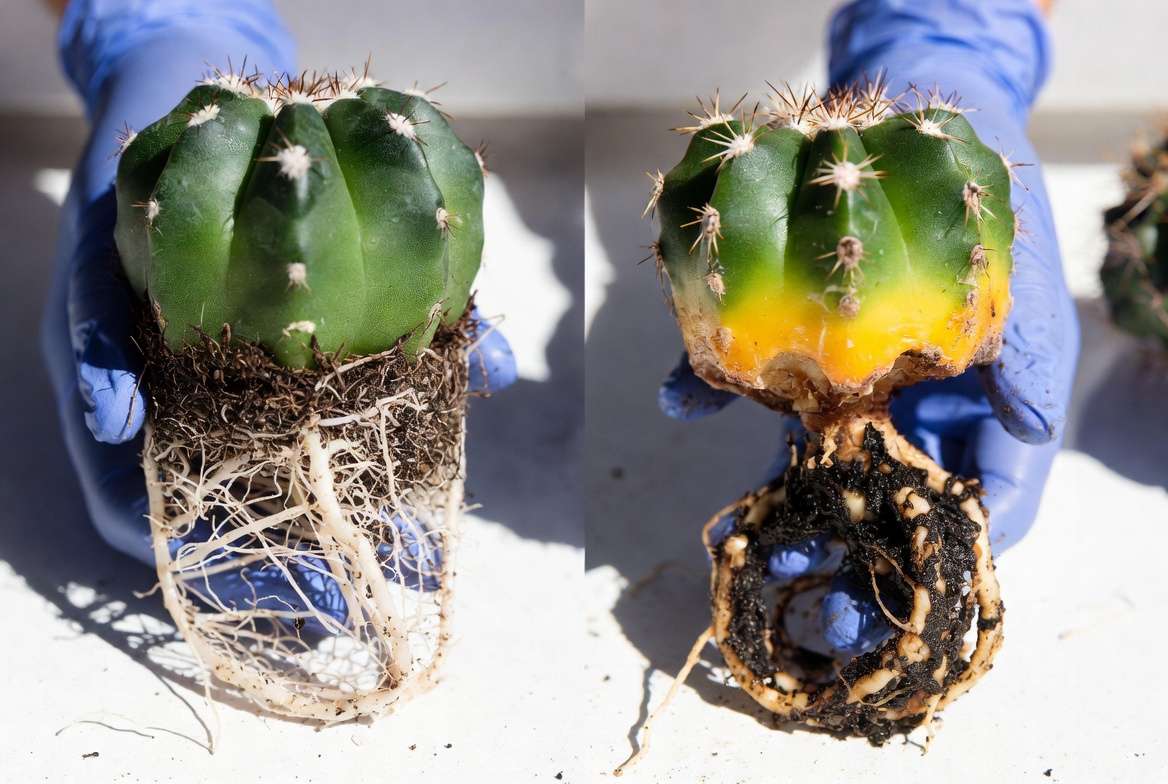
Healthy Roots: Should appear white, light tan, and feel firm or wiry.
-
Rotted Roots: Will be dark brown or black, slimy, mushy, and often stringy (the outer root sheath slips off easily, leaving a hair-like thread behind).
-
Swampy Soil: The potting mix smells stagnant and remains wet long after watering.
IV. The Usual Suspects: Types of Rot in Cacti 🦠
Not all rot is created equal. Identifying the specific type of pathogen attacking your plant can help you understand why it happened and how to prevent it in the future.
1. Fungal Root Rot
This is the most common affliction for indoor house plants. It is typically caused by Fusarium or Phytophthora fungi, which lie dormant in soil until they are activated by excessive moisture and poor drainage. Fungal rot is usually a slightly slower-moving disease, starting at the root tips and creeping its way up into the core of the cactus.
2. Bacterial Soft Rot
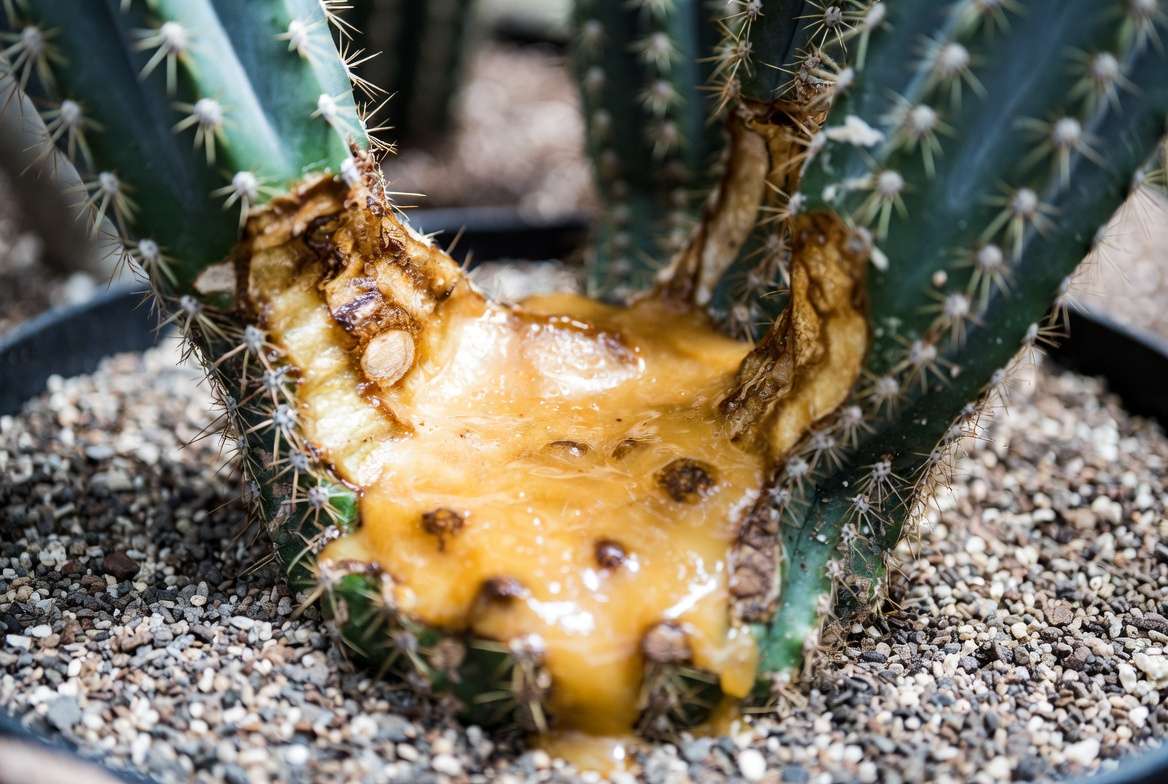
Bacterial soft rot (often caused by Erwinia species) is fast-moving, highly destructive, and incredibly smelly. Bacteria usually enter the cactus through a physical wound—like a scratch from a pet, a drop, or unsterilized pruning shears—combined with high humidity or water sitting on the plant’s skin. Bacterial rot can turn a healthy cactus into a puddle of foul-smelling mush in a matter of days.
3. Dry Rot
Unlike the squishy, wet rot described above, dry rot (often caused by Phyllosticta fungi) presents as corky, crusty, or sunken brown/black lesions on the cactus skin. The tissue underneath doesn’t turn to mush; instead, it dries out and crumbles. While less immediately fatal than wet soft rot, it will slowly stunt and kill the plant if not isolated and treated with a fungicide.
V. 🚑 Step-by-Step Treatment: How to Save Your Mushy Cactus
If you’ve confirmed that your plant is indeed suffering from overwatering and decay, it is time to act quickly. Treating cactus rot is essentially plant surgery. You must remove all infected tissue to stop the spread, or the pathogen will continue to consume the plant from the inside out.
Gather your tools: thick gardening gloves (or tongs), a sharp, sterilized knife or pruning shears, rubbing alcohol, and a clean workspace.
Step 1: Triage and Unpotting
Gently remove the cactus from its wet soil. Do not yank it by the stem; instead, squeeze the sides of the pot to loosen the soil and carefully slide the plant out.
-
Clear the Debris: Shake off as much of the old, soggy soil as possible.
-
Wash the Roots: Briefly rinse the root system under lukewarm room-temperature water. This washes away the mud so you can clearly see the extent of the damage.
-
Assess: If only a few roots are black and mushy, you are in luck. If the entire root system and the bottom half of the stem are squishy, prepare for major surgery.
Step 2: The Surgical Pruning ✂️
This is the most critical step in your cactus rescue operation.
-
Sterilize First: Wipe your knife or shears thoroughly with 70% isopropyl (rubbing) alcohol.
-
Make the Cut: Snip away all black, brown, slimy, or hollow roots. If the rot has traveled up into the actual stem of the cactus, you must slice off the bottom of the plant completely.
-
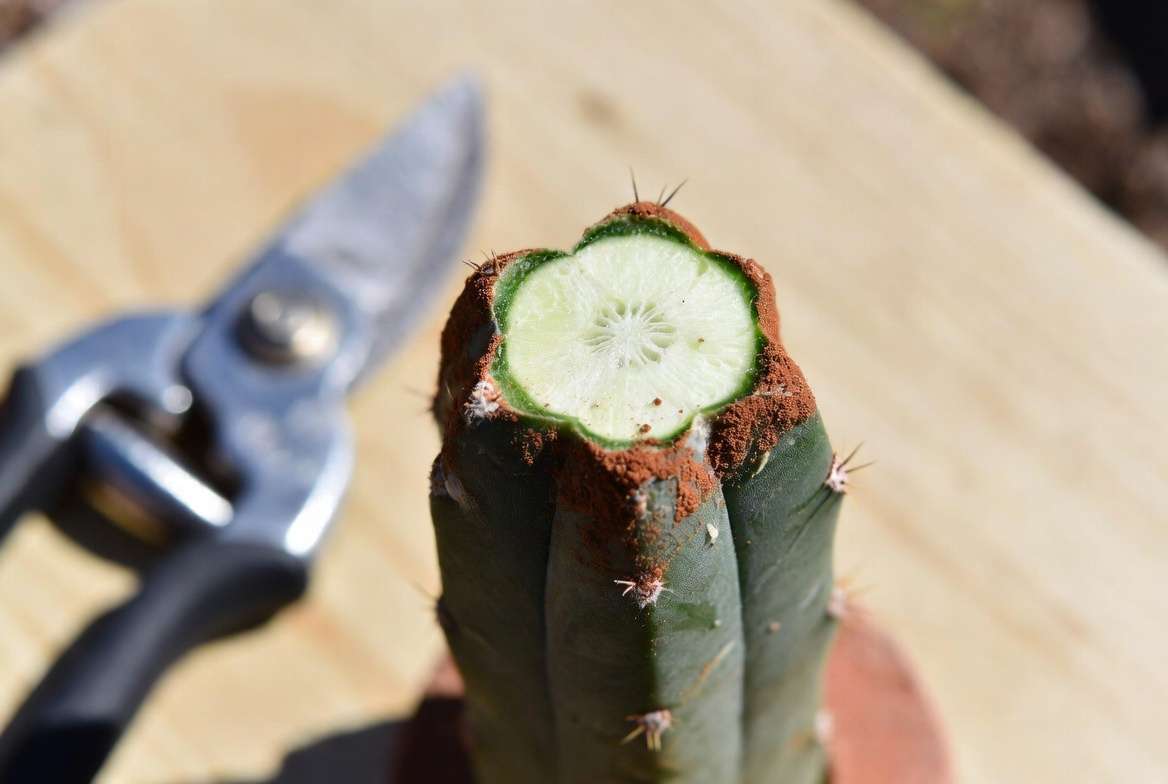
The “Clean Margin” Rule: You must cut until you see only bright green, firm, or crisp white healthy flesh. Even a tiny speck of brown or yellow rotting tissue left behind will cause the infection to restart.
-
Sterilize Between Every Cut: If you slice through rotted tissue and then immediately slice into healthy tissue, you just infected the healthy part. Wipe your blade with alcohol between every single cut.
Step 3: The Callusing Phase (Do NOT Skip This!) ⏳
One of the biggest mistakes novice plant owners make is repotting a freshly cut cactus directly into the soil. An open wound exposed to dirt and moisture is a guaranteed death sentence.
-
Air Dry: Place your surgically pruned cactus in a warm, dry, and well-ventilated spot out of direct sunlight.
-
Let it Scab: Leave it there for anywhere from 3 to 14 days (depending on the size of the wound) until the cut end forms a hard, dry, whitish-tan “scab” or callus.
-
Expert Secret: To speed up healing and prevent further fungal issues, lightly dust the fresh, wet wound with ground cinnamon (a fantastic natural fungicide) or commercial sulfur powder / rooting hormone before setting it aside to dry.
Step 4: Repotting – The Fresh Start 🪴
Once the callus is completely hard and dry, it’s time to give your survivor a new home.
-
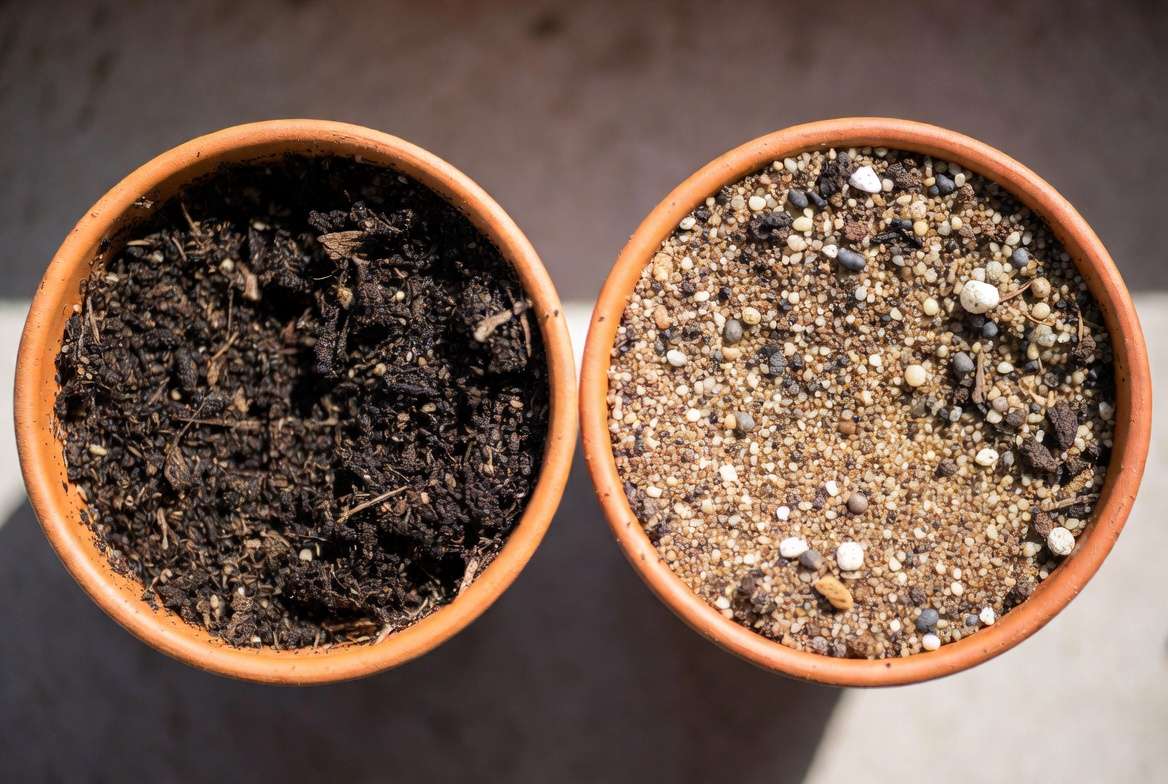
The Right Pot: Always choose an unglazed terracotta or clay pot. Terracotta is porous, allowing moisture to evaporate through the walls of the pot. Crucial: Ensure the pot has a large drainage hole at the bottom!
-
The Perfect Gritty Mix: Throw away standard indoor potting soil—it holds too much moisture. Create a highly well-draining soil mix by blending 1 part standard succulent/cactus soil, 1 part perlite, and 1 part pumice or coarse horticultural sand. This mimics their natural desert environment and ensures water drains rapidly.
Step 5: The Recovery Ward
-
Do NOT Water Immediately: After placing the callused cactus into the dry, gritty soil, wait at least one to two weeks before giving it a drop of water. This gives the plant time to acclimate and encourages it to push out new root nodes in search of moisture.
-
Lighting: Keep the recovering plant in bright, indirect sunlight. Direct, scorching sun will stress the already weakened plant.
VI. The Last Resort: Beheading & Propagation 🪓
Sometimes, despite our best efforts, the rot is simply too advanced. If the infection has hollowed out the entire lower half of your cactus, root pruning won’t save it. You have to resort to “beheading.”
-
The Clean Slice: Using your sterilized knife, slice off the very top portion of the cactus that is still firm, green, and completely unaffected by rot.
-
Examine the Core: Look closely at the cross-section of the cut. If you see a brown ring or orange dots in the vascular tissue (the center ring), the rot is still present. Sterilize your knife and cut an inch higher. Repeat until the tissue is flawlessly clean.
-
Callus and Propagate: Treat this top cutting exactly as described in the callusing step above. Once it has formed a hard scab, place the callused end gently on top of dry succulent soil. Over the next few weeks, it will grow a brand-new root system, effectively becoming a cloned, healthy plant!
VII. 🛡️ Prevention: Foolproof Tips to Stop Rot Before It Starts
The best treatment for cactus rot is never letting it happen in the first place. Follow these E-E-A-T backed best practices for watering and maintenance:
-
The “Soak and Dry” Method 💧: Cacti do not want frequent sips of water. They want a torrential downpour followed by a long drought. When you water, soak the soil completely until water runs out the drainage holes. Then, do not water again until the soil is 100% bone-dry all the way to the bottom of the pot.
-
Myth Buster: The “Rocks at the Bottom” Trap 🚫: Never put a layer of gravel or rocks at the bottom of a pot without drainage holes. This does not create drainage; it creates a “perched water table.” The soil acts like a sponge, holding the water right up against the roots, virtually guaranteeing root rot.
-
Winter Dormancy: Most cacti go dormant in the winter when daylight decreases and temperatures drop. During this time, they require almost zero water. Watering your cactus in December the same way you do in July is a fast track to a mushy plant.
-
Airflow is Key: In their native habitats, cacti enjoy constant wind, which dries them out quickly after storms. Keep your indoor plants in well-ventilated areas, avoiding stagnant, humid corners.
VIII. 🙋♀️ Frequently Asked Questions (FAQs)
Can a mushy cactus heal on its own? No. Once a cactus becomes squishy from rot, the tissue is dead and the infection is actively spreading. If left completely untreated, the rot will consume the entire plant. Surgical intervention is mandatory.
Is cactus rot contagious to my other houseplants? Yes! The fungal and bacterial pathogens that cause rot can easily spread. Spores can splash from wet soil onto neighboring plants, and pathogens can be transferred via dirty hands, unsterilized pruning shears, or reused potting soil.
Why did my cactus get mushy after I watered it just once? If a single watering caused your cactus to collapse, the plant likely already had severe, hidden root rot from the nursery, or it had suffered extreme drought stress that killed the roots, making them rot instantly when finally exposed to water.
Can I reuse the pot and soil from a rotted cactus? Never reuse the soil—throw it in the outdoor trash immediately. You can reuse the pot, but only if you scrub it thoroughly with soapy water and then soak it in a solution of 1 part bleach to 9 parts water for 30 minutes to kill any lingering pathogens.
IX. Conclusion & Call to Action (CTA) 💚
Finding out that your beloved succulent is suffering from rot is heartbreaking, but now you have the expert knowledge required for accurate cactus rot identification and treatment. Remember the golden rules: catch it early, be ruthless in cutting away the rot, let the wound callus completely, and repot in an ultra-gritty, well-draining soil mix.
Overwatering a cactus is a rite of passage for almost every indoor gardener. Don’t beat yourself up! Use this experience as a learning opportunity to master the “soak and dry” method and perfect your soil mixes.
Have you ever successfully performed plant surgery to save a mushy cactus? Or are you currently battling rot right now? Drop your stories, questions, and rescue photos in the comments below—let’s grow and learn together! And don’t forget to share this guide with that one friend who tends to “over-love” their desert plants. 🌵🩹💚











