
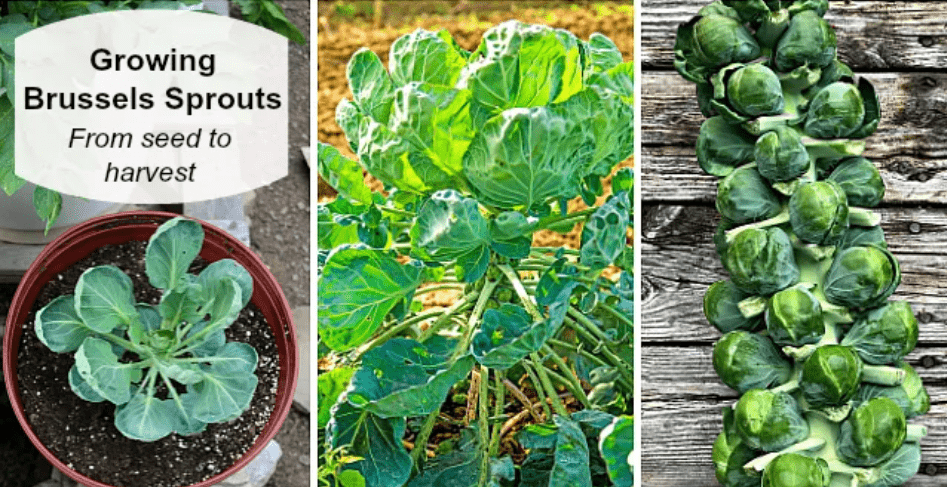
Brussels sprouts are a delicious and nutritious vegetable that can be easily grown in your own garden. Harvesting them at the right time and using the proper techniques is essential to ensure a successful and bountiful yield. In this article, we will cover the best practices for harvesting Brussels sprouts at home, including tips on when to harvest, how to properly cut the sprouts, and how to store them for maximum freshness. Whether you’re a seasoned gardener or just starting out, these tips will help you enjoy fresh, homegrown Brussels sprouts at their peak flavor.
Understanding Brussels Sprouts
1.Brief History and Background
Brussels sprouts have been cultivated for centuries, with their origins dating back to ancient Rome. They are a member of the Brassicaceae family, which also includes cabbage, broccoli, and kale. The modern Brussels sprout is thought to have originated in Belgium, which is where the name “Brussels” comes from. These small, cabbage-like vegetables are known for their nutty flavor and are packed with nutrients, making them a popular choice for home gardeners.
A.Popularity and nutritional benefits
Brussels sprouts have gained popularity in recent years due to their numerous health benefits. They are high in fiber, vitamins C and K, and antioxidants, making them a nutritious addition to any diet. They are also low in calories and carbohydrates, making them a great option for those looking to maintain a healthy weight or manage their blood sugar levels. Additionally, Brussels sprouts contain compounds that have been shown to have anti-inflammatory and anti-cancer properties, making them a valuable addition to a healthy diet.
2.Growth Cycle of Brussels Sprouts
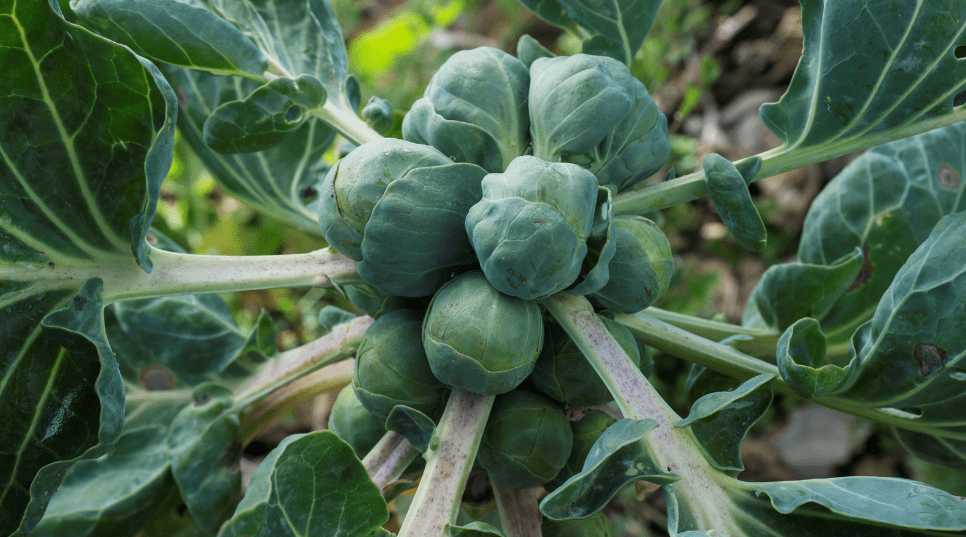
Brussels sprouts are a cool-weather crop that typically grow best in temperatures between 45-75 degrees Fahrenheit. They are typically planted in the early spring or late summer for a fall harvest. The plants take about 3-6 months to reach maturity, and the sprouts grow along the stem of the plant, gradually getting larger as they develop. It’s important to give Brussels sprouts plenty of space to grow, as overcrowding can result in smaller sprouts. Once harvested, Brussels sprouts can be stored in the refrigerator for up to a week, making them a convenient and versatile vegetable for cooking.
A.Explanation of the stages from planting to harvesting.
Brussels sprouts go through several stages from planting to harvesting. They are typically planted in early spring or late summer and take about 3-6 months to reach maturity. During this time, the sprouts grow along the stem of the plant, gradually getting larger as they develop. It’s important to give Brussels sprouts plenty of space to grow, as overcrowding can result in smaller sprouts. Once they are ready to be harvested, they can be stored in the refrigerator for up to a week, making them a convenient and versatile vegetable for cooking. Overall, the growth cycle of Brussels sprouts involves planting, allowing time for maturity, and then harvesting when the sprouts are at the desired size.
Preparing for the Harvest
1.Recognizing the Right Time to Harvest
Recognizing the Right Time to Harvest is crucial for getting the best tasting and most nutritious Brussels sprouts. It’s best to wait until the sprouts are firm, and about 1-2 inches in diameter before harvesting. You can start harvesting from the bottom of the plant and work your way up as the sprouts mature. When harvesting, it’s important to use a sharp knife to cut the sprouts off the stem, leaving the smaller ones to continue growing. Be sure to remove any yellowing or damaged leaves from the plant to ensure a bountiful harvest. With the right timing and technique, you can enjoy fresh, homegrown Brussels sprouts that are perfect for a variety of delicious recipes.
2.Seasonal Considerations
Seasonal considerations play an important role in the growth cycle of Brussels sprouts. These vegetables thrive in cool weather, making them an ideal crop for fall and winter harvest. It’s best to plant them in late spring or early summer so that they have enough time to mature before the first frost. Additionally, Brussels sprouts benefit from consistent moisture and regular fertilization during their growth period. In warmer climates, it’s still possible to grow Brussels sprouts, but they may require additional care and attention to ensure a successful harvest. By understanding the seasonal needs of Brussels sprouts, you can maximize their growth potential and enjoy a plentiful harvest.
3.Necessary Tools and Equipment
To successfully harvest Brussels sprouts, you’ll need a few key tools and equipment. A sharp knife is essential for cutting the sprouts off the stem, as well as for removing any damaged leaves from the plant. Additionally, it’s helpful to have a pair of gardening gloves to protect your hands while working with the plants. If you’re growing Brussels sprouts in a larger garden or plot, a sturdy pair of garden shears may also come in handy for larger-scale harvesting. By using the right tools and equipment, you can ensure a smooth and efficient harvest of your Brussels sprouts.
Harvesting Techniques
1.Step-by-Step Harvesting Process
Harvesting Brussels sprouts is a step-by-step process that starts with monitoring the size of the sprouts. Once they reach about 1-2 inches in diameter, it’s time to start harvesting. Use a sharp knife to carefully cut the sprouts off the stem, starting from the bottom and working your way up. Be sure to leave the smaller, undeveloped sprouts on the plant to continue growing. Remove any damaged or yellowing leaves from the plant while you harvest. It’s important to harvest regularly, as leaving the sprouts on the plant for too long can result in a bitter taste. With the right techniques, you can enjoy a bountiful harvest of delicious Brussels sprouts.
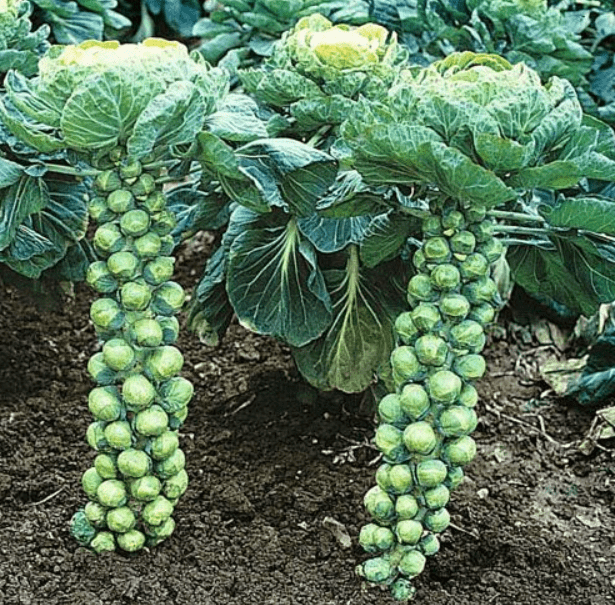
2.Harvesting the Main Stem vs. Main Stem Harvesting
When it comes to harvesting Brussels sprouts, there are two main methods to consider: harvesting the main stem or harvesting the side shoots. Harvesting the main stem involves cutting the entire stem at the base of the plant once the sprouts have reached a good size. This method allows for a single, large harvest of all the sprouts at once.
On the other hand, harvesting the side shoots involves picking the individual sprouts as they reach the desired size, starting from the bottom of the plant and working upwards. This method allows for a more gradual and continuous harvest, as the plant will continue to produce new side shoots throughout the season.
Both methods have their advantages, and it ultimately comes down to personal preference and how you want to enjoy your Brussels sprouts. Whether you prefer a larger, single harvest or a continuous supply of smaller sprouts, the key is to monitor the size of the sprouts and harvest them at the right time to ensure the best flavor and quality.
By following these harvesting techniques, you can enjoy a successful and bountiful harvest of Brussels sprouts from your garden. Happy harvesting!
3.Safety Tips During Harvesting
- Wear gloves to protect your hands from any thorns or rough foliage on the Brussels sprouts plant.
- Use garden shears or a sharp knife to carefully cut the sprouts from the plant to avoid damaging the plant.
- Be mindful of any insects or pests that may be present on the plants and take precautions to protect yourself from bites or stings.
- Be cautious when bending or kneeling to harvest the sprouts to avoid straining your back or knees.
- Wash your hands thoroughly after harvesting to remove any dirt or residue from the plants.
Post-Harvest Handling
1.Cleaning and Preparing Sprouts
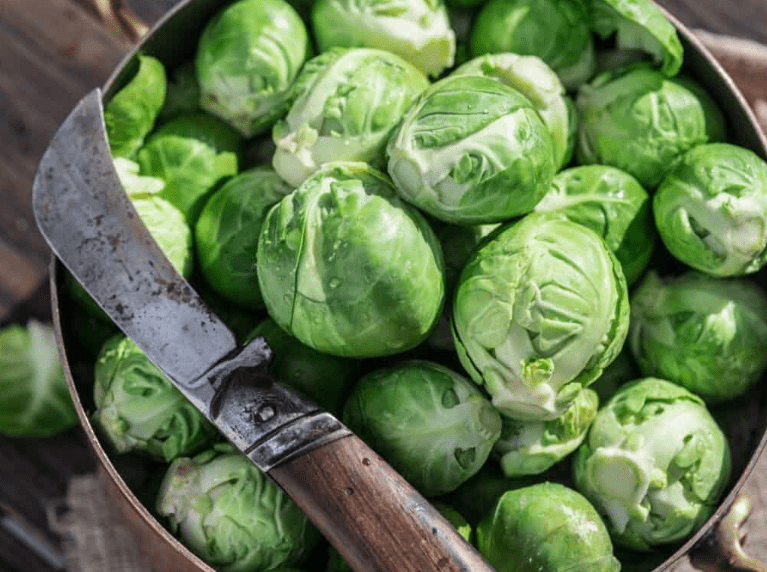
To ensure a successful and bountiful harvest of Brussels sprouts, it’s important to follow proper cleaning and preparation techniques. After harvesting the sprouts, start by removing any dirt or debris by gently rinsing them under cold water. Trim off any excess stems or leaves and remove any sprouts that are damaged or discolored. You can also blanch the sprouts by boiling them in water for a few minutes and then immediately placing them in ice water to stop the cooking process. This will help preserve their color and flavor. Once the sprouts are cleaned and prepared, they can be stored in the refrigerator for up to a week or frozen for longer-term storage. Enjoy the fresh, delicious taste of homegrown Brussels sprouts!
2.Storage Options
Once you have harvested and prepared your Brussels sprouts, it’s important to consider your storage options. If you plan to use the sprouts within a week, you can store them in the refrigerator. Place the cleaned and prepared sprouts in an airtight container or a plastic bag with a damp paper towel to maintain their freshness. If you have a larger harvest and want to store the sprouts for a longer period, you can freeze them. To do this, blanch the sprouts in boiling water for a few minutes, then immediately transfer them to an ice water bath to stop the cooking process. Once they are cooled, pat them dry and place them in freezer-safe bags or containers. Properly stored, frozen Brussels sprouts can last for several months, allowing you to enjoy your homegrown harvest well into the future. By following these storage options, you can ensure that your bountiful Brussels sprout harvest stays fresh and delicious.
3.Maximizing Freshness and Flavor
When harvesting Brussels sprouts from your garden, it’s important to follow best practices in order to maximize their freshness and flavor. One tip is to harvest your Brussels sprouts in the morning when the temperatures are cooler, as this will help to preserve their flavor. Additionally, it’s important to pick the sprouts when they are firm and green, as this is a sign that they are at their peak ripeness. Once harvested, it’s best to store your Brussels sprouts in the refrigerator if you plan to use them within a week. For longer storage, consider blanching and freezing them to maintain their flavor and freshness for several months. By following these tips and techniques, you can ensure that your homegrown Brussels sprouts are delicious and ready to enjoy.
Troubleshooting Common Issues
1.Dealing with Pests and Diseases
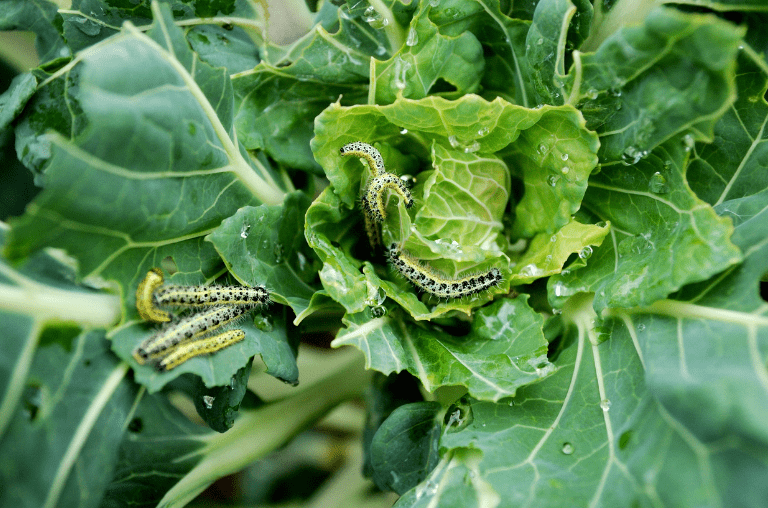
One common issue when harvesting Brussels sprouts is dealing with pests and diseases. Aphids, cabbage loopers, and cabbage worms are common pests that can damage Brussels sprout plants. Regularly inspecting your plants for signs of pests and using natural or organic pest control methods can help to minimize damage. Additionally, diseases such as clubroot and blackleg can affect Brussels sprout plants. To prevent these diseases, ensure that your garden soil is well-drained and avoid planting Brussels sprouts in the same area for consecutive years. If you notice any signs of disease, promptly remove and dispose of affected plants to prevent the spread of disease to other plants in your garden. By being proactive in pest and disease management, you can help to ensure a successful Brussels sprout harvest.
2.Addressing Growth Problems
Another common issue when harvesting Brussels sprouts is addressing growth problems. If your Brussels sprouts are not growing to a desirable size, there are a few potential reasons for this. One possibility is that the plants are not receiving enough nutrients. You can address this by applying a balanced fertilizer to the soil. Additionally, ensure that the plants are receiving adequate water and sunlight to support healthy growth. Another potential issue is overcrowding. If Brussels sprout plants are planted too close together, they may not have enough space to grow properly. Thin out any overcrowded plants to give the remaining sprouts room to develop. By addressing these growth problems, you can help to ensure a successful and bountiful Brussels sprout harvest from your garden.
3.Weather-Related Challenges
Weather-related challenges can also affect the growth of Brussels sprouts. Extreme temperatures, particularly heat, can cause the plants to bolt and produce smaller sprouts. To mitigate this, consider planting Brussels sprouts in the cooler months or providing shade during hot periods. Excessive rain or moisture can also lead to fungal diseases that stunt growth. Proper drainage and airflow can help prevent these issues. Monitor the weather conditions and take appropriate measures to protect your Brussels sprout plants from any adverse effects.
Tips for Future Harvests
1.Soil and Fertilization Tips
To promote healthy growth and a successful Brussels sprout harvest, it’s important to pay attention to soil and fertilization. Brussels sprouts thrive in well-drained, nutrient-rich soil. Prior to planting, amend the soil with compost or organic matter to improve its fertility. A balanced, slow-release fertilizer can also be applied during the growing season to provide essential nutrients.
2.Crop Rotation and Companion Planting
Rotating your crops can help prevent diseases and pests that may affect Brussels sprout plants. Avoid planting Brussels sprouts in the same spot every year, and instead, rotate them with other types of vegetables to break the lifecycle of potential pests and diseases. Additionally, consider companion planting with other plants that can benefit Brussels sprouts, such as herbs like thyme or sage, or other vegetables like carrots or beets. These plants can help repel pests and improve the overall health of your Brussels sprout crop.
3.Sustainable Gardening Practices
Incorporating sustainable gardening practices can also improve the health and yield of your Brussels sprout plants. Consider using natural pest control methods, such as introducing beneficial insects or using organic pesticides, instead of chemical sprays. Additionally, practicing water conservation techniques, such as mulching or using drip irrigation, can help maintain soil moisture and reduce water usage. By implementing these sustainable practices, you can create a healthier and more resilient growing environment for your Brussels sprout plants.
In conclusion, harvesting Brussels sprouts at home requires patience and attention to detail. It’s important to wait until the sprouts are firm and about the size of a walnut before harvesting. Additionally, removing the lower leaves and picking the sprouts from the bottom up will encourage the remaining sprouts to continue growing. By following these best practices, you can enjoy a delicious and plentiful harvest of Brussels sprouts from your own garden.
Frequently Asked Questions (FAQs)
Gardening enthusiasts are always looking for new ways to improve the health and yield of their plants, and fertilizer tree spikes are a great option to consider. In this post, we’ll delve into the benefits of using tree spikes to boost the productivity of your garden. We’ll also provide tips on the best techniques for using them and how they can enhance the overall health of your plants. Whether you’re a seasoned gardener or just starting out, utilizing fertilizer tree spikes can make a significant difference in the success of your garden.
Understanding Fertilizer Tree Spikes
A. What are fertilizer tree spikes?
1.Definition and composition
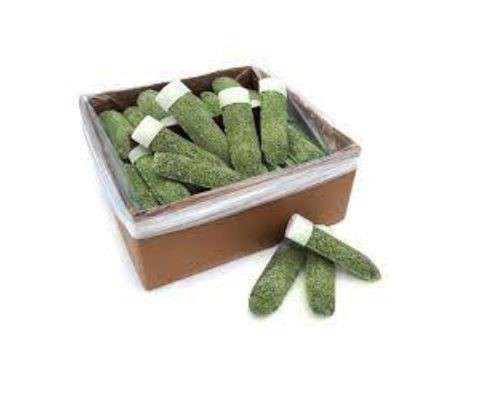
Fertilizer tree spikes are a convenient and effective way to provide essential nutrients to trees and plants. They are specially formulated spikes that are inserted into the soil near the base of the tree or plant. The spikes are made of a combination of nutrients, such as nitrogen, phosphorus, and potassium, along with other essential elements that promote healthy growth. These nutrients are released slowly over time, providing a consistent and long-lasting source of nutrition for the tree or plant. Fertilizer tree spikes are designed to be easy to use and are an efficient way to improve the health and yield of your garden.
2.Types of fertilizer tree spikes (organic vs. synthetic)
There are two main types of fertilizer tree spikes: organic and synthetic. Organic fertilizer tree spikes are made from natural materials, such as compost, manure, or bone meal, and are broken down by microorganisms in the soil, providing a more sustainable and environmentally friendly option. Synthetic fertilizer tree spikes, on the other hand, are made from chemical compounds and provide a quick release of nutrients to the plants. Both types have their benefits and drawbacks, so it’s important to choose the type that best fits your gardening needs and preferences. Overall, using fertilizer tree spikes can significantly improve the health and yield of your garden by providing essential nutrients to your trees and plants. It’s important to follow the instructions on the packaging, and to monitor the health and growth of your plants to ensure they are getting the proper nutrition.
Benefits of Using Fertilizer Tree Spikes
A. Enhanced nutrient delivery
Enhanced nutrient delivery is one of the key benefits of using fertilizer tree spikes. These spikes are designed to be inserted into the ground around the base of your trees or plants, where they slowly release nutrients directly into the root zone. This allows for a more targeted delivery of essential nutrients, promoting healthier growth and increased yield. For organic fertilizer tree spikes, the natural materials are broken down by microorganisms in the soil, providing a sustainable and environmentally friendly option. Synthetic fertilizer tree spikes, on the other hand, provide a quick release of nutrients to the plants. Overall, using fertilizer tree spikes can significantly improve the health and yield of your garden by providing essential nutrients to your trees and plants. It’s important to follow the instructions on the packaging and to monitor the health and growth of your plants to ensure they are getting the proper nutrition.
B. Improved plant health and growth
Improved plant health and growth is one of the key benefits of using fertilizer tree spikes. These spikes are designed to be inserted into the ground around the base of your trees or plants, where they slowly release nutrients directly into the root zone. This targeted delivery of essential nutrients promotes healthier growth and increased yield. Additionally, organic fertilizer tree spikes provide a sustainable and environmentally friendly option, as the natural materials are broken down by microorganisms in the soil. On the other hand, synthetic fertilizer tree spikes offer a quick release of nutrients to the plants. Overall, using fertilizer tree spikes can significantly improve the health and yield of your garden. It’s important to follow the instructions on the packaging and to monitor the health and growth of your plants to ensure they are getting the proper nutrition.
C. Ease of use and convenience
Are another major benefit of using fertilizer tree spikes. Unlike traditional granular or liquid fertilizers, tree spikes are easy to handle and apply. Simply insert the spikes into the ground around the base of your trees or plants, and let them do their work. There’s no need to measure out and mix liquid fertilizers, or worry about the wind blowing granular fertilizers away. This makes using tree spikes a convenient option for busy gardeners who want to ensure their plants are getting the nutrients they need without a lot of time and effort. Additionally, the slow-release nature of tree spikes means you don’t have to reapply the fertilizer as often, saving you time and making it easier to maintain the health of your garden. Overall, the ease of use and convenience of fertilizer tree spikes make them a practical and effective option for promoting healthy plant growth and increasing yield in your garden.
Choosing the Right Fertilizer Tree Spikes
A. Assessing your garden’s needs
Assessing your garden’s needs is an important first step before using fertilizer tree spikes. Take a look at the types of plants you have and consider their specific nutrient requirements. Some plants may require more nitrogen, while others may need more phosphorus or potassium. Once you have a clear understanding of your garden’s needs, you can choose the right fertilizer tree spikes that provide the necessary nutrients for your plants. Additionally, consider the size of your garden and the number of plants you need to fertilize. This will help you determine how many tree spikes you will need to effectively nourish your entire garden. By assessing your garden’s needs, you can ensure that you are providing the right nutrients in the right quantities, leading to healthier, more abundant plants.
B. Comparing different brands and formulations
Comparing different brands and formulations of fertilizer tree spikes can help you find the best option for your garden. Some brands may offer specific formulations for different types of plants, while others may focus on providing a balanced blend of nutrients for a variety of plants. It’s important to consider the specific needs of your garden and the types of plants you have when choosing the right fertilizer tree spikes. Additionally, consider the release time of the nutrients in the tree spikes. Some tree spikes may provide a slow-release of nutrients, while others may offer a quick-release. Understanding the release time of the nutrients can help you choose the best option for your garden’s specific needs. By comparing different brands and formulations, you can find the best fertilizer tree spikes to effectively nourish and improve the health of your garden.
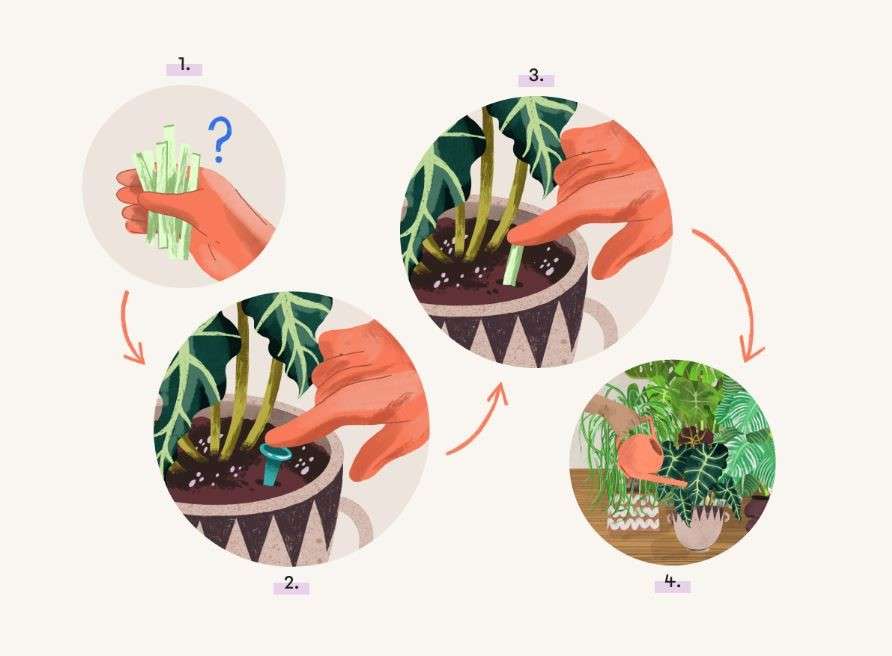
How to Apply Fertilizer Tree Spikes
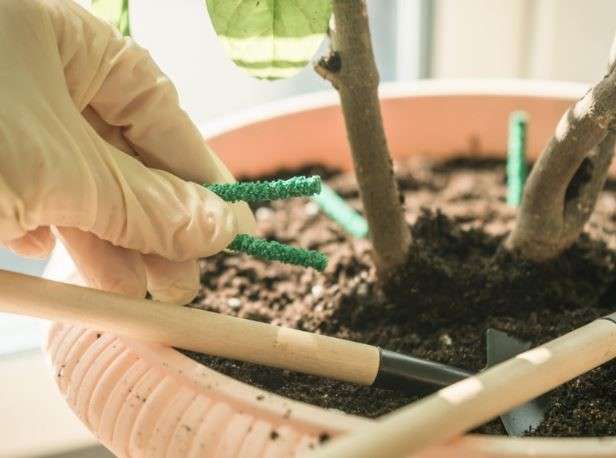
Fertilizer tree spikes are a convenient and effective way to nourish your garden and improve the health of your plants. When applying fertilizer tree spikes, it’s important to follow the instructions on the packaging carefully. First, you’ll need to measure the diameter of the tree or plant you want to fertilize to determine how many spikes to use. Then, use a hammer to drive the spikes into the ground around the drip line of the tree or plant. Be sure to space the spikes evenly around the perimeter to ensure even distribution of nutrients. After applying the spikes, water the area thoroughly to help the nutrients penetrate the soil and reach the roots. By using fertilizer tree spikes, you can provide your garden with the essential nutrients it needs to thrive and increase its yield.
Common Mistakes to Avoid
A. Over-fertilization
Can be harmful to your garden and can lead to nutrient imbalances in the soil. It’s important to follow the instructions on the packaging of the fertilizer tree spikes to avoid over-fertilization. Using too many spikes or applying them too frequently can lead to an excess of nutrients in the soil, which can be harmful to the plants. Be sure to carefully measure the diameter of the tree or plant and use the appropriate number of spikes according to the instructions. Additionally, be mindful of the spacing of the spikes around the perimeter of the tree or plant to ensure even distribution of nutrients. By using fertilizer tree spikes properly, you can avoid the risk of over-fertilization and promote the health and yield of your garden.
B. Incorrect placement
Incorrect placement of fertilizer tree spikes is a common mistake that can have negative effects on your garden. It’s important to properly place the spikes to ensure that the nutrients are distributed evenly and effectively. Placing the spikes too close to the trunk of the tree or plant can lead to the roots not receiving the necessary nutrients. On the other hand, placing them too far away from the roots may result in the nutrients not reaching the plants at all. It’s crucial to follow the instructions on the packaging and place the spikes at the appropriate distance from the trunk or base of the plant. Additionally, take into consideration the size and spread of the root system to ensure that the spikes are placed in the right location for maximum effectiveness. By avoiding incorrect placement of fertilizer tree spikes, you can enhance the health and yield of your garden.
C. Neglecting soil health
Can have a significant impact on the growth and yield of your garden. Using fertilizer tree spikes is an effective way to provide essential nutrients to your plants and trees. These spikes are designed to slowly release nutrients into the soil, promoting healthy growth and increasing the yield of your garden. It’s important to properly place the spikes to ensure that the nutrients are distributed evenly and effectively. Placing the spikes too close to the trunk of the tree or plant can lead to the roots not receiving the necessary nutrients. On the other hand, placing them too far away from the roots may result in the nutrients not reaching the plants at all. It’s crucial to follow the instructions on the packaging and place the spikes at the appropriate distance from the trunk or base of the plant. Additionally, take into consideration the size and spread of the root system to ensure that the spikes are placed in the right location for maximum effectiveness. By avoiding incorrect placement of fertilizer tree spikes, you can enhance the health and yield of your garden.
Case Studies and Success Stories
A. Examples from home gardeners
Have shown that using fertilizer tree spikes can significantly increase the yield and health of their plants. By properly placing the spikes at the right distance from the trunk or base of the plant, gardeners have reported seeing stronger, healthier plants with increased fruit and flower production. Some have even seen their plants grow larger and more robust. These success stories highlight the effectiveness of using fertilizer tree spikes to improve the overall health and yield of a garden. By following the recommended techniques for using tree spikes, home gardeners can achieve impressive results in their gardens.
B. Expert insights
Can also shed light on the effectiveness of using fertilizer tree spikes. Horticulturists and gardening professionals recommend using tree spikes as a convenient and efficient method for providing essential nutrients to plants. Fertilizer tree spikes are designed to slowly release nutrients directly into the root zone of the plant, ensuring that they are effectively absorbed and utilized. This targeted approach can result in improved plant health, increased yield, and overall better growth. Experts also emphasize the importance of proper placement of the tree spikes to avoid any potential harm to the plant. By following the recommended techniques and guidelines for using tree spikes, gardeners can maximize the benefits and achieve optimal results in their gardens.
In conclusion, using fertilizer tree spikes can be a great way to boost the yield of your garden. By providing a slow release of nutrients directly to the roots of your plants, tree spikes can help improve the health and productivity of your garden. They are easy to use and can be a convenient option for busy gardeners looking to maximize their garden’s yield. Consider trying out fertilizer tree spikes to see the impact they can have on your garden.