
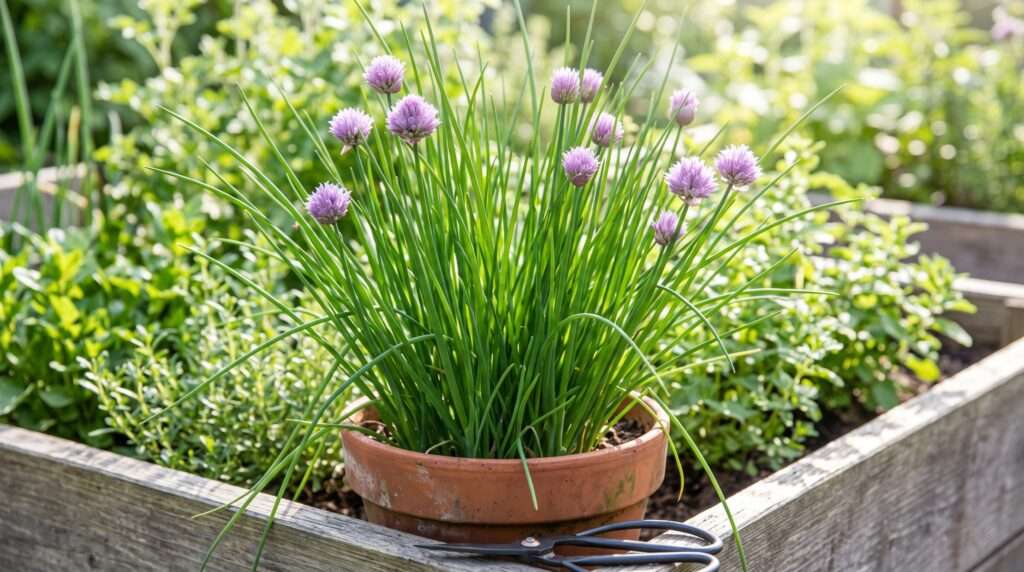
Few kitchen experiences are as frustrating as buying a plastic clamshell of wilted supermarket herbs, only to throw half of them away a few days later. The permanent solution is cultivating your own chive plants. These resilient, cold-hardy perennials are incredibly rewarding, offering an abundant, cut-and-come-again harvest for eight or more months of the year. Whether tucked into a patio container or lining a vegetable bed, chives are a low-maintenance culinary staple. However, growing them to their maximum potential requires understanding their unique growth habits and avoiding a few common pitfalls that cause clumps to weaken, yellow, or die back prematurely.
At a Glance: Chive Care Snapshot
| Feature | Requirement |
| Botanical Name | Allium schoenoprasum (Common) / Allium tuberosum (Garlic) |
| Sunlight | 6–8 hours of direct sunlight (tolerates light afternoon shade) |
| Water | Consistent moisture; allow the top 1 inch of soil to dry out between waterings |
| Soil | Rich, loamy, well-draining, pH 6.0–7.0 |
| Hardiness Zones | USDA Zones 3–9 |
The Anatomy and Varieties of Chive Plants
Before you start digging, it is essential to understand exactly what type of allium you are planting. While they share similar care requirements, the two primary culinary chives have distinct physical and flavor profiles.
Common Chives vs. Garlic Chives: Identifying Your Variety 🌸
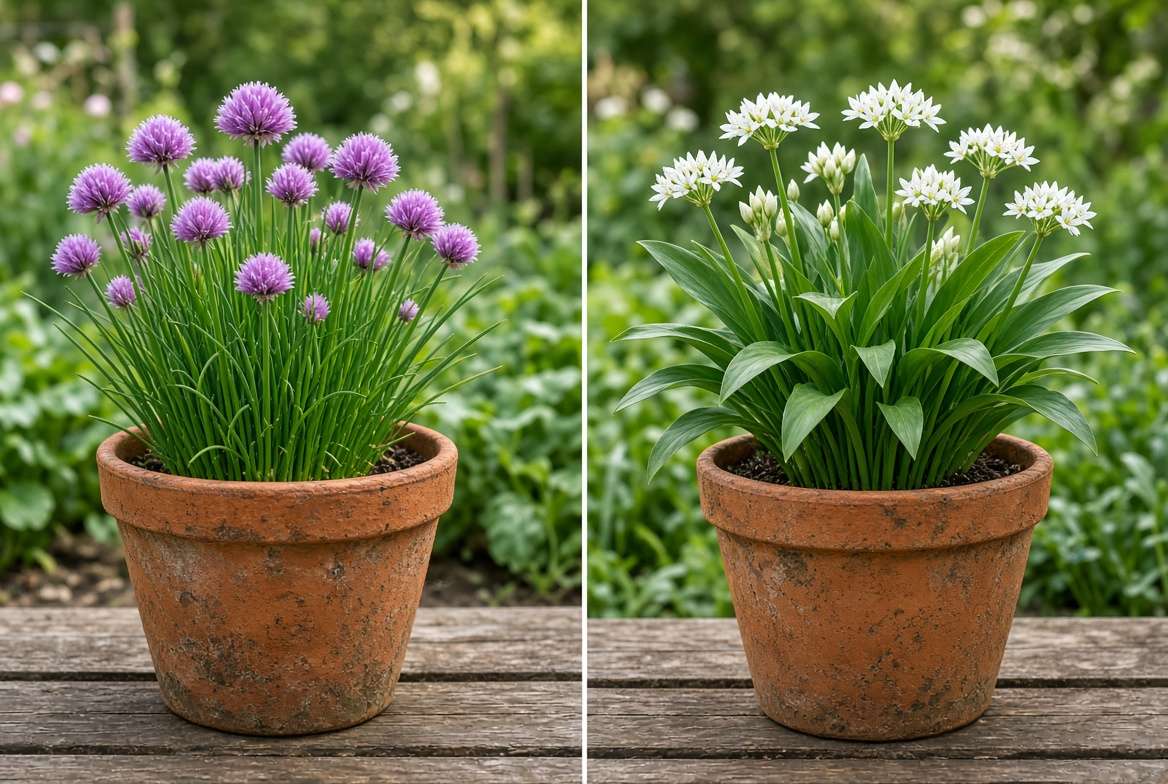
Common Onion Chives (Allium schoenoprasum): This is the classic herb garden staple. You can identify them by their hollow, cylindrical, tubular green blades. In late spring to early summer, they send up delicate, purple, puffball-like flowers. Their flavor is mildly onion-forward, making them perfect for baked potatoes, omelets, and delicate vinaigrettes.
Garlic Chives (Allium tuberosum): Also known as Chinese chives, this variety is easily distinguished by its flat, solid, ribbon-like leaves. Instead of purple puffballs, garlic chives produce fragrant, white, star-shaped flower clusters in late summer or early autumn. As the name suggests, they deliver a subtle but distinct garlic flavor, ideal for stir-fries, dumplings, and savory marinades.
Why Chives Are the Ultimate Companion Plant in Your Garden 🐝
Chives do more than just taste good; they are hardworking garden allies. Their strong allium scent acts as a natural deterrent, confusing the olfactory senses of common pests. Planting chives near tomatoes, carrots, and roses helps repel aphids, Japanese beetles, and carrot rust flies. Furthermore, allowing a portion of your chives to bloom provides early-season nectar that attracts native bees, beneficial hoverflies, and parasitic wasps, establishing a healthy ecological balance in your backyard.
Core Environmental Requirements for Thriving Chives
To produce thick, upright stalks that regenerate quickly after cutting, chives need the right balance of sun, soil, and hydration.
Sunlight: Striking the Balance Between Leaf Growth and Scorch ☀️
Chive plants are sun-lovers. To achieve sturdy, upright growth, they require a minimum of six to eight hours of direct, full sun daily. When deprived of adequate light, the leaves become thin, leggy, and pale, eventually flopping over the sides of their pot.
However, in extreme heat (USDA Zones 8 and 9), intense afternoon sun combined with high summer temperatures can scorch the tips of the leaves, turning them papery and brown. If you live in a hot climate, position your chives where they receive morning sun but are protected by dappled shade during the hottest hours of the afternoon.
Soil Composition and Potting Mix Secrets 🪴
Chives possess a dense, fibrous root system that rapidly depletes surrounding soil nutrients. They thrive in organically rich, loamy soil that drains quickly.
If planting in garden beds, amend your native soil with a generous layer of well-aged compost before planting to improve aeration and nutrient density. For container gardening, avoid heavy garden soil. Instead, use a premium, well-draining potting mix blended with a handful of perlite or pumice. Always choose a container with ample drainage holes—terracotta pots are excellent choices as their porous nature allows soil to breathe, preventing the roots from suffocating in stagnant water.
Irrigation: Establishing the “Goldilocks” Watering Rhythm 💧
The fastest way to kill a chive plant is by overwatering, which leads to root rot. Conversely, underwatering causes the blades to turn yellow and crispy. The goal is consistent moisture without waterlogging.
Rely on the finger test: insert your index finger one inch into the soil. If it feels completely dry, it is time to water deeply until moisture runs out the bottom drainage holes. If it still feels damp, wait a day or two. When watering, apply the water directly to the base of the plant. Overhead watering traps moisture deep inside the dense crown, creating a perfect breeding ground for fungal diseases.
5 Common Chive Care Mistakes to Avoid for an Endless Harvest
Even experienced gardeners occasionally struggle with perennial herbs. If your chives are underperforming, you are likely making one of these five critical errors.
Mistake #1: The “Flat-Top” Trim (Harvesting Leaves Incorrectly) ✂️
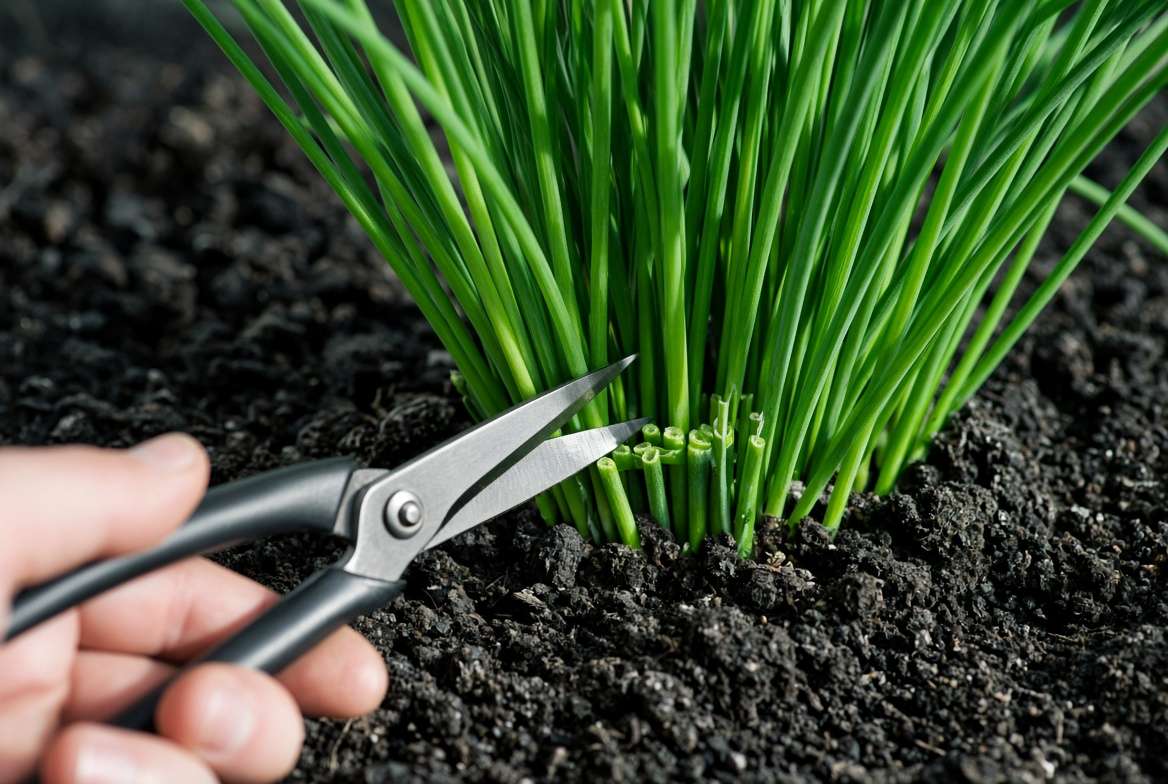
The most common mistake gardeners make is giving their chives a “haircut”—snipping off just the top half of the spears. This leaves behind blunt, hollow, yellowing stubs that sap the plant’s energy and look unsightly.
The Pro Fix: Always harvest chives from the outside of the clump first. Use clean, sharp floral snips to cut the individual leaves down to a base of 1 to 2 inches above the soil line. This method removes the older growth entirely, signals the root crown to push up fresh, tender shoots, and keeps the plant looking tidy.
Mistake #2: Neglecting Clump Division (Root Suffocation) 🪓
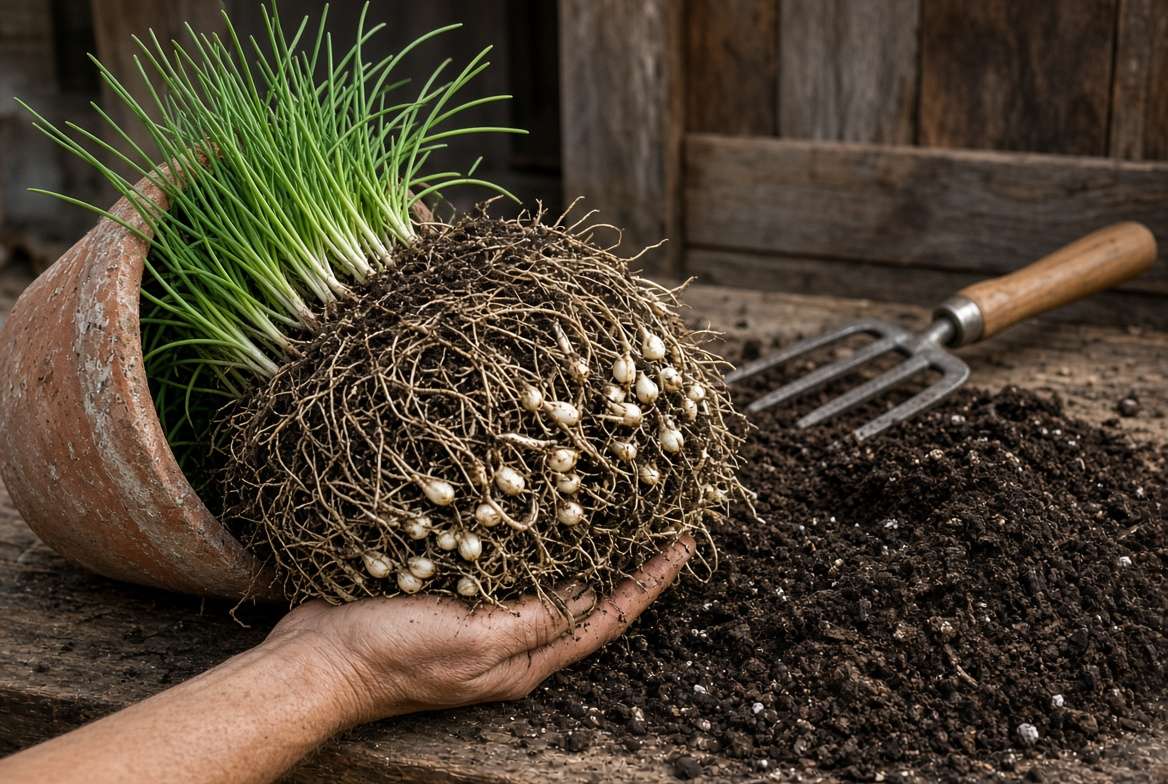
Chives grow via underground bulbs that multiply rapidly. After three or four years in the same spot, these bulbs become so tightly packed that they compete for water, oxygen, and nutrients. The result is a massive, woody center with thin, spindly, drooping blades around the edges.
The Pro Fix: You must divide your root clumps every three to four years. In early spring or mid-autumn, dig up the entire plant and tease the root ball apart into smaller clusters to rejuvenate the plant.
Mistake #3: Ignoring the Flowers (Letting Plants Go to Seed) 🌾
Chive blossoms are beautiful, but allowing every flower head to mature and produce black seeds is a mistake. Seed production requires immense energy. Once the plant sets seed, it stops prioritizing new vegetative leaf growth. Furthermore, chives are aggressive self-seeders; leaving the flower heads guarantees chives popping up in every corner of your garden next spring.
The Pro Fix: Harvest the young, unopened edible blossom buds for salads or to infuse vinegars. If you want to enjoy the purple blooms, allow a few to open for the pollinators, but deadhead the spent stems completely down to the base before they dry out and scatter seeds.

Mistake #4: Over-Fertilizing with High-Nitrogen Feeds 🧪
Because chives are grown for their green foliage, it is tempting to pump them full of synthetic, high-nitrogen fertilizers to encourage rapid growth. This backfires. Excess nitrogen forces the plant to grow too fast, resulting in weak, floppy foliage that lacks structural integrity. Worse, it dilutes the aromatic oils, leaving you with large but flavorless herbs.
The Pro Fix: Chives are light feeders. Apply a one-inch top-dressing of aged compost or a very dilute organic fish emulsion just once in early spring as new growth emerges.
Mistake #5: Drowning the Bulbs During Winter Dormancy ❄️
As temperatures drop in late autumn, chives naturally die back to the ground and enter dormancy. A common error, particularly for container growers, is continuing their summer watering schedule throughout the winter. Dormant bulbs sitting in cold, wet soil will rapidly succumb to rot.
The Pro Fix: Reduce watering significantly as winter approaches. If your pots are kept outdoors, rely solely on natural precipitation, and ensure the pots are elevated on pot feet so they don’t sit in freezing puddles. Add a light layer of straw mulch to insulate the crowns against severe freeze-thaw cycles.
How to Multiply Your Chive Plants for Free
One of the greatest benefits of growing perennial herbs is the ability to easily propagate them. Multiplying your chives ensures you always have fresh, vigorous plants to swap with neighbors or expand your garden footprint.
Step-by-Step: Dividing Mature Chive Clumps 🪣
Division is the fastest, most reliable way to propagate.
-
Dig: Wait for a cool, overcast day in spring or fall. Gently dig out the entire root ball using a garden fork, being careful not to slice through the bulbs.
-
Separate: Shake off the excess soil. Using your hands (or two hand forks placed back-to-back), gently pry the dense clump apart. Tease the bulbs into smaller, distinct clusters containing 4 to 6 bulbs each.
-
Replant: Immediately replant these smaller clusters into fresh, compost-rich soil, spacing them about 8 to 10 inches apart. Water deeply to settle the soil and eliminate air pockets around the roots.
Starting Chives from Seed vs. Starter Plugs 🌱
While division is faster, growing from seed is economical and necessary if you are starting from scratch.
Start seeds indoors 6 to 8 weeks before your last expected frost. Sow the black, angular seeds shallowly in a sterile seed-starting mix. They germinate best in a temperature sweet spot of 18–21°C (65–70°F). Keep the soil consistently moist but not soggy. Once the delicate, grass-like seedlings are three inches tall and the danger of frost has passed, harden them off by gradually exposing them to outdoor conditions over a week before transplanting.
Diagnosing and Fixing Common Chive Plant Issues
Chives are remarkably hardy, but they are not entirely immune to environmental stress or pests. Quick diagnosis is key to saving a struggling plant.
Yellowing, Drooping, or Crispy Leaf Tips: Root Cause Diagnostic 🔍
-
Crispy, brown tips: Usually indicates a lack of water, low humidity, or windburn. Increase watering frequency slightly and shield from harsh, drying winds.
-
Yellowing leaves starting from the base: The classic sign of overwatering or poor drainage. Stop watering immediately, check the container’s drainage holes, and allow the top two inches of soil to dry out.
-
Overall drooping and pale color: Often points to dense root-binding (needs division) or a lack of sunlight. Move the plant to a brighter location.
Dealing with Pests: Thrips, Allium Leaf Miners, and Aphids 🐛
While their scent repels many insects, a few specific pests target alliums.
-
Aphids: Occasionally cluster on new growth. Dislodge them with a sharp blast of water from the hose or apply organic insecticidal soap.
-
Allium Leaf Miners: These pests lay eggs in the foliage, and the resulting maggots mine down into the bulbs, causing deformed, twisted growth. Prevent them by using physical barriers, like floating row covers, during peak flight periods in spring and fall.
-
Thrips: Tiny insects that cause white, stippled patches on the leaves. Treat severe infestations with spot applications of neem oil, applying late in the evening to avoid harming bees.
Fungal Diseases: Rust and Damping Off 🍂
High humidity, poor air circulation, and wet foliage invite fungal issues. Rust (Puccinia allii) presents as small, bright orange or rust-colored pustules on the leaves. There is no cure for rust once established; immediately prune and dispose of infected foliage (do not compost it) to prevent spores from spreading. Ensure your plants are spaced adequately to allow wind to dry the leaves after rain.

Maximizing Flavor: Harvesting and Preserving Chives
Proper harvesting techniques not only keep the plant healthy but also ensure you are getting the most robust flavor from your crop.
The 30-Day Harvest Cycle: How Often Can You Cut? 🧺
During peak growing season (late spring through early autumn), a healthy chive plant will regrow enough to be harvested every 30 to 60 days. To ensure an uninterrupted supply, practice rotational cutting. If you have a large clump, divide it visually into thirds. Harvest one-third this week, the next third next week, and the final third the following week. By the time you return to the first section, it will have regenerated fresh, harvestable shoots.
Freezing vs. Dehydrating: Retaining Pungency and Texture 🧊
When the season ends, you will likely have more chives than you can consume fresh.
-
Freezing (Best for Flavor): Chives lose much of their oniony punch when dried. Freezing is vastly superior. Wash and thoroughly dry the leaves, snip them into small pieces, and spread them on a baking sheet lined with parchment paper. Flash-freeze for two hours, then transfer to a heavy-duty freezer bag. You can sprinkle them frozen directly into soups, stews, and egg dishes.
-
Compound Butter: An elegant preservation method is whipping finely snipped chives and separated blossom petals into softened, high-quality butter. Roll the butter into a log using parchment paper and freeze. Slice off coins of chive butter to melt over grilled steaks or roasted vegetables throughout the winter.
Frequently Asked Questions About Chive Plants
Do chive plants come back every year?
Yes. Chives are herbaceous perennials hardy to USDA Zone 3. The green foliage will die back completely to the ground after the first hard freeze, but the underground bulbs survive winter and will push up fresh green shoots as soon as the soil warms in early spring.
Can I grow chives on a sunny indoor windowsill?
While possible, it is challenging. Chives require high light levels that most modern, double-paned windows cannot provide, often resulting in weak, spindly growth. To succeed indoors, use a well-draining potting mix, rotate the pot weekly, and ideally supplement with a full-spectrum LED grow light for 12 hours a day.
Are chive flowers completely edible?
Absolutely. The purple blooms of common chives and the white blooms of garlic chives are entirely edible. They possess a concentrated, spicy allium flavor. Pull the individual florets apart and sprinkle them over salads, deviled eggs, or use whole blossom heads to infuse white wine vinegar to create a beautiful, pink, onion-flavored dressing.
Why do my chives keep falling over?
Flopping chives are usually the result of three specific issues: inadequate direct sunlight causing weak cellular structure, excessive nitrogen fertilizer promoting rapid but flimsy growth, or an overgrown, root-bound clump that requires immediate division to restore vigor.
Caring for chive plants is a low-friction entry point into the world of perennial herb gardening. By providing them with excellent drainage, avoiding the temptation to over-fertilize, making proper baseline cuts during harvest, and dividing the clumps every few years, you guarantee yourself a robust, flavorful harvest that returns reliably season after season. Head out to the garden, check the base of your clumps, deadhead any lingering dried stems, and enjoy the unmatched flavor of freshly snipped alliums in your next meal. What is your favorite way to incorporate fresh chives into your cooking?











