
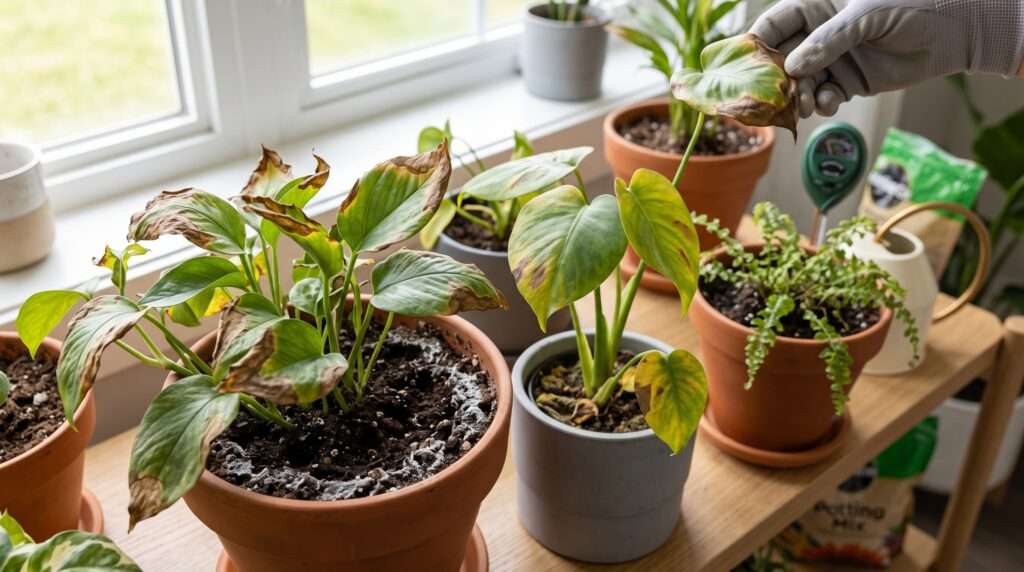
It is a heartbreaking scenario familiar to nearly every plant enthusiast. You carefully measure out a dose of “miracle” plant food, hoping to give your beloved Monstera or patio tomatoes a lush, vibrant boost. But just a few days later, instead of a sudden burst of new growth, the leaves begin to crisp, curl, and turn a sickly shade of yellow. If you are noticing these rapid, declining changes, you are likely witnessing fertilizer burn symptoms in container gardens.
When it comes to feeding potted plants, the old adage “if a little is good, a lot must be better” could not be further from the truth. In the confined environment of a planter or pot, a heavy hand with synthetic nutrients can quickly turn toxic. However, do not throw the plant in the compost bin just yet. By learning how to diagnose this issue early and taking swift corrective action, you can rescue your leafy investments and restore your soil’s health.
This comprehensive guide covers everything from identifying the exact signs of chemical scorch to emergency rescue protocols and long-term soil health management for your containers. Let’s dive in and save those plants! 🌱✨
🧪 What Exactly Is Fertilizer Burn? (The Science Made Simple)
To truly understand how to fix the problem, we first need to look at what happens beneath the soil surface. Synthetic fertilizers—whether they come in liquid, granular, or powder form—are essentially composed of concentrated mineral salts (primarily Nitrogen, Phosphorus, and Potassium, or NPK).
In a natural, open-ground garden setting, when you apply fertilizer, rain and natural groundwater movement disperse these salts through vast amounts of soil. But in a container garden, your plant is trapped in a closed system.

The Osmotic Shift 💧➡️🧂
Plants absorb water through a delicate process called osmosis. Normally, the concentration of moisture inside the plant’s roots is lower than the moisture in the surrounding potting mix, allowing water to flow naturally into the root system.
When you apply too much synthetic fertilizer, you drastically increase the concentration of mineral salts in the soil. Suddenly, the soil becomes “saltier” than the inside of the plant roots. This triggers a reverse osmotic effect: the high salt concentration literally pulls moisture out of the plant’s roots.
The plant is essentially experiencing severe chemical dehydration, even if the potting mix feels soaking wet to the touch. The roots begin to dehydrate, shrivel, and die, rendering them incapable of transporting water and nutrients up to the foliage.
Expert Insight 💡: Organic vs. Synthetic Organic fertilizers (like worm castings, compost, or bone meal) rely on soil microbes to slowly break them down into plant-available nutrients. Because they are not raw, water-soluble salts, the risk of fertilizer burn is exceptionally low. Synthetic fertilizers, while fast-acting, deliver an immediate, intense payload of soluble salts that can easily overwhelm a confined root zone.
🔎 The Tell-Tale Signs: Identifying the Symptoms
Accurate diagnosis is your first line of defense. Because container plants have a limited buffer zone, the visual cues of distress often appear rapidly—sometimes within 24 to 48 hours of feeding. Here is exactly what to look for when diagnosing fertilizer burn symptoms in container gardens.
🍂 Crispy, Brown Leaf Tips and Margins
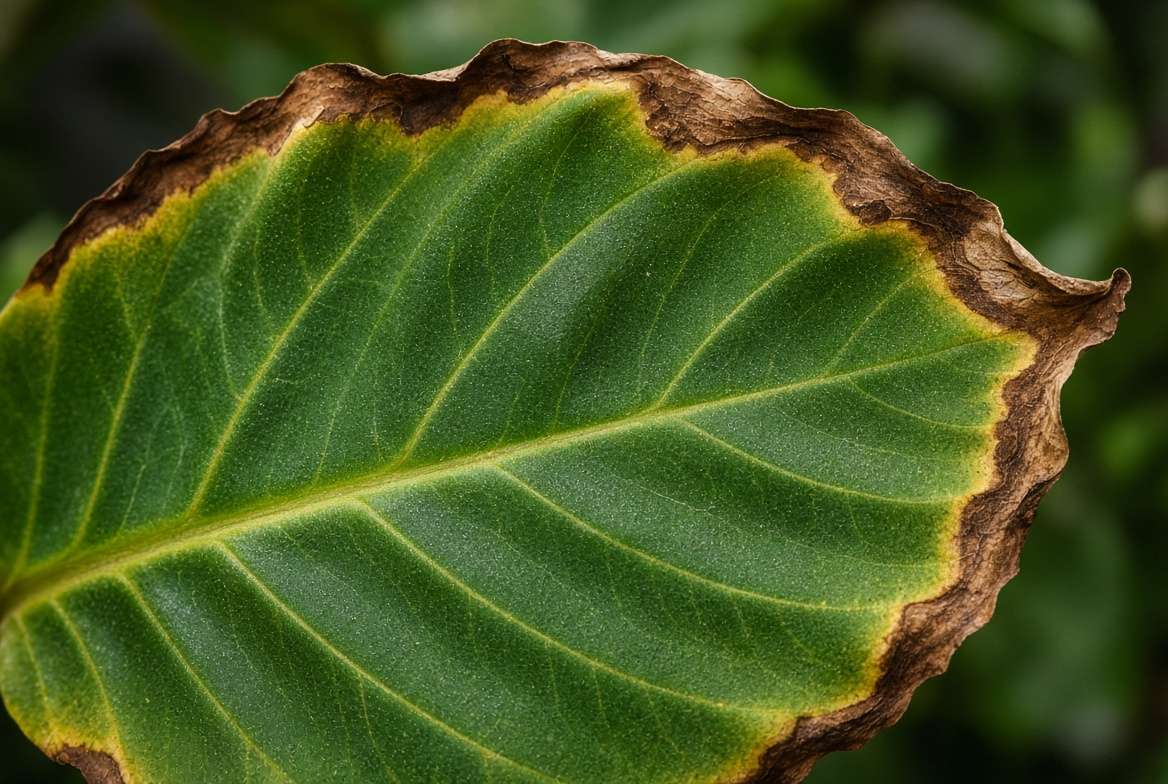
This is the hallmark symptom of nutrient burn, known botanically as marginal necrosis. When a plant is chemically dehydrated, it naturally prioritizes its core survival. Moisture is pulled away from the furthest extremities first—the tips and outer edges of the leaves. You will notice sharp, dry, brown, crispy edges that may eventually crumble to the touch. Unlike natural aging, where a leaf slowly fades, this crisping happens rapidly and often affects multiple leaves simultaneously.
🟡 Sudden Yellowing (Chlorosis) of Lower Leaves
While yellowing leaves can indicate several issues, fertilizer burn typically causes rapid chlorosis in the older, lower foliage first. As toxic levels of salts accumulate, the plant attempts to shed the affected tissue. If your plant was perfectly green on Tuesday, fed on Wednesday, and dropping yellow lower leaves by Friday, excessive nitrogen or salt buildup is the primary suspect.
❄️ The “Salt Crust” on the Soil Surface
Take a close look at the surface of your potting mix. Do you see a white, crusty, crystalline buildup? Look also at the edges of the pot—especially if you use porous terracotta, which naturally wicks moisture. A heavy, white, powdery residue on the rim or exterior of the pot is a glaring indicator of severe salt accumulation in your soil profile.
🥀 Wilting Despite Wet Soil
This is perhaps the most confusing symptom for indoor gardeners. Your plant’s leaves are drooping heavily, looking desperately thirsty. Your instinct is to reach for the watering can, but when you check the soil, it is heavily saturated. This phenomenon occurs because the root system has been chemically scorched and destroyed; it physically cannot absorb the water sitting right next to it.

🛑 Stunted Growth and Root Dieback
If you suspect fertilizer burn and the plant is small enough, gently slide it out of its pot to inspect the root ball.
-
Healthy roots: Generally firm, plump, and white or light tan.
-
Burned roots: Brown, blackened, shriveled, mushy, and sometimes emitting a slightly sour or decaying odor due to secondary root rot setting in after the chemical damage.
🕵️♀️ Fertilizer Burn vs. Other Common Plant Ailments
Misdiagnosis often leads to fatal mistakes. For instance, treating a fertilizer-burned plant for a nutrient deficiency by adding more fertilizer is a guaranteed death sentence. Here is how to differentiate chemical scorch from other common lookalikes.
Overwatering and Root Rot 💧
-
The Difference: Root rot causes leaves to turn yellow and soft/mushy, whereas fertilizer burn causes dry, crispy, brown edges. A root-rotted plant often sits in heavy, foul-smelling, waterlogged soil without the tell-tale white salt crust on the surface.
Sun Scorch ☀️
-
The Difference: Sun scorch (sunburn) typically affects the uppermost leaves or the side of the plant directly facing a harsh light source. The bleached, white, or brown patches often appear in the center of the leaf where the sun hits hardest. Fertilizer burn, conversely, starts at the tips and margins and frequently affects lower extremities first as the roots struggle to pump water upwards.
Nutrient Deficiencies 📉
-
The Difference: A plant lacking nutrients (like a magnesium or iron deficiency) will show complex yellowing patterns, such as yellow leaves with stark green veins (interveinal chlorosis). The edges rarely get instantly crispy. Deficiencies develop slowly over weeks or months, whereas fertilizer burn is an acute, rapid-onset trauma following a feeding.
🚑 The Rescue Mission: How to Save Your Potted Plants (Step-by-Step)
If you have confirmed that your plant is suffering from chemical scorch, time is of the essence. The longer the toxic salts sit in the root zone, the more cellular damage occurs. Here is the exact protocol to stabilize your plant and begin the recovery process.
Step 1: The Deep Flush (Leaching) 🚿
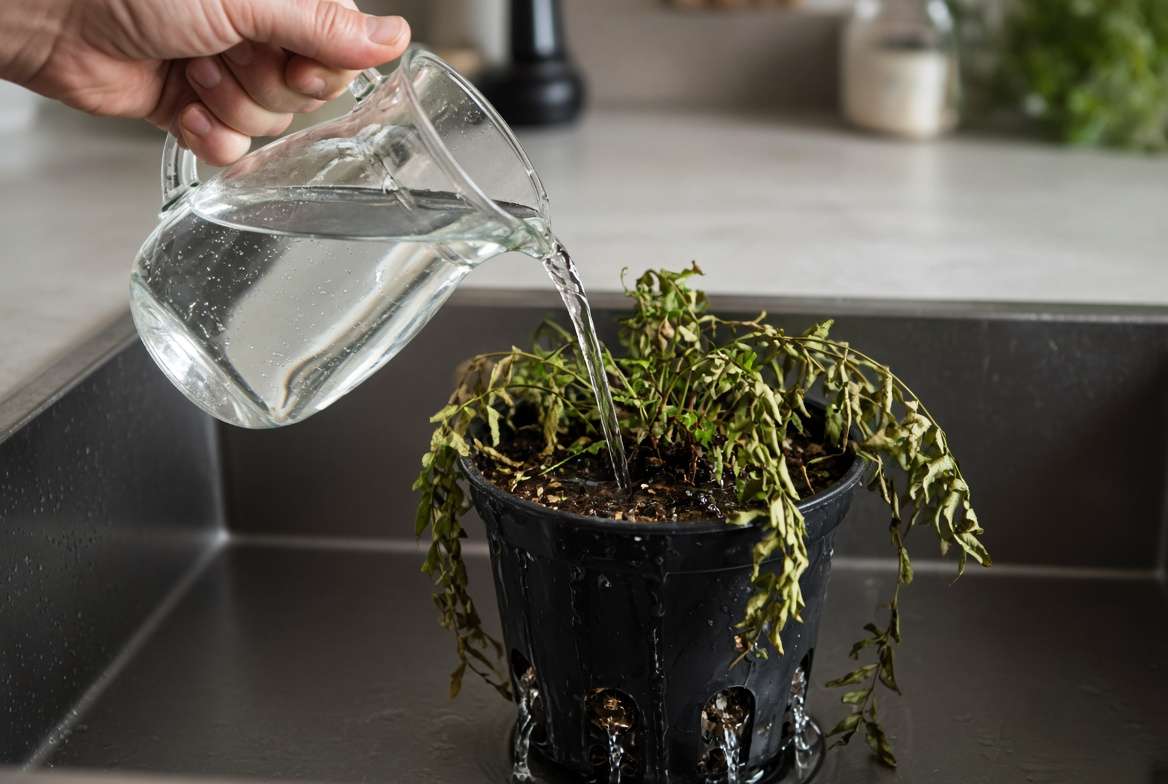
Leaching is the most effective first-aid treatment for mild to moderate fertilizer burn. The goal is to physically wash the excess water-soluble nutrients out of the potting mix.
-
Move your affected plant to a sink, bathtub, or an outdoor area with good drainage.
-
Turn on the tap to a gentle flow of tepid, room-temperature water (cold water can shock an already stressed tropical plant).
-
Allow the water to run continuously through the soil for 5 to 10 minutes.
-
As a general rule, you want to push a volume of water through the soil that equals roughly two to three times the volume of the container.
-
Allow the pot to drain completely for at least an hour before returning it to its saucer. Do not let the plant sit in the flushed, salty runoff water.
Pro Tip 💡: This step is only possible if your container has proper drainage holes. If your plant is housed in a decorative cachepot without drainage, you cannot leach it. You must move immediately to Step 3.
Step 2: Physical Removal of Surface Salts 🥄
If your potting soil has a visible white crust on top, flushing alone might just push those concentrated salts deeper into the root zone. Before you leach the soil, take a spoon and gently scrape off the top inch of the potting mix. Be careful not to gouge the shallow feeder roots. Dispose of this crusty soil in the trash, not the compost bin. Replace the removed layer with fresh, unfertilized potting soil after the leaching process is complete.
Step 3: Emergency Repotting (For Severe Cases) 🪴
If the burn is severe—meaning the plant is aggressively dropping leaves, the soil smells decaying, or there are no drainage holes in the current pot—leaching will not be enough. You must perform an emergency repotting.
-
Gently remove the plant from its container.
-
Carefully shake off as much of the toxic potting mix from the root ball as possible.
-
Fill a bucket with room-temperature water and gently submerge and swish the root ball to rinse away the remaining salt-heavy soil.
-
Inspect the root system. Use sterilized pruning snips to cut away any mushy, black, or entirely shriveled roots.
-
Repot the plant in a clean container (with drainage holes!) using a fresh, sterile, and well-aerated potting mix. Do not add any fertilizer to this new mix.
Step 4: Pruning the Damage ✂️
Once the toxic soil situation is resolved, turn your attention to the foliage. Crispy, brown leaf tips and entirely yellow leaves will never turn green again; the tissue is dead. Leaving severely damaged foliage on the plant forces it to waste valuable energy attempting to repair the irreparable.
Using clean, sharp scissors, trim away fully dead leaves at the base of the stem. For leaves with only crispy margins, you can trim the brown edges off, following the natural shape of the leaf, leaving a tiny sliver of brown to avoid cutting into the healthy green tissue and causing fresh wounds.
🌱 Long-Term Soil Health: Preventing Future Fertilizer Burn
Once your plant begins to stabilize and push out new growth (which can take anywhere from two to four weeks), you need a safer feeding strategy. Container gardens require a much more delicate touch than raised beds or in-ground landscaping.
Switch to Organic, Slow-Release Options 🐢
The absolute easiest way to prevent fertilizer burn is to ditch synthetic liquids and powders entirely. Organic fertilizers—such as worm castings, compost tea, kelp meal, and bone meal—nourish the soil microbiome. They require microbes to break them down before the plant can uptake the nutrients. This slow-drip feeding mechanism makes it nearly impossible to accidentally scorch your roots.
The “Dilute and Frequent” Approach 💧
If you prefer using synthetic, water-soluble liquid fertilizers because of their fast-acting results, alter the dosage. The manufacturer’s instructions on the back of the bottle are often far too strong for typical indoor or patio container plants.
Adopt the “weakly, weekly” method. Dilute the liquid fertilizer to one-quarter (1/4) or one-half (1/2) of the recommended strength. Feeding your plants a highly diluted solution more frequently provides a steady, safe stream of nutrients without the hazardous salt spikes.
Always Water Before Feeding 💦
Never apply liquid fertilizer to dry potting soil. When a plant is thirsty, its roots will rapidly absorb whatever liquid hits them first. If that liquid is a concentrated chemical fertilizer, the shock and subsequent burn are instantaneous. Always water your container garden thoroughly with plain water a few hours before applying any liquid feed. The water acts as a protective buffer for the root epidermis.
Annual Soil Refreshing ♻️
Even with careful feeding, mineral salts from tap water and mild fertilizers will eventually accumulate in a closed container system. To maintain optimal soil health and prevent late-stage toxicity, make it a habit to refresh your potting mix. For large, heavy pots that are difficult to fully repot, remove the top two to three inches of soil every spring and replace it with fresh mix and a handful of organic worm castings. For smaller houseplants, fully replacing the soil every 12 to 18 months keeps the root environment sterile and safe.
❓ Frequently Asked Questions (FAQs)
Can a plant recover from fertilizer burn? Yes, in most cases, a plant can fully recover if the symptoms are caught early. The survival rate depends on the health of the root system. If the roots are only mildly damaged and the soil is flushed promptly, new, healthy foliage will eventually replace the damaged leaves. If the entire root system has turned to mush, recovery is unlikely.
How long does it take for a plant to flush out excess fertilizer? The physical flushing of the soil offers immediate relief to the plant by stopping further chemical burn. However, visible signs of plant recovery take much longer. You likely will not see new, healthy growth for 2 to 4 weeks, as the plant must expend energy repairing its root system before it can support new leaves.
Should I use fertilizer on newly potted plants? No. You should wait at least 4 to 6 weeks before fertilizing a newly repotted plant. The vast majority of commercial potting soils already contain a starter charge of slow-release fertilizer. Adding more on top of this starter charge is a primary cause of nutrient burn. Additionally, recently disturbed roots need time to heal and settle before processing heavy nutrient loads.
Do coffee grounds cause fertilizer burn in pots? Coffee grounds are an organic material and do not cause the same rapid, salt-induced chemical burn as synthetic fertilizers. However, applying a thick, uncomposted layer of coffee grounds directly to the surface of a container plant can create a dense, water-repellent crust that suffocates roots. It is always better to compost coffee grounds first or use them very sparingly mixed into the soil.
Gardening in containers is an incredibly rewarding experience, bringing nature directly onto our patios, balconies, and living rooms. Experiencing fertilizer burn symptoms in container gardens is an initiation rite nearly every green thumb goes through. By understanding the science of soil salinity, recognizing the early crispy warning signs, and mastering the deep-flush rescue technique, you can save your current plants and cultivate a thriving, burn-free indoor jungle for years to come.
Have you successfully rescued a plant from an over-feeding disaster? Share your revival story or ask any troubleshooting questions in the comments below—let’s keep those roots happy and healthy! 🪴💚











