
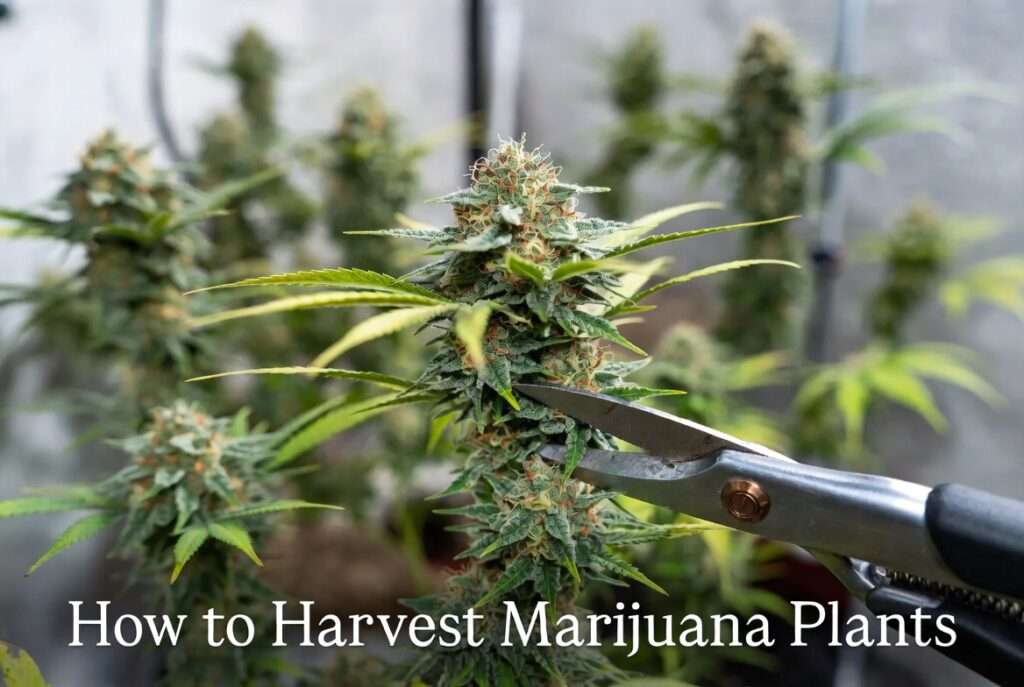
After months of careful nurturing, watering, and watching your plants grow, the moment finally arrives — harvest time. The excitement is real, but so is the pressure. Get it right, and you’ll be rewarded with dense, aromatic buds packed with maximum yield and potency. Get it wrong, and you risk losing quality, flavor, and even entire crops.
Learning how to harvest marijuana plants properly is one of the most important skills any grower can master. This comprehensive guide walks you through every stage — from identifying the perfect harvest window to drying, trimming, and curing — so you can achieve professional-level results at home. Whether you’re a beginner or an experienced cultivator looking to refine your technique, this guide delivers expert insights to help you succeed.
Proper harvesting isn’t just about cutting plants down. It’s a science that directly influences cannabinoid levels (THC, CBD), terpene profiles, smoothness, and overall bag appeal. Many growers lose 20-30% of potential quality simply by rushing this final phase. In this detailed, step-by-step article, you’ll discover proven methods used by seasoned cultivators to maximize both quantity and quality while avoiding common pitfalls. Let’s turn your hard work into exceptional results! 🌿
Understanding When Your Marijuana Plants Are Ready to Harvest
Timing is everything in cannabis cultivation. Harvest too early, and your buds will lack potency and weight. Harvest too late, and THC begins converting to CBN, resulting in more sedative effects and potential degradation of terpenes.
Pistil Method
One of the easiest visual indicators is observing the pistils (the white hair-like structures on the buds). When 70-90% of the pistils have turned dark brown, curled inward, and become brittle, your plants are generally ready. This method is helpful for beginners but should be combined with other signs for accuracy.
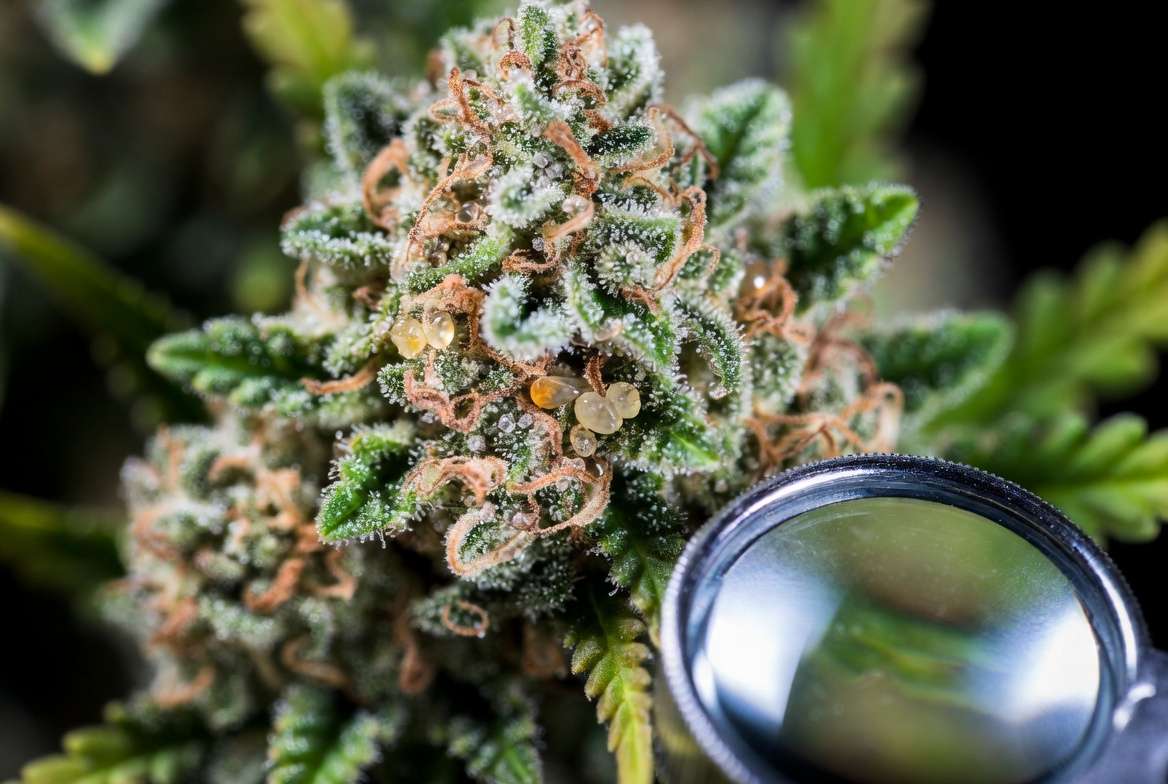
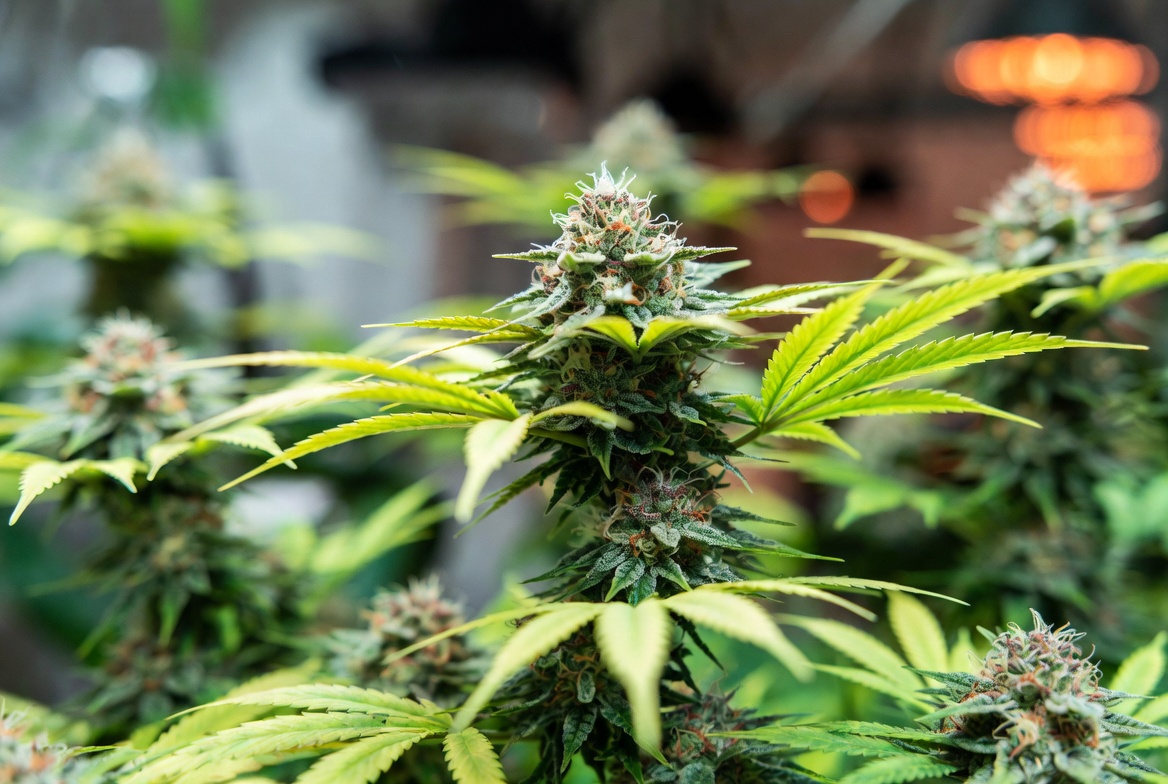
Trichome Method – The Gold Standard
For the most precise results, examine the trichomes — the tiny crystal-like glands covering the buds. You’ll need a jeweler’s loupe (30x–60x magnification) or a digital microscope.
- Clear trichomes: Too early — buds are still developing.
- Milky white trichomes: Peak potency for most users seeking balanced effects.
- Amber trichomes: More relaxing, couch-lock effects (ideal for indica strains).
Pro Recommendation: Aim for 60-70% milky trichomes and 10-30% amber for a well-rounded harvest. Different strains perform best at slightly different ratios — indicas often benefit from a higher amber percentage, while sativas shine with more milky trichomes. 📸
Strain Variations Indica-dominant plants typically finish faster (8-10 weeks of flowering) and show readiness sooner. Sativa-dominant varieties may take 10-14+ weeks and maintain clearer trichomes longer. Hybrids fall somewhere in between. Always check your specific strain’s expected flowering time from the breeder.
Best Time of Day Harvest in the early morning before lights turn on (or just before sunrise outdoors). At this time, terpene levels are highest and plants have lower moisture stress.
Expert Tip: Keep a harvest journal! Note trichome ratios, pistil colors, and final results for each grow cycle. Over time, this becomes your most valuable tool. 🌟
Essential Tools and Preparation for a Successful Harvest
A smooth harvest starts with proper preparation. Here’s what you’ll need:
- Sharp, sterilized pruning shears or scissors
- Nitrile gloves (to prevent resin buildup on hands)
- Jeweler’s loupe or digital microscope
- Drying racks or hangers
- Hygrometer and thermometer
- Airtight glass jars for curing
- Boveda humidity packs (58-62% RH)
- Clean workspace with good ventilation
Pre-Harvest Flushing Two weeks before harvest, flush your plants with plain pH-balanced water. This removes excess nutrients and salts, leading to smoother, cleaner-tasting smoke. For soil grows, flush for 10-14 days; hydroponic systems may need only 7 days.
Setting Up Your Space Choose a dark, cool room with temperatures between 60-70°F (15-21°C) and humidity around 45-55%. Good airflow is essential to prevent mold while avoiding direct fans on hanging branches.
Safety First Always wear gloves, work in a clean environment, and follow local laws regarding cultivation and possession. Responsible growing includes respecting regulations and prioritizing safety. 🧤
Step-by-Step Guide to Harvesting Marijuana Plants
Step 1: Final Inspection and Decision Making
Double-check trichomes and pistils across multiple buds (top colas and lower branches can mature at different rates). Decide whether to harvest the entire plant or do selective harvesting.
Step 2: Choosing Your Harvest Style
- Whole plant harvest: Cut at the base for uniform drying. Best for smaller plants.
- Branch-by-branch: Allows you to harvest ripe sections while letting others mature. Ideal for long-flowering strains.
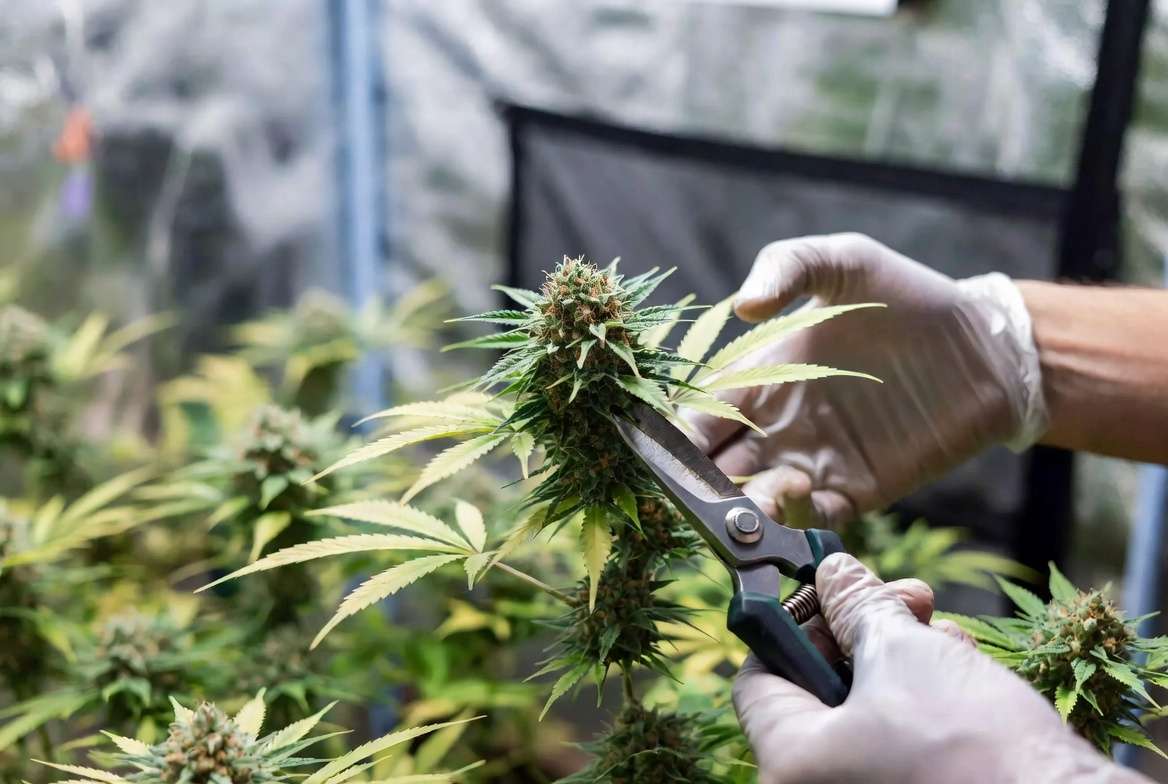
Step 3: Cutting the Plants
Use clean, sharp shears to make angled cuts. This minimizes damage to the stem and reduces the risk of infection. Handle plants gently to avoid knocking off valuable trichomes.
Step 4: Initial Defoliation
Remove large fan leaves right after cutting. This improves airflow and makes trimming easier later. Don’t remove all leaves — sugar leaves protect the buds during drying.
Step 5: Wet Trimming vs. Dry Trimming
Wet trimming (trimming immediately after harvest): Easier on fresh buds, results in better bag appeal, but can reduce terpenes slightly if not dried properly. Dry trimming (after drying): Preserves more aroma and flavor but requires more effort and space.
Choose based on your climate and setup. In humid areas, wet trimming helps reduce mold risk.
Visual Tip: Take clear photos at each stage for your grow journal! ✂️
Drying Your Harvest – The Foundation of Quality Buds 🌬️
Drying is often called the most underrated step in cannabis cultivation. Done correctly, it preserves terpenes, maintains potency, and sets the stage for excellent curing. Rushed or improper drying is one of the top reasons growers end up with harsh, low-quality buds.
Ideal Drying Conditions Maintain a temperature of 60-70°F (15-21°C) and relative humidity between 45-55%. Good airflow is critical, but avoid pointing fans directly at the hanging branches to prevent uneven drying or trichome damage.
Hanging Methods
- Hang whole plants upside down in a dark room (light degrades THC).
- Or hang individual branches on drying racks or strings. Space them out adequately so air can circulate freely around each bud.
How Long to Dry? Expect 7-14 days depending on climate and bud density. Use the stem snap test: a properly dried stem should break cleanly with a satisfying “snap” rather than bending. Buds should feel dry on the outside but still slightly spongy when squeezed.
Common Drying Problems and Solutions
- Drying too fast (crispy buds, lost terpenes): Increase humidity or reduce airflow.
- Drying too slow (risk of mold): Improve ventilation and lower humidity slightly.
- Mold or bud rot: Remove affected areas immediately and increase spacing. Prevention is always better — consistent monitoring with a hygrometer is essential.
Pro Insight: Slow, controlled drying allows chlorophyll to break down properly while preserving delicate cannabinoids and terpenes. This is what separates home-grown “okay” buds from premium, smooth-smoking flowers. Many commercial operations cut corners here, but patient growers reap the rewards. 📊
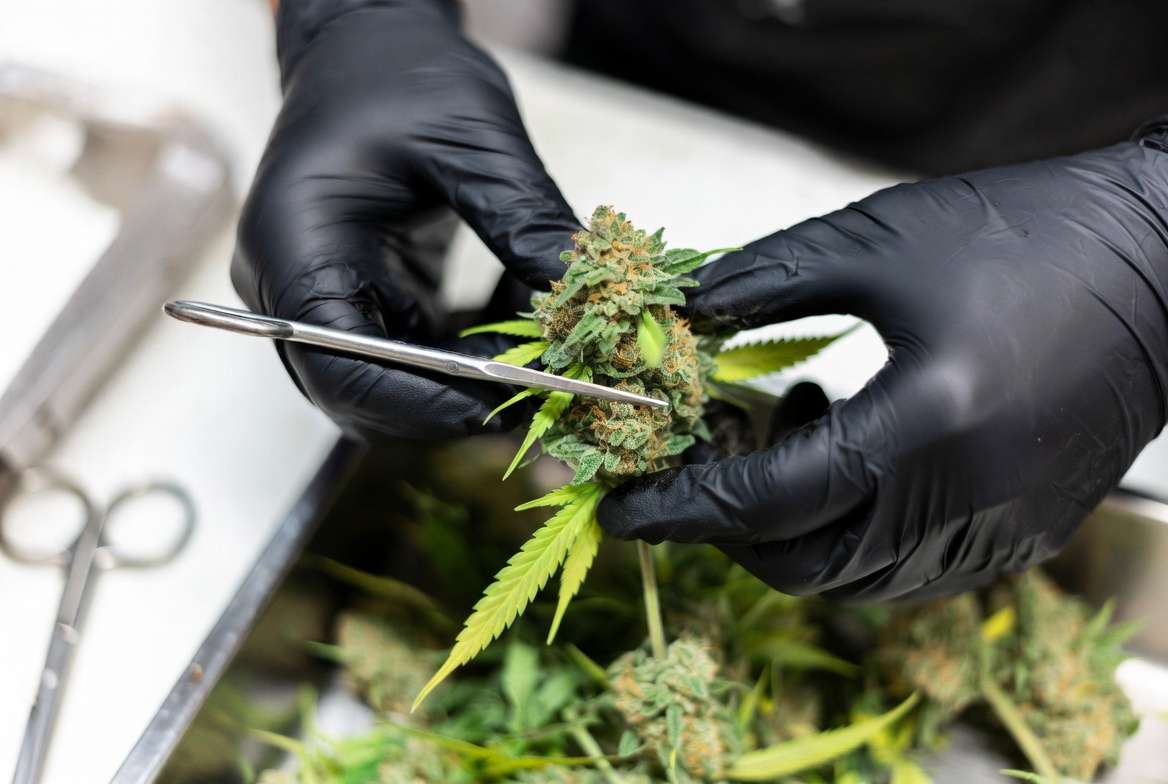
Trimming Techniques for Beautiful, Potent Buds ✂️🍃
Trimming transforms your dried harvest into those Instagram-worthy, high-quality buds while maximizing usable material.
Wet Trimming vs. Dry Trimming – Deep Dive Wet trimming (done right after harvest) is popular because buds are easier to manicure when fresh. It often produces superior bag appeal with tighter, cleaner lines. However, it can slightly reduce aroma if the buds dry too quickly afterward.
Dry trimming (after full drying) is favored by many connoisseurs because it better preserves terpenes and results in stronger fragrance. The downside? It’s more time-consuming and sticky work.
Tools and Best Practices Use sharp, curved precision scissors and wear gloves. Trim in a well-lit area over a clean tray to catch kief (the valuable trichome dust).
What to Do with Your Trim
- Sugar leaves and small trim: Make bubble hash, edibles, or cannabutter.
- Kief: Collect for dry sift or sprinkle on joints.
- Fan leaves and stems: Compost them responsibly or use for tea.
Achieving Perfect Bag Appeal Focus on removing all protruding sugar leaves while keeping a light coating of trichomes on the surface. The goal is tight, frosty buds that look as good as they smoke.
Helpful Tip: “Trim mindfully — every sugar leaf counts toward your final yield and quality!” 🌟
Curing Marijuana for Maximum Flavor, Potency, and Smoothness 🏺
Curing is where the magic happens. This slow chemical process breaks down remaining chlorophyll and allows cannabinoids and terpenes to mature, turning good buds into great ones.
Why Curing Matters Properly cured cannabis burns evenly, tastes smoother, and delivers more complex flavors and effects. Many first-time growers skip or rush this stage and wonder why their harvest doesn’t match expectations.
Step-by-Step Curing Process
- Place dried, trimmed buds loosely in airtight glass mason jars (fill 75% full).
- Store in a cool, dark place (60-70°F).
- Burping schedule: Open jars daily for 10-15 minutes during the first 1-2 weeks to release moisture and gases. Reduce to every few days in weeks 3-4.
- Continue curing for a minimum of 2-4 weeks. Many experts recommend 6-8 weeks or longer for premium results.
Humidity Control Use a hygrometer inside each jar. Ideal range is 58-62% RH. Boveda humidity packs are excellent for maintaining perfect levels automatically.
Signs of Properly Cured Buds
- Rich, pleasant aroma when the jar is opened.
- Buds feel springy but not moist.
- Smooth, clean smoke with no harshness.
Long-Term Storage After curing, keep jars in a cool, dark cabinet. Vacuum-sealed bags or CVault containers work well for longer storage. Well-cured cannabis can maintain quality for 1-2 years or more.
Expert Note: Curing is a patient grower’s best friend. The transformation from harsh to silky-smooth is remarkable and well worth the wait. 🕒
Maximizing Yield and Potency – Advanced Tips from Experienced Growers 💪
To push your results even further:
- Selective/Staggered Harvesting: Harvest top colas first when ready, allowing lower buds more time to fatten up.
- Environmental Fine-Tuning: Slightly cooler nights in late flowering can boost resin production.
- Avoid Common Mistakes: Don’t harvest during high heat, over-trim too aggressively, or expose buds to light during drying.
- Tracking Results: Weigh your harvest at multiple stages (wet weight, dry weight, cured weight) to improve future cycles.
Realistic Yield Expectations Indoor plants typically yield 1-2 ounces per square foot under good conditions. Outdoor plants can produce ½ lb to several pounds per plant depending on size and strain.
Troubleshooting Low Yield or Potency
- Yellowing too early? Check nutrient lockout.
- Low trichome density? Review lighting and genetics.
- Harsh final product? Extend curing time.
Troubleshooting Common Harvest Problems ✅
- Mold/Bud Rot: High humidity culprit. Increase airflow and remove affected buds immediately.
- Pests in Late Flowering: Use neem oil or beneficial insects early.
- Uneven Drying: Rotate hanging branches daily.
- Potency Loss: Avoid heat and light exposure at all stages.
Quick Reference Checklist
- Trichomes mostly milky? ✔️
- Proper flush completed? ✔️
- Drying environment stable? ✔️
- Patience during curing? ✔️
Sustainable and Responsible Harvesting Practices 🌍
As plant care enthusiasts, we honor the earth by:
- Composting all organic waste.
- Reusing trimming material creatively.
- Conserving water during flushing.
- Always complying with local cultivation laws and promoting responsible use.
Conclusion
Mastering how to harvest marijuana plants transforms your entire growing journey. From that first exciting cut to the moment you open a perfectly cured jar months later, each step rewards attention to detail and patience.
By following this comprehensive guide, you’ll maximize both yield and potency while producing smooth, flavorful, high-quality buds you can be proud of. Remember: every harvest teaches you something new. Keep detailed notes, experiment responsibly, and enjoy the process.
Your plants have worked hard for you — now give them the respectful finish they deserve. Happy harvesting! 🌿✨
If you have questions about your specific grow or want to share your results, drop them in the comments below. For more expert plant care guides, explore our other articles on indoor growing, nutrient management, and strain selection.
Frequently Asked Questions (FAQs)
Q1: How long does it take to harvest and cure marijuana? From the start of flowering, expect 8-14 weeks for harvest plus 2-8 weeks of curing for best results.
Q2: Should I harvest when trichomes are milky or amber? 60-70% milky with 10-30% amber usually gives the best balanced effects. Adjust based on desired experience.
Q3: Can I harvest early for higher CBD? Yes — earlier harvests often preserve more CBD and less THC conversion.
Q4: What’s the best tool for checking trichomes? A 30x-60x jeweler’s loupe or a digital USB microscope.
Q5: How do I prevent mold during drying? Maintain 45-55% humidity, good airflow, and proper spacing.
Q6: Is wet trimming or dry trimming better? Both work well. Wet trimming offers better appearance; dry trimming preserves more aroma.


