
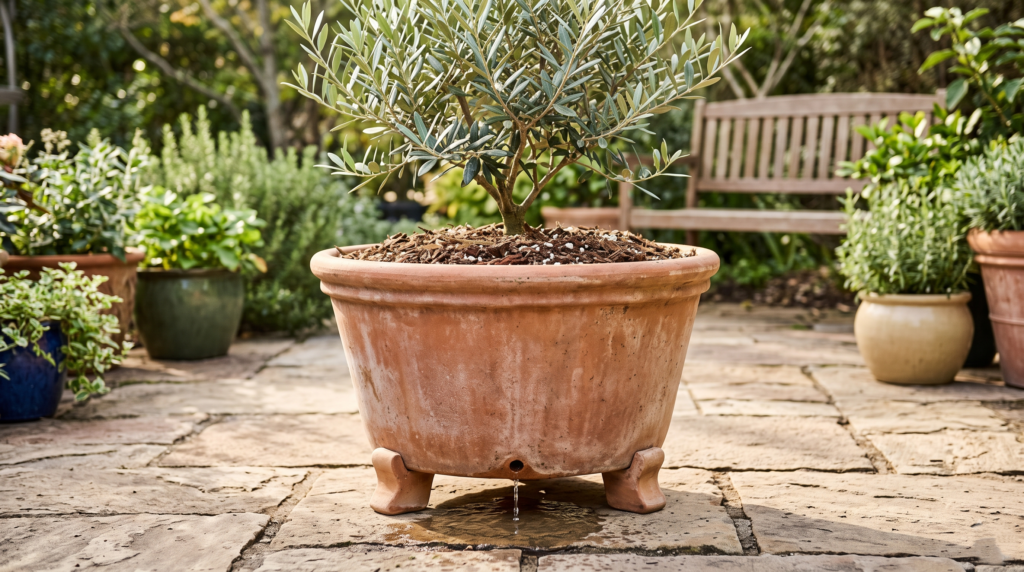
Imagine this: you’ve finally invested in that stunning, mature olive tree or a massive fiddle leaf fig for your patio. You pot it up in a gorgeous, expensive ceramic planter, water it diligently, and wait for it to thrive. But instead, a few weeks later, the leaves begin to yellow, droop, and fall off. The soil feels wet, yet the plant looks like it’s dying of thirst. What went wrong?
You are likely witnessing the silent killer of potted plants: root rot.
When dealing with oversized planters, standard potting rules no longer apply. Successfully managing drainage in large containers is the single most critical factor in keeping your investment alive. In this comprehensive guide, we are going to dive deep into the science of soil mechanics, debunk the biggest gardening myths, and walk through the exact, professional methods to ensure your large container plants build a vigorous, healthy root system for years to come. 🌿
Why Managing Drainage in Large Containers is Different (and Harder) 🌧️
Taking care of a small pothos in a 6-inch nursery pot is entirely different from managing a dwarf citrus tree in a 20-gallon planter. As you scale up in container size, physics and gravity start working against your plant’s root health in two major ways.
The Science of the “Perched Water Table” 💧
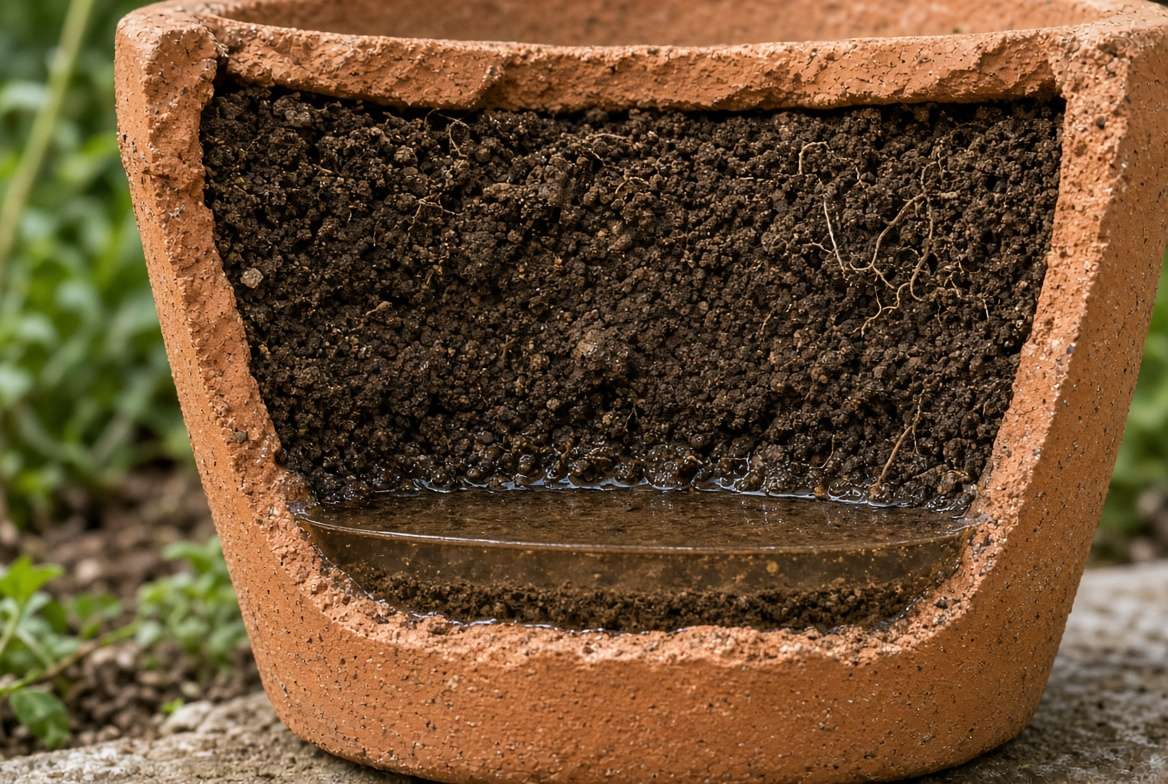
To understand container drainage, you have to understand the “perched water table.” In the ground, gravity pulls water down continuously through the subsoil. But in a container, the bottom of the pot acts as a barrier. Capillary action (the soil’s tendency to hold onto water like a sponge) fights against gravity.
Because of this tug-of-war, the very bottom layer of soil in a pot will always remain 100% saturated with water after a heavy soaking, regardless of how many drainage holes you have. This saturated zone is the perched water table. In large containers, this soggy layer can be several inches thick, creating an anaerobic (oxygen-starved) swamp that suffocates deep roots and invites phytophthora and pythium—the fungal pathogens responsible for root rot.
Weight and Soil Compaction Over Time 🧱
The second challenge is sheer mass. Fifteen gallons of wet potting soil can weigh upwards of 100 pounds. Over months and years, this incredible weight compresses the lower layers of the soil profile. The crucial macro-pores (the tiny air pockets between soil particles that roots need to breathe) collapse. Once compaction occurs, drainage slows to a trickle, and your large container effectively turns into a bathtub.
The “Gravel at the Bottom” Myth Busted 🚫🪨
If you ask any old-school gardener how to improve drainage in a large, heavy pot, they will almost always give you the same advice: “Just put a thick layer of gravel, rocks, or broken terracotta pots at the bottom before you add your soil.”
It sounds completely logical. Rocks drain fast, right?
Wrong. This is the most dangerous myth in container gardening. 🛑
Adding gravel to the bottom of a pot does not improve drainage. In fact, it makes root rot much more likely. Remember the perched water table we just discussed? Water does not easily move from a fine-textured material (potting soil) into a coarse-textured material (gravel) until the fine material is completely saturated.
By adding three inches of rocks to the bottom of your pot, you haven’t eliminated the perched water table; you’ve simply moved it three inches higher up into the pot, closer to your plant’s delicate root ball. You are artificially shrinking the amount of breathable soil your plant has access to.
The Expert Solution: For optimal drainage, you need a uniform, consistent soil profile from the very top of the container all the way to the bottom. Skip the rocks.
Step-by-Step: Setting Up a Large Container for Maximum Drainage 🛠️
Now that we know what not to do, let’s look at the foolproof, step-by-step methodology for setting up oversized outdoor or indoor planters.
Step 1: Choosing (or Modifying) the Right Pot 🕳️
A large container without drainage holes is not a planter; it is a coffin. ⚰️
-
The Minimum Requirement: A pot larger than 10 gallons should have at least three to four drainage holes that are roughly 3/4 to 1-inch in diameter.
-
Modifying Your Pot: If you bought a beautiful fiberglass, resin, or glazed ceramic pot that lacks sufficient holes, you must drill them. Use a masonry bit for ceramic and terracotta, or a standard wood/plastic bit for resin. Apply a piece of masking tape over the spot before drilling to prevent the glaze from chipping.
-
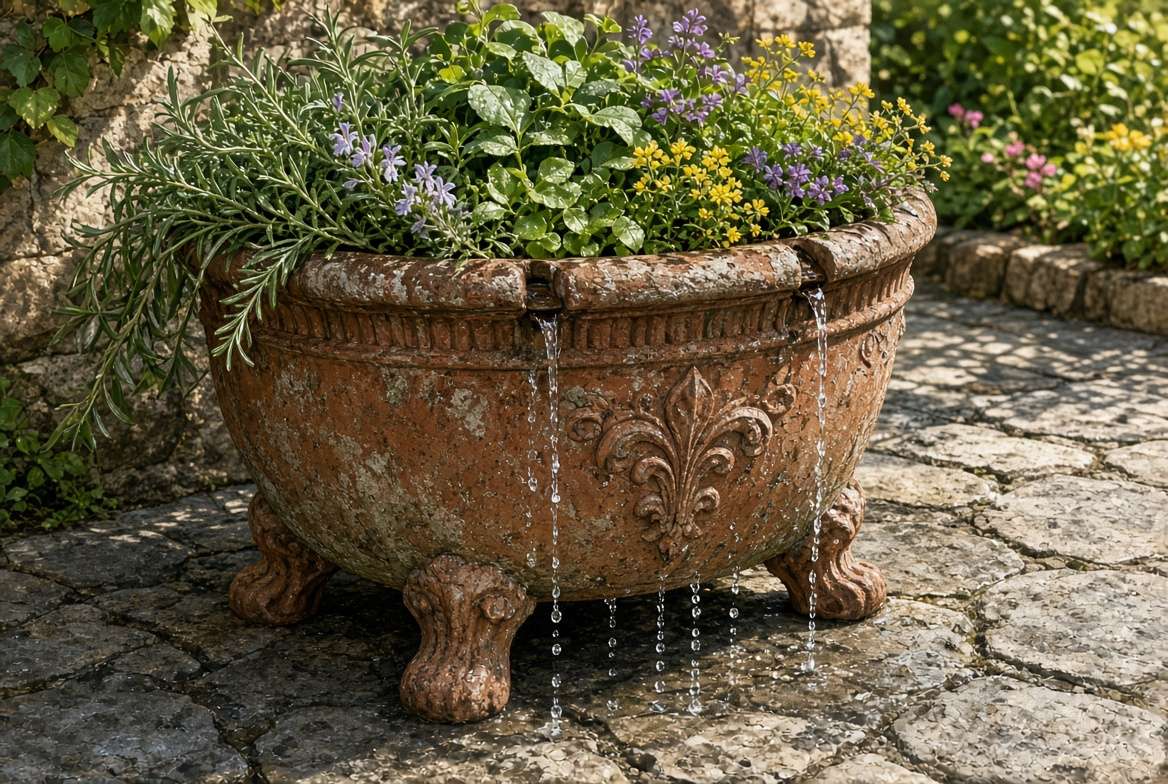
Side vs. Bottom Drainage: Side-drainage holes (drilled about half an inch up from the bottom edge) are exceptional for large outdoor pots sitting on flat patios, as they guarantee water can escape even if the bottom of the pot is sitting completely flush against the concrete.
Step 2: Elevating the Container (The Crucial Step) 🧱
Even with massive drainage holes, a heavy pot sitting flat on a smooth deck or patio will create a vacuum seal. Water won’t drain, and the bottom layer of soil will stay permanently waterlogged.
-
Pot Feet: Always elevate large containers. You can buy decorative terracotta “pot feet,” or use simple cedar shims, heavy-duty casters (which also make moving heavy plants a breeze!), or rubber risers.
-
Air Pruning: Elevating the pot allows for airflow underneath. When roots reach the drainage holes and hit dry air, the tips naturally die back (a process called “air pruning”). This prevents roots from circling the bottom of the pot and choking themselves.
Step 3: Crafting the Perfect High-Porosity Soil Recipe 🌱
Standard, out-of-the-bag potting soil is formulated for small plants and retains far too much moisture for large containers. To combat the weight and compaction issues discussed earlier, you need to build a structural, well-draining soil mix.
The “5-1-1” or Chunky Soil Base Recipe: Instead of relying solely on peat moss or coco coir, you need chunky amendments that refuse to break down quickly.
-
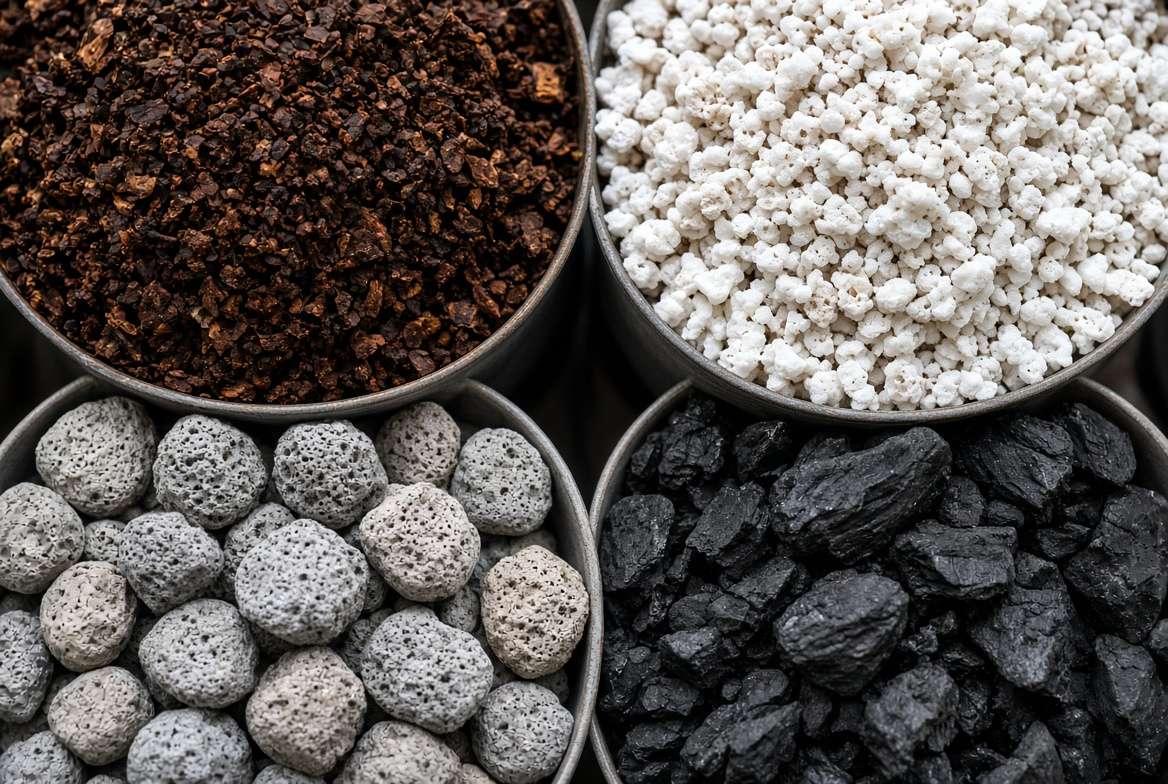
Pine Bark Fines (Orchid Bark): The secret weapon. Adding small pieces of bark provides structure and air pockets that last for years.
-
Coarse Perlite or Pumice: These volcanic rocks introduce permanent macro-pores into the soil, allowing water to flush through rapidly.
-
Horticultural Charcoal (Biochar): Helps filter impurities, sweetens the soil, and provides a home for beneficial soil microbes.
An ideal mix for a large container tree might look like: 50% pine bark fines, 25% standard potting soil or compost, and 25% coarse perlite or pumice.
Step 4: Installing Drainage Screens 🕸️
With a chunky, high-porosity soil mix and large drainage holes, you run the risk of your expensive soil washing right out onto your patio every time you water.
-
The Fix: Cut a piece of fiberglass window screening or a square of permeable landscaping fabric and lay it flat across the bottom of the pot over the drainage holes. It will keep all your soil securely inside while letting water flow out effortlessly.
Advanced Solutions for Oversized and Extra-Heavy Planters 🌳
When you move into the territory of 20, 30, or even 50-gallon planters—often used for citrus trees, Japanese maples, or large privacy bamboos—standard methods sometimes aren’t enough. These containers can weigh hundreds of pounds when fully watered, making repotting or tipping them to check drainage impossible. Here are professional techniques to manage excess moisture in mammoth pots.
The Pot-in-Pot Method (Double Potting) 🪴🪴
If you have a gorgeous, heavy concrete or ceramic cachepot (a decorative outer pot), don’t plant directly into it. Instead, use the pot-in-pot method.
-
How it Works: Plant your tree in a sturdy, lightweight plastic nursery pot that fits snugly inside the decorative cachepot. Ensure the inner plastic pot has aggressive drainage holes.
-
The Benefit: You can easily lift the inner pot out to check on root health, flush the soil, or trim circling roots. To manage water runoff, place a thick layer of coarse bricks at the very bottom of the outer cachepot so the inner pot is elevated above any pooled water.
Embracing Fabric Smart Pots 🧵
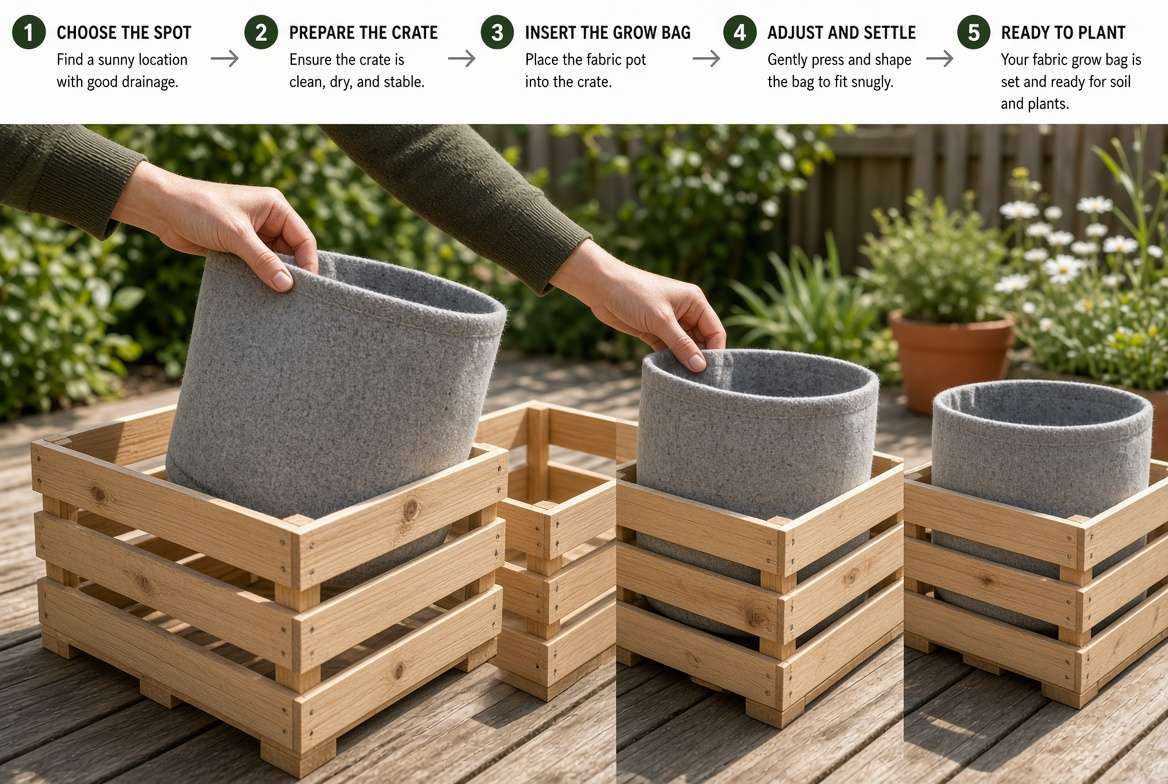
For the absolute best drainage and root health, ditch solid walls entirely and use fabric grow bags (smart pots).
-
The Magic of Fabric: Grow bags are made of porous geotextile fabric. Water drains freely not just from the bottom, but from the entire surface area of the pot. Furthermore, as moisture evaporates from the sides, it cools the root zone during scorching summer months.
-
Design Hack: You can place a fabric grow bag inside a large decorative wooden crate or wicker basket, marrying supreme root aeration with high-end aesthetic appeal.
Creating a Wicking System 🧽
Remember the dreaded perched water table? You can actively pull water out of that bottom layer using a simple physics trick: capillary wicking.
-
The Setup: Before filling your pot with soil, thread a long piece of synthetic nylon rope (do not use cotton, as it will rot) through one of the bottom drainage holes. Let a few inches dangle out of the bottom, and bury the rest in the bottom few inches of the potting mix.
-
The Result: The nylon acts like a wick, aggressively pulling excess moisture out of the saturated bottom layer of soil and dripping it away outside the pot. This drastically reduces the size of the perched water table and increases oxygen availability.
Proactive Maintenance: Keeping Drainage Flowing Year-Round 🗓️
Setting up your large container correctly is only half the battle. Soil breaks down over time, and regular maintenance is required to ensure your drainage remains swift and efficient.
Flushing the Soil to Prevent Mineral Buildup 🚿
When you water potted plants, especially if you use synthetic liquid fertilizers or hard tap water, salts and minerals accumulate in the soil. Over time, these mineral salts can bind soil particles together, destroying the macro-pores and crusting the soil surface, which repels water.
-
The Flush: Once every two to three months during the growing season, flush your large containers. Water the plant deeply until water pours out of the bottom, wait ten minutes, and do it again. This pushes accumulated salts out of the root zone and keeps the soil structure loose.
Monitoring Soil Compaction and Aerating 🌬️
As organic matter (like compost and peat) decomposes, it turns to sludge, settling at the bottom of the pot and clogging your drainage holes.
-
Gentle Aeration: Take a long wooden dowel, a chopstick, or a specialized metal soil probe, and gently poke vertical holes down into the soil, stopping just before you hit the bottom. Wiggle the dowel slightly to create air channels. This physically breaks up compacted zones, allows oxygen to reach deep roots, and helps water penetrate evenly rather than running down the sides of the pot.
Diagnostic Guide: Signs Your Large Container Plant is Drowning 🥀
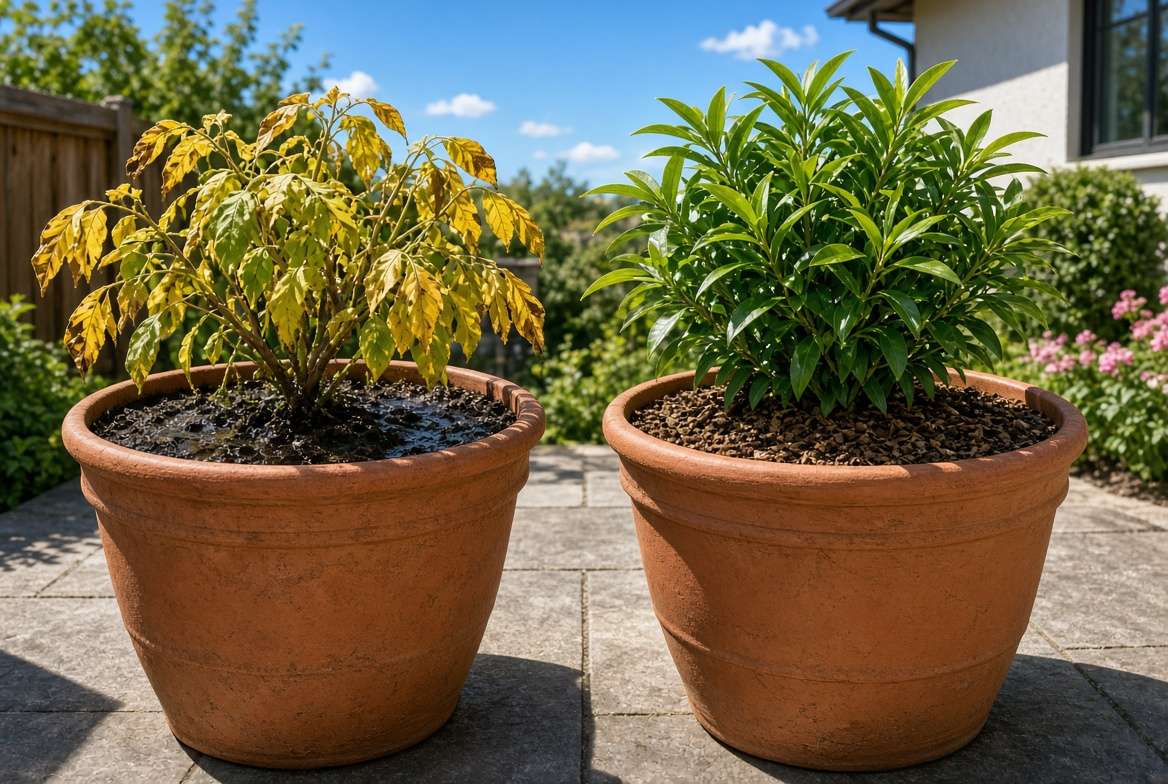
Even with the best intentions, things can go wrong. Recognizing the early symptoms of root rot versus under-watering is crucial, as the two often look identical to the untrained eye. Because a rotting root system can no longer uptake water, the plant will look dehydrated even when sitting in mud.
Early Warning Signs ⚠️
-
Chlorosis (Yellowing Leaves): The lowest leaves turn yellow and drop off while remaining slightly plump (unlike the crispy, dry yellow leaves of an under-watered plant).
-
Drooping Despite Wet Soil: If your plant looks wilted, but you stick your finger two inches into the soil and it feels damp, stop watering immediately.
-
Fungus Gnats: A sudden swarm of tiny black flies buzzing around the soil surface is a clear indicator that the top layer of soil is staying too wet for too long, signaling poor overall drainage.
Late-Stage Symptoms 🚨
-
The Smell Test: If you sniff the drainage holes or the soil surface and detect a sour, swampy, or rotten egg (sulfurous) smell, anaerobic bacteria have taken over. Root rot is actively destroying the plant.
-
Mushy Base: The trunk or stem right at the soil line becomes soft, dark, or squishy.
Emergency Triage: Can You Save It? 🚑
If root rot has set in, you must act fast.
-
Unpot the Plant: Lay the heavy container on its side and gently slide the root ball out.
-
Trim the Rot: Healthy roots are firm and white or tan. Rotted roots are dark brown, slimy, and easily pull away, leaving a hair-like thread behind. Sterilize pruning shears and cut away all the mushy roots.
-
The Hydrogen Peroxide Drench: Mix 1 part 3% hydrogen peroxide with 2 parts water and spray the remaining healthy roots. This kills fungal spores and infuses the root zone with a blast of oxygen.
-
Repot: Repot into a fresh, dry, chunky soil mix using the 5-1-1 recipe mentioned earlier.
Frequently Asked Questions (FAQs) ❓
To ensure you have all the expert knowledge at your fingertips, let’s answer some of the most common questions about managing drainage in large planters.
Q: Can I use packing peanuts for drainage to make the large pot lighter? A: No. While it makes the pot lighter, standard packing peanuts decompose and release toxic chemicals into the soil. Even environmentally friendly starch peanuts will quickly melt into a glue-like sludge, completely blocking your drainage holes. Use the chunky soil mix (perlite/pumice) instead to keep weight down safely.
Q: How many drainage holes does a 20-gallon pot really need? A: Aim for at least 4 to 6 holes that are roughly 1 inch in diameter. If your pot only has one central hole, use a masonry or plastic drill bit to carefully add more around the perimeter.
Q: What is the best potting mix for large outdoor fruit trees, like lemons or figs? A: Fruit trees need excellent drainage but also stability so they don’t blow over in the wind. A mix of 40% pine bark fines, 30% coarse sand or pumice, 20% compost, and 10% perlite provides the perfect balance of weight, nutrient retention, and aggressive drainage.
Conclusion & Next Steps 🏁
Managing drainage in large containers is less about watering frequency and entirely about physics, soil structure, and preparation. By abandoning the harmful “gravel at the bottom” myth, elevating your heavy pots to ensure airflow, and crafting a chunky, highly porous soil mix, you create an environment where roots can breathe, expand, and thrive.
When you get the drainage right, growing large trees and specimen plants in containers transforms from a stressful guessing game into an incredibly rewarding gardening experience.
What’s your current large container setup? Have you struggled with heavy, waterlogged pots in the past? Let us know in the comments below, and don’t forget to check out our complete guide on [Insert Link to Your Relevant Article: e.g., Best Fertilizer Practices for Potted Trees] to keep your freshly repotted plants growing strong! 🌱✨











