

Mint is the undisputed king of kitchen herbs. It is invigorating, hardy, fiercely resilient, and absolutely delicious. However, if you plant it directly into the ground, it quickly turns from a charming herb into an unstoppable lawn conqueror. This aggressive spreading is exactly why mastering mint propagation in containers is one of the most valuable skills you can learn as a home gardener.
Container propagation gives you an unlimited supply of fresh leaves for mojitos, teas, and culinary garnishes, all while maintaining 100% control over its notorious root runners. I’ve spent years trialing various Mentha species—from classic Peppermint and Spearmint to novelty varieties like Chocolate and Pineapple mint—and I can confidently say that confining them to pots is the only way to garden with peace of mind.
In this comprehensive guide, we will dive deep into the science and practice of multiplying your mint plants safely. You will master three proven propagation methods tested for maximum root vigor, learn the exact soil and container formulas to avoid root rot, and discover professional harvesting tricks that stimulate lush, bushy growth instead of weak, leggy stems. Let’s get our hands dirty! 🌿
2. Why Containers Are Non-Negotiable for Mint Growers 🛡️🌱
Before we take our first cutting, we must understand the beast we are dealing with. Why is planting mint in the ground such a universal gardening faux pas?
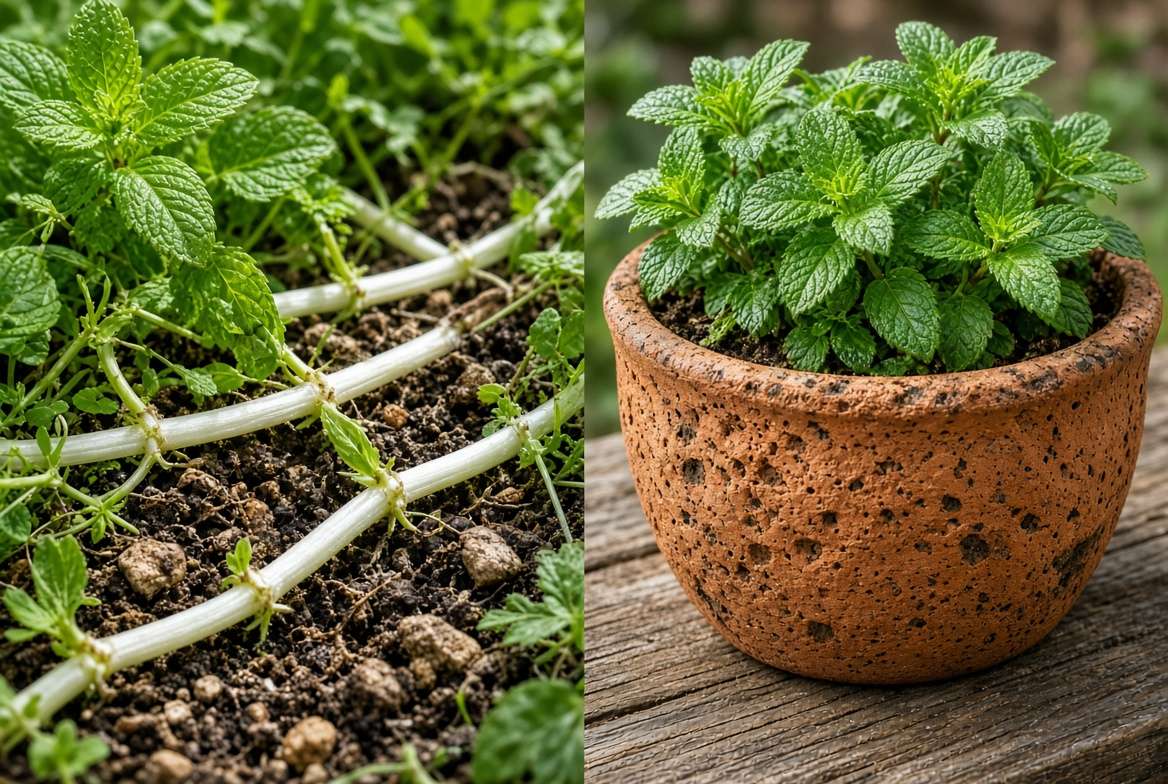
The Invasive Nature of Underground Stolons
Mint does not just grow up; it grows out. The plant spreads via underground stems called rhizomes (or stolons). These thick, white runners travel horizontally just below the soil surface, shooting up new plants at regular intervals. A single mint plant can send runners several feet away in a single season, easily choking out neighboring delicate herbs, vegetables, and even grass. By utilizing pots, you create an impenetrable physical barrier that traps these stolons, keeping your garden ecosystem balanced.
Microclimate Control in Pots
Growing herbs in pots allows for ultimate environmental control. Mint thrives in consistently moist soil, but it detests “wet feet” (waterlogged roots). When you grow mint in containers, you can perfectly tailor the drainage, adjust the soil aeration, and easily move the plant to chase the spring sun or protect it from blistering summer heat. Furthermore, container growing allows for seamless seasonal overwintering adjustments, easily moving your beloved herbs indoors when the frost hits.
Variety Isolation
If you are a culinary enthusiast, you likely want to grow multiple types of mint. However, if you plant Peppermint and Spearmint in the same garden bed, their aggressive root systems will tangle. Worse, if they flower, they can cross-pollinate, leading to muddy, hybridized flavors. Keeping each variety in its own dedicated container ensures flavor purity and prevents one aggressive variety from outcompeting the others.
3. Step-by-Step: 3 Foolproof Methods for Mint Propagation in Containers ✂️🧪
Mint is incredibly eager to grow, making it the perfect candidate for home propagation. Whether you are working with a store-bought grocery bundle or pruning an existing mother plant, here are the three most effective methods.
Method 1: Water Propagation from Stem Cuttings (Best for Beginners) 💧
This is the most visually satisfying method, allowing you to watch the root system develop day by day.
-
Selecting the Right Stem: Look for a healthy, robust, green stem that is semi-firm. Avoid woody, brown stems at the base of the plant, as these take much longer to root. Ensure the stem is not currently flowering; flowering redirects the plant’s energy away from root production.
-
The Cut: Using sterilized pruning snips or a sharp knife, cut a 4 to 6-inch stem segment. Make the cut at a crisp 45-degree angle just below a “node” (the small bump where leaves emerge). The node contains high concentrations of meristematic tissue, which is actively dividing and ready to push out new roots.
-
Node Prep: Strip the leaves from the bottom two inches of the stem. You never want foliage submerged in water, as it will rot, introducing harmful bacteria to your cutting.
-
Vessel & Water Quality: Place the stripped end of the cutting into a clean glass jar or propagation tube. Fill it with room-temperature water. If your tap water is heavily chlorinated, let it sit out for 24 hours first, or use filtered water. Place the jar in a bright location that receives indirect sunlight. Direct, hot sun will cook the tender cuttings.
-
Maintenance & Root Milestones: Change the water every 48 hours to replenish oxygen and prevent stagnation. Within 5 to 7 days, you will notice tiny white root nodules emerging from the submerged nodes. Once these roots reach 1 to 2 inches long (usually around day 14), they are ready to be potted into soil.

Method 2: Direct Soil Cuttings (Fastest Root-to-Soil Transition) 🪴
While water propagation is fun to watch, rooting directly in soil skips the risky transition phase where “water roots” have to adapt to a soil environment.
-
Prep the Cutting: Prepare a 4 to 6-inch cutting exactly as described in the water method.
-
Rooting Hormone (Optional): Mint is so vigorous that rooting hormone powder is rarely strictly necessary. However, dipping the cut end into a natural rooting hormone or even a dash of cinnamon (a natural antifungal) can accelerate the process and protect against pathogens.
-
Pre-Moistening the Mix: Fill a small nursery pot with a light, well-draining seed-starting mix. Water it thoroughly before planting.
-
Planting: Use a pencil or chopstick to poke a hole into the damp soil. Gently slide the mint stem into the hole, ensuring at least one bare node is buried. Firm the soil around the stem to ensure good contact. Do not simply shove the soft stem into the dirt, as this can crush the delicate tissue.
-
The Humidity Dome Trick: Mint cuttings lose moisture through their leaves faster than they can absorb it without roots. To prevent wilting, place a clear plastic bag over the pot, or use a repurposed clear plastic bottle with the bottom cut off. This creates a mini-greenhouse. Remove the dome for 15 minutes a day to allow for fresh air exchange, and keep the soil lightly moist. Roots should establish in about two weeks.
Method 3: Root Division & Runner Layering (Instant Bushy Plants) 🌾
If you already have an established, overgrown container of mint, division is the fastest way to multiply your yield.
-
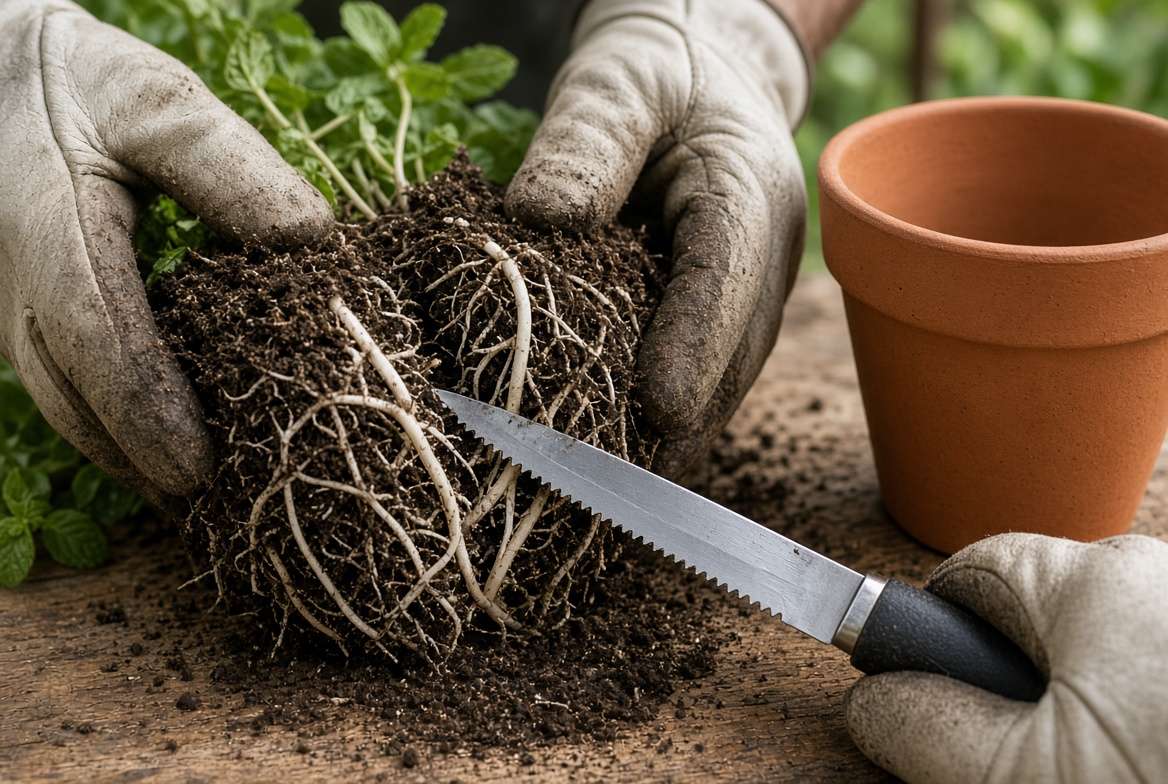
Dividing an Existing Root Ball: In early spring or late autumn, gently slide the root-bound mint out of its container. You will see a dense, tangled mat of roots and runners. Using a sterilized, serrated garden knife, slice the root ball directly in half, or into quarters depending on its size. Ensure each section has healthy roots and upward-facing green shoots. Replant each division into its own fresh container.
-
Layering Stems (Stolon Pinning): This is a brilliantly lazy way to propagate. If your potted mint has a long, leafy runner dangling over the edge, simply place a second small pot filled with soil next to it. Bend the runner down so a node touches the soil of the new pot. Pin it in place using a bent paperclip or floral pin. Keep the soil in the new pot moist. The runner will root into the new pot while still drawing nutrients from the mother plant. Once heavily rooted (about 3 weeks), snip the “umbilical cord” stem connecting the two pots.
4. Anatomy of the Perfect Mint Container Setup 🏺🪴
Mint is remarkably adaptable, but providing the ideal physical environment guarantees a lush, continuous harvest and prevents diseases like root rot or powdery mildew.
The Ideal Container Specifications
Not all pots are created equal when it comes to herb gardening.
-
Material Selection: Terracotta clay pots are highly breathable, wicking away excess moisture from the soil. This is excellent for heavy-handed waterers, but it means you must water more frequently in mid-summer. Glazed ceramic or heavy-duty plastic pots retain moisture much better, making them ideal for mint’s water-loving nature, provided you manage your watering schedule properly.
-
Pot Dimensions: Because mint roots grow horizontally rather than putting down deep taproots, choose a container that is wide and shallow. A pot that is 8 to 12 inches wide and 6 to 8 inches deep is the perfect playground for mint runners.
-
Drainage Checklist: This is non-negotiable. Never plant mint in a decorative cachepot that lacks bottom drainage holes. Trapped water displaces oxygen in the soil, rapidly suffocating the roots.

The Custom Soil Blend Recipe
Do not use standard, heavy garden dirt from your yard. It will compact in a pot and strangle the roots. Mint thrives in a rich, loamy, well-draining environment.
The Ultimate Mint Potting Formula:
-
60% High-quality peat moss or coco-coir base: Provides essential moisture retention and a light, fluffy structure.
-
25% Perlite or coarse horticultural sand: Essential for breaking up the soil and ensuring rapid water drainage and oxygen flow.
-
15% Screened aged compost or worm castings: Provides a gentle, slow-release source of organic nitrogen, which is exactly what leafy green herbs need to produce foliage.
Mint prefers a slightly acidic to neutral soil pH ranging between 6.0 and 7.0. This mix naturally falls right into that sweet spot, ensuring optimal nutrient absorption.
5. Transitioning & Caring for Newly Propagated Mint in Pots ☀️💧
Once your cuttings have roots, the critical transitional phase begins. Proper aftercare determines whether your new plants thrive or collapse.
Hardening Off & Acclimation
If you rooted your cuttings in a glass of water, those roots are accustomed to a frictionless, 100% aquatic environment. When moved into dense soil, they experience transplant shock. To minimize this, keep the soil consistently wet (like a squeezed-out sponge) for the first week, slowly tapering off the watering frequency as the roots toughen up. Furthermore, do not immediately thrust a newly potted cutting into blazing afternoon sun. Start them in bright, indirect shade and gradually expose them to morning sunlight over the course of 7 to 10 days.
The Golden Rules of Watering Container Mint
Mint demands a delicate balance: it loves hydration but despises mud.
-
The “Top-Inch” Test: Instead of watering on a strict calendar schedule, stick your index finger one inch into the soil. If it feels dry to the touch, it is time to water deeply until moisture trickles out the drainage holes. If it still feels moist, wait another day.
-
Beware the Saucer: If you keep a saucer under your pot to catch drips, empty it 20 minutes after watering. Letting the pot sit in a puddle causes the soil to act like a wick, pulling water back up and drowning the lower root system.

Pruning for Bushy Growth (The “Pinch” Technique)
Left to its own devices, mint will grow straight up, becoming tall, weak, and “leggy.” To force the plant to grow into a dense, bushy mound, you must override its apical dominance.
-
The Pinch: Once your new mint plant is about 4 to 6 inches tall and has several sets of true leaves, pinch or snip off the very top terminal cluster of leaves. This signals the plant to stop growing vertically and start pushing energy into lateral (side) branches.
-
Flower Prevention: In mid-to-late summer, mint will attempt to send up spikes of purple or white flowers. While pretty, blooming causes the plant’s essential oils to turn bitter and woody. Snip off flower buds the absolute second you see them form to preserve that sweet, aromatic culinary flavor.
6. Troubleshooting Common Mint Propagation Mistakes 🚨🔍
Even experts face setbacks. Here is how to diagnose and fix the most common propagation pitfalls.
-
Problem 1: Blackening / Rotting Stems in Water
-
Cause: Foliage was left submerged beneath the water line, or the water became stagnant and bacteria-laden.
-
Fix: Always strip the lower leaves. Change the water every 2 days, and ensure you use sterilized shears to make clean, uncrushed cuts.
-
-
Problem 2: Leggy, Weak Stems with Pale Leaves
-
Cause: Insufficient light. The plant is stretching in a desperate attempt to find the sun.
-
Fix: Mint needs 4 to 6 hours of sunlight. Move the container to a south or east-facing window, or supplement with a full-spectrum LED grow light.
-
-
Problem 3: Sudden Wilting After Potting Up
-
Cause: Severe transplant shock. The delicate water-roots dried out in the new potting mix.
-
Fix: Give the plant a deep soaking immediately, and consider placing a loose plastic bag over the plant for a few days to boost ambient humidity while the roots recover.
-
-
Problem 4: Powdery Mildew on Lower Leaves
-
Cause: A fungal infection caused by high humidity, wet leaves, and poor air circulation.
-
Fix: Space your herb containers 6 to 8 inches apart. Always water at the soil line (base of the plant) rather than overhead to keep the foliage dry. Remove and destroy heavily infected leaves.
-
7. Comparison Table: Water Propagation vs. Soil Cuttings vs. Root Division 📊
To help you choose the best route for your specific gardening situation, refer to this quick comparison matrix:
8. Expert Tips for Overwintering Container Mint ❄️🏡
Mint is a perennial powerhouse. In colder hardiness zones, it will naturally die back to the soil line during freezing winters and re-emerge in the spring. However, container soil freezes much faster and harder than ground soil, putting the roots at higher risk.
-
The Big Chop: Right before the first hard frost of the autumn, aggressively cut back your mint foliage, leaving just 2 to 3 inches of stem above the soil line.
-
Sheltering the Pot: Move the container into a protected, unheated space like a garage, enclosed porch, or cold frame. The goal is to keep the roots dormant but protect them from the severe freeze-thaw cycles that can crack pots and kill tissue. Water very sparingly—perhaps once a month—just to keep the soil from turning to dust.
-
Indoor Winter Harvesting: Alternatively, bring a smaller pot indoors and place it on your sunniest south-facing windowsill. It will grow much slower during the short winter days, but it will survive to provide a modest winter harvest.
-
Spring Rejuvenation: When the danger of frost has passed in the spring, move the pots back outside. Top-dress the container with an inch of fresh, rich compost to inject a dose of nitrogen, water deeply, and watch the vigorous new growth explode.
9. Frequently Asked Questions 💬❓
Q: How long does it take for mint cuttings to root in containers? A: When placed in water, cuttings usually show signs of root nodules within 5 to 7 days, with fully plantable roots developing in about two weeks. Soil cuttings take slightly longer to establish visually, usually showing strong resistance to a gentle “tug test” at around 14 to 21 days.
Q: Can I propagate store-bought grocery mint stems? A: Absolutely! As long as the stems are fresh, green, and have not been severely refrigerated or bruised. Simply trim a fresh quarter-inch off the bottom of the stem to open up the vascular tissue, strip the lower leaves, and pop them into water.
Q: How many mint cuttings should I plant in one 10-inch pot? A: You can comfortably plant 3 to 4 rooted cuttings in a 10-inch pot. Mint fills out space rapidly. Planting them a few inches apart gives you an instantly fuller-looking pot without causing immediate overcrowding.
Q: Why is my potted mint losing its strong aroma and flavor? A: A loss of essential oils is usually caused by two things: lack of sunlight or flowering. Mint requires adequate sun to produce its aromatic oils. Furthermore, if the plant shifts its energy into producing blooms, the foliage flavor drops drastically. Ensure proper light and prune away buds!
Q: Do I need rooting hormone powder for mint propagation? A: No, mint is one of the easiest and most aggressive rooters in the botanical world. While rooting hormone can marginally speed up the process for soil cuttings, it is completely unnecessary for successful water propagation.
10. Conclusion & Green Thumb Takeaways 🌿💚
Mastering mint propagation in containers is a rite of passage for every herb gardener. By utilizing the simple techniques of cutting, rooting, and containing, you unlock an endless supply of one of the kitchen’s most versatile herbs, all without sacrificing your lawn to underground runners.
Remember the golden rules: prioritize healthy, non-woody stems, provide bright but indirect light during the fragile rooting phase, and invest in a well-draining, nutrient-rich potting mix. Don’t be afraid to prune aggressively—mint thrives on it!
Grab your pruning shears, pick out a beautiful terracotta pot, and start multiplying your herb collection today. Your future self (and your summer iced teas) will thank you. Happy propagating! 🌱✨











