

We have all been there. You are doing your weekly plant check, admiring your beautiful indoor jungle, when your stomach suddenly drops. Your prized Echeveria, Jade plant, or Aloe vera is suddenly marred by mysterious, dark blemishes. Panic sets in. Are they dying? Is it contagious?
If you are frantically searching for the best methods for treating black spots on succulent leaves, take a deep breath. You are in exactly the right place.
As a dedicated plant care specialist who has rescued, propagated, and rehabilitated hundreds of succulents over the years, I know exactly how disheartening this looks. But here is the good news: while black spots are undeniably a plant’s distress signal, they are rarely an immediate death sentence. Succulents are incredibly resilient survivors. If you catch the symptoms early, you can completely halt the damage.
In this comprehensive guide, we are going to dive deep into exactly what is happening to your plant. We will cover how to accurately diagnose the root cause, the exact step-by-step protocols to cure your succulent, and expert prevention strategies to ensure your desert beauties stay pristine and healthy for years to come. Grab your pruning shears and a magnifying glass—let’s save your plant! 🪴✨
Step 1: Diagnose the Problem – Why Are There Black Spots on My Succulent? 🔍
Before you can fix the problem, you need to know exactly what you are fighting. Treating a fungal infection with pest control methods won’t just fail; it might actually stress your plant further. The key to successful succulent care is accurate observation. Here are the five most common culprits behind those unsightly black marks.
Overwatering and Edema (The #1 Culprit) 💧
If I had to guess why your succulent is struggling, I would put my money on overwatering. Succulents are native to arid environments; their fleshy leaves are designed to stockpile water for long droughts.
When you water a succulent too frequently, or if it sits in heavy, moisture-retaining soil without proper drainage, the roots absorb water much faster than the leaves can transpire (breathe) it out. This intense internal water pressure causes the plant’s cell walls to stretch until they literally burst.
-
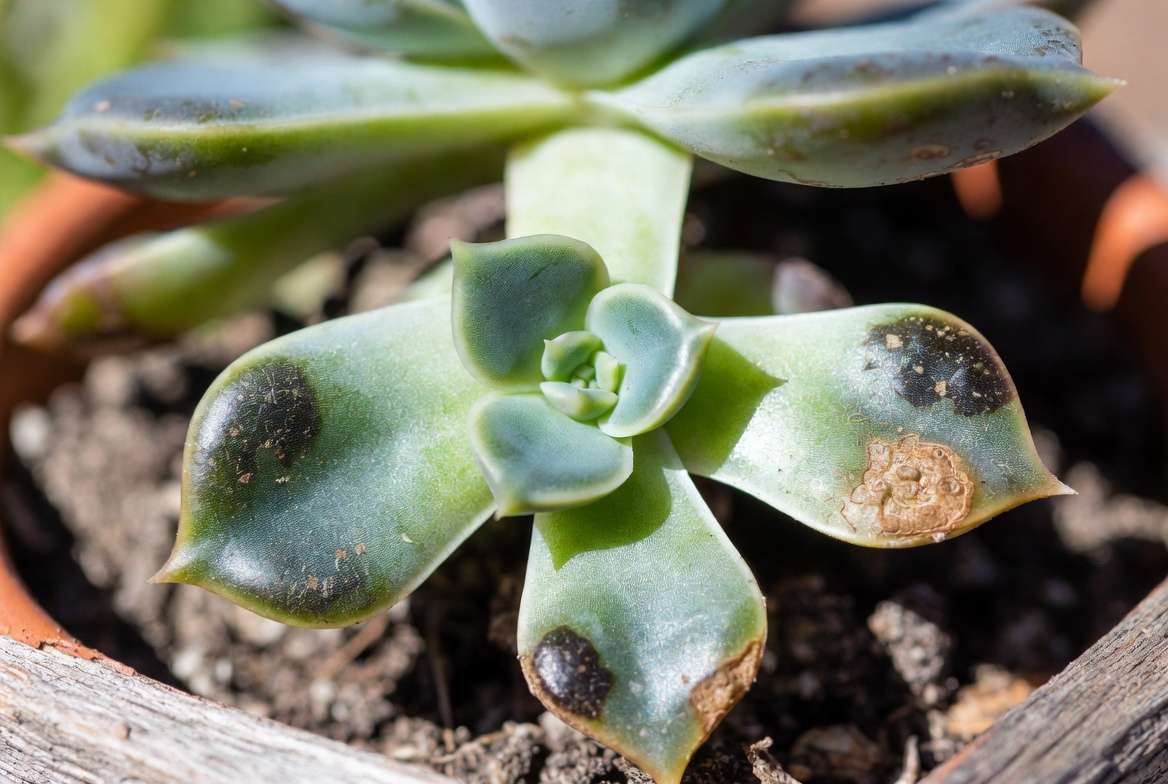
The Symptoms: When the ruptured cells heal, they form corky, scab-like brown or black spots on the leaves, most commonly on the undersides.
-
The Danger: While edema itself is just cosmetic scarring, it is a glaring red flag that your plant is drowning. If left unchecked, chronic overwatering leads to deadly root rot, which will turn the entire stem black and mushy.
Fungal and Bacterial Infections 🦠
Fungi and bacteria thrive in damp, stagnant environments—the exact opposite of what succulents need. If your plants are crowded together, misted with water, or living in a highly humid room without airflow, they are prime targets for pathogens.
-
Anthracnose & Leaf Spot: These fungal diseases manifest as distinct black, dark brown, or reddish spots that slowly expand. The spots may look sunken, wet, or have a yellow halo around them.
-
Sooty Mold: If the black spots look like a layer of dark ash or powder sitting on top of the leaf, you are likely dealing with sooty mold. This fungus doesn’t actually eat the plant; instead, it grows on “honeydew”—the sticky, sweet excrement left behind by sap-sucking pests.
Sneaky Pest Infestations 🐛
Speaking of pests, bugs are another major cause of leaf discoloration. While succulents are generally pest-resistant, a stressed plant is a vulnerable plant.
-
Spider Mites: These microscopic arachnids suck the sap right out of the plant cells. Their damage often looks like tiny, clustered black or brown pinpricks on the foliage, accompanied by faint webbing.
-
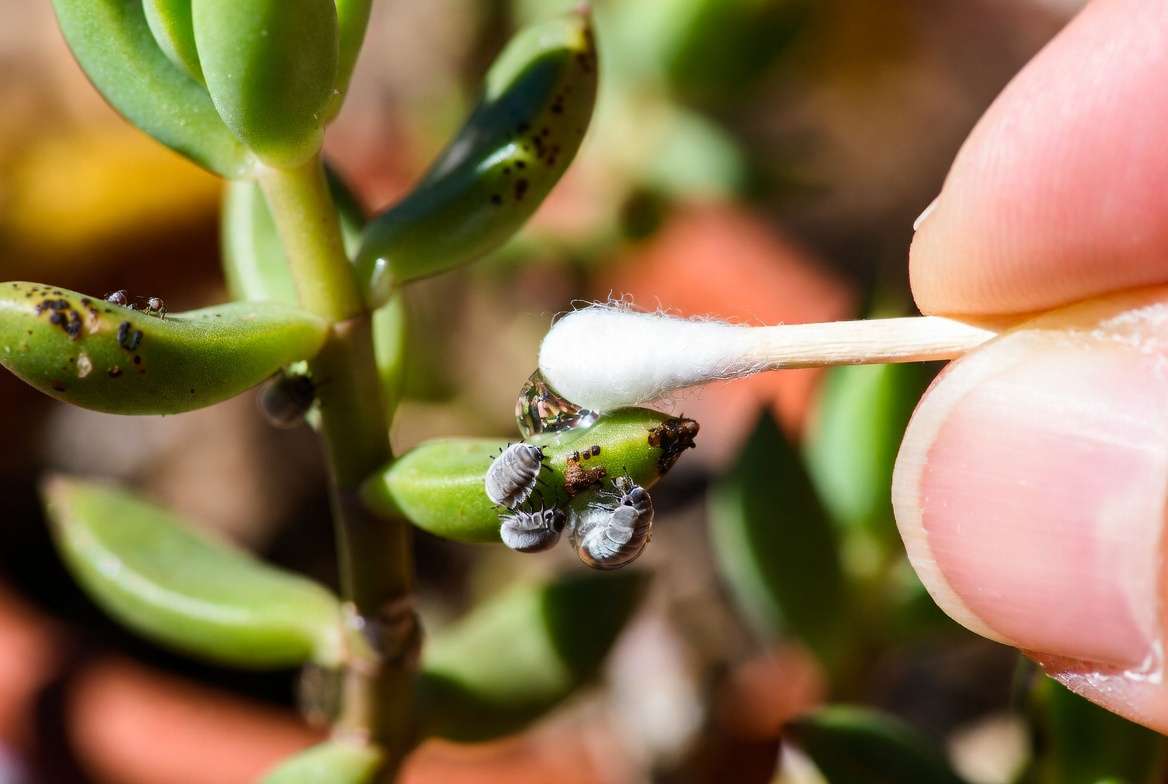
Aphids and Mealybugs: While mealybugs look like white cotton, the damage they leave behind, combined with the secondary sooty mold that grows on their honeydew, can result in black patches.
Sunburn or Thermal Stress ☀️
It is a common misconception that all succulents want to be baked in the scorching sun all day. While they love bright light, sudden exposure to harsh, direct sunlight—especially hot afternoon rays—can severely burn them.
-
The Symptoms: Sunburn usually presents as large, dry, black, brown, or white scorched patches on the leaves that are directly facing the light source. Unlike fungal spots, sunburn patches will feel dry and crispy, not soft or mushy. If you recently moved your indoor plant outside without acclimating it, sunburn is likely your culprit.
Chemical Burns (The Over-treatment Trap) 🧪
Sometimes, in our desperation to save our plants, we accidentally harm them. Applying strong insecticidal soaps, neem oil, or even DIY rubbing alcohol sprays during the heat of the day can trigger phototoxicity.
-
The Reaction: The chemical reacts with the intense sunlight, essentially deep-frying the plant’s epidermal layer. This results in severe black chemical burns. Always apply treatments in the evening to give the plant time to dry before the sun rises!
The Action Plan: Treating Black Spots on Succulent Leaves (Step-by-Step) 🛠️
Now that we have identified the enemy, it is time to take decisive action. Put on your plant-doctor gloves. Here is the step-by-step triage protocol to stop the spread and treat your succulent safely.
Immediate Action: Quarantine the Patient 🛑
The very first thing you must do when you notice black spots—especially if you suspect fungi or pests—is to isolate the plant. Move the affected succulent into a separate room, away from your other indoor plants. Fungal spores can travel easily on a gentle breeze, and spider mites love to hitch a ride on neighboring foliage. A strict quarantine protects the rest of your urban jungle from an outbreak.
Surgical Removal: Pruning the Damaged Foliage ✂️
I know it hurts to cut your plant, but if the black spots are caused by a fungal or bacterial infection, those leaves are highly contagious. Furthermore, black spots are permanent; a damaged succulent leaf will never turn green again.
-
Sterilize: Wipe down a pair of sharp pruning shears or scissors with 70% isopropyl alcohol. You must ensure your tools are pristine so you don’t introduce new bacteria into the open wounds.
-
Snip: Carefully cut off the most severely infected leaves as close to the main stem as possible.
-
Dispose: Do not put these diseased leaves in your compost bin! Throw them straight into the garbage to prevent spores from spreading.
-
Re-sterilize: Wipe your blades down again after you finish.
Targeted Treatments Based on the Cause 🎯
With the heavily damaged foliage removed, it is time to treat the root cause to ensure the black spots do not spread to the healthy new growth.
Treatment A: Banishing Fungal Infections 🍄
If your diagnosis pointed to Anthracnose, leaf spot, or sooty mold, you need an antifungal intervention.
-
Keep it Dry: Fungi require moisture to survive. Immediately stop misting the plant and ensure no water sits in the rosette or on the leaves when you water.
-
Apply a Fungicide:
-
Commercial Option: A liquid copper-based fungicide is highly effective against a broad spectrum of succulent diseases. Spray the plant thoroughly, following the manufacturer’s dilution instructions carefully.
-
Natural/DIY Option: If you prefer natural remedies, mix 1 tablespoon of baking soda and half a teaspoon of mild liquid dish soap (like Dawn) into a gallon of water. Spray the affected areas. The baking soda changes the pH of the leaf surface, making it inhospitable for fungal spores.
-
-
Repeat: Fungal infections are stubborn. You will likely need to reapply your chosen treatment every 7-10 days until you are certain no new black spots are forming.
Treatment B: Eradicating Pests 🕷️
If bugs are biting your succulent and causing dark necrotic spots, a swift eviction notice is required.
-
The Alcohol Swab (Best for Mealybugs & Aphids): Dip a cotton swab or Q-tip in 70% isopropyl alcohol and gently dab it directly onto the visible pests. The alcohol dissolves their protective outer coating, killing them instantly upon contact.
-
The Insecticidal Spray (Best for Spider Mites): For larger infestations, you can use a commercial insecticidal soap or a diluted Neem oil spray.
-
Crucial Warning: Many succulents (like Echeverias and Graptopetalums) have a powdery, waxy coating on their leaves called farina. This acts as natural sunscreen and waterproofer. Oils and heavy soaps will melt this farina off, permanently changing the look of the leaf and making it vulnerable to sunburn. Always spot-test a single leaf first!
-
-
Schedule: Pests hatch in cycles. Treat the plant every 5-7 days for about a month to ensure you catch any newly hatched generations.
Treatment C: Root Rot Intervention (The Ultimate Rescue) 🚑
If the black spots are accompanied by yellowing, translucent, or mushy leaves that fall off at the slightest touch, you are dealing with severe overwatering and impending root rot. This requires emergency surgery.
-
Unpot: Gently pull the succulent out of its pot and massage the old, soggy soil away from the roots.
-
Inspect: Healthy roots are firm and white or light tan. Rotted roots will be black, slimy, and smell distinctly like a swamp.
-
Amputate: Take your sterilized shears and aggressively cut away all the black, mushy roots. You must remove every trace of rot, or it will continue to spread up the stem.
-
Air Dry: Leave the bare-root succulent sitting out on a dry paper towel in a shady spot for 2 to 3 days. This allows the cut roots to callous over and heal.
-
Repot: Once calloused, replant the succulent into a fresh, completely dry, gritty soil mix (we will cover the perfect soil recipe next!). Do not water it for at least a week to let the plant settle.
-
Pro Tip 💡: Remember the cardinal rule of plant medicine: Never apply oils, soaps, or chemical sprays to succulents when they are sitting in direct sunlight. The combination of intense light and topical treatments will cause severe chemical burns, adding even more black spots to your poor plant!
Long-Term Care: How to Prevent Black Spots from Returning 🛡️
Treating black spots on succulent leaves is only half the battle. To truly establish yourself as a green-thumbed expert, you must master preventative care. Succulents want to thrive, but they need an environment that mimics their harsh, dry native habitats.
Master the “Soak and Dry” Watering Method 🚿
Watering on a strict schedule (e.g., “every Sunday”) is the fastest way to kill a succulent. Plant needs fluctuate based on the season, temperature, and humidity.
Instead, use the “Soak and Dry” method. Wait until the soil is 100% bone dry all the way to the bottom of the pot. You can test this by sticking a wooden skewer deep into the soil; if it comes out completely clean and dry, it is time to water. When you do water, drench the soil completely until water pours out of the drainage holes. Then, leave it alone until it is bone dry again.
Upgrade Your Soil and Potting Situation 🪴
Your succulent is only as healthy as the soil it lives in. Standard potting soil holds onto too much moisture and will eventually suffocate desert plants.
-
The Perfect Soil Recipe: You want a mix that drains incredibly fast. A professional-grade, gritty mix consists of roughly:
-
30% Organic matter (like coconut coir or standard potting soil)
-
70% Inorganic grit (a mix of pumice, perlite, coarse poultry grit, or calcined clay).
-
-
The Pot: Your pot must have a drainage hole. Stashing a succulent in a cute mug or glass terrarium without drainage is a guaranteed recipe for edema and root rot. Terra cotta pots are excellent because the porous clay breathes, allowing excess moisture to evaporate from the sides.
Maximize Airflow and Ventilation 🌬️
Fungal spores despise moving air. If your succulents are tightly packed together on a crowded shelf, you are creating a humid microclimate. Space your pots out slightly. If they are indoors, ensure there is gentle air circulation in the room, either from an open window or a small oscillating fan.
Safe Sun Acclimation 🌤️
To prevent those crispy black sunburn patches, always acclimate new plants slowly. If you bring a succulent home from a shady nursery (or move an indoor plant to your sunny patio for the summer), do not put it in full sun immediately.
Place it in bright, indirect light first. Over the course of 10 to 14 days, gradually move it into brighter, direct sunlight for an extra hour each day. This allows the plant time to build up its internal UV defenses.
Damage Control: When Is It Too Late to Save a Succulent? 🥀
As an expert, I have to be honest with you: sometimes, despite our best efforts, a plant is too far gone.
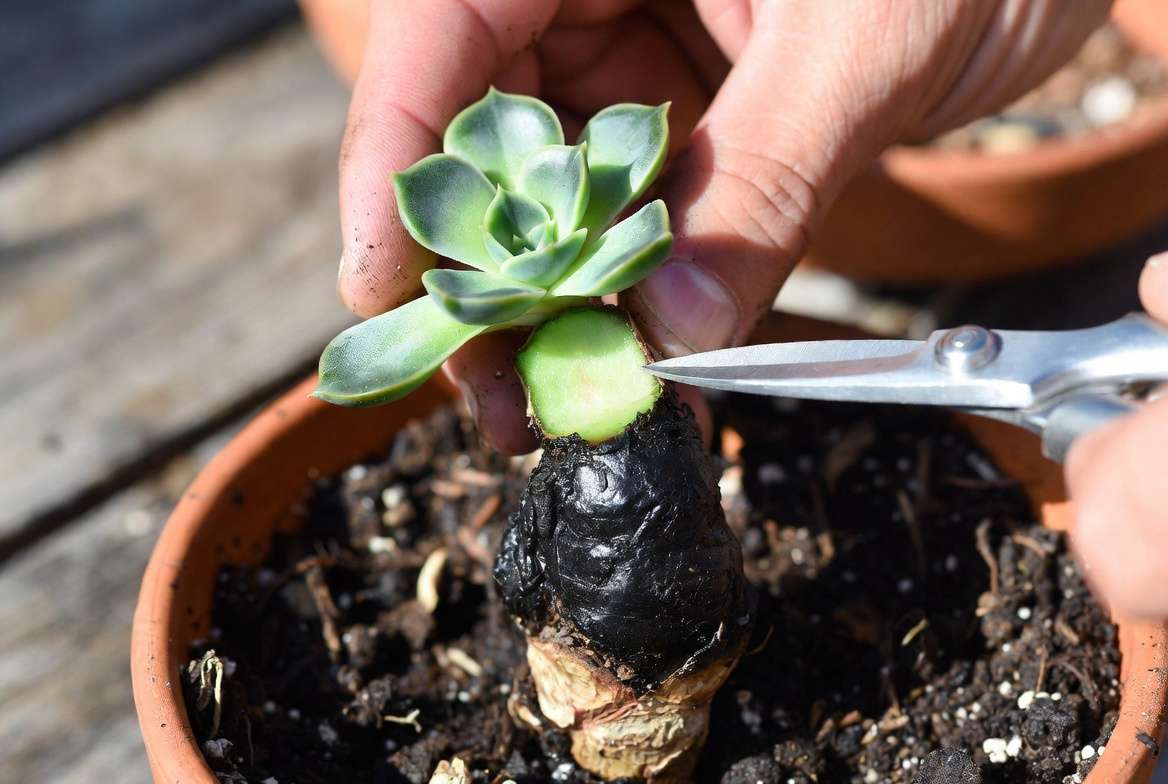
If you notice black spots on the leaves, immediately check the main stem of the plant. If the stem itself is black, squishy, and collapsing inward, the rot has become systemic. The plant’s vascular system is dead, and the main plant cannot be saved.
The Last Resort: Beheading and Leaf Propagation 🌱
But wait! Don’t throw it in the compost yet. Succulents are masters of regeneration. You can often turn a tragic failure into an exciting propagation project.
-
Beheading: If the top of the rosette is still firm, green, and healthy, use sterilized shears to cut the head completely off, ensuring you cut above the black rot. Let the fresh cut dry and callous for a few days, then stick it in dry soil. It will grow entirely new roots!
-
Leaf Propagation: If even the top rosette is compromised, gently twist off any remaining healthy, firm, green leaves. Lay them flat on top of dry soil in a bright, indirect spot. Over the next few weeks, those individual leaves will sprout tiny pink roots and grow into brand-new baby succulents.
Frequently Asked Questions (FAQs) About Succulent Black Spots 💬
When you are deep in the trenches of plant rehabilitation, you naturally have a lot of questions. As a plant care expert, these are the most common inquiries I receive from distressed plant parents who are navigating the process of treating black spots on succulent leaves.
Will the black spots ever disappear? The short answer is no. Unfortunately, plant tissue does not heal the way human skin does. Once a leaf is scarred by edema, fungus, sunburn, or pests, that black mark is permanent. However, do not let this discourage you! By successfully treating the root cause, you ensure that all the new foliage growing from the center of the rosette will be completely healthy and unblemished. Eventually, as the plant grows, the older, damaged leaves will naturally shrivel and fall off from the bottom.
Is Neem oil safe for all succulents? Neem oil is a fantastic, organic, broad-spectrum pesticide and fungicide, but it comes with a major caveat for succulents. Many popular varieties—like Echeveria, Pachyphytum, and Sedum—produce a natural, powdery wax coating called farina (epicuticular wax). This coating acts as the plant’s natural sunscreen and water repellent. Neem oil, like any oil or heavy soap, will strip this farina right off the leaf. While it may kill the pests, it leaves the plant looking patchy and highly vulnerable to sunburn. If your plant has farina, I recommend using 70% isopropyl alcohol on a cotton swab instead. If you must use Neem oil, always do a spot test on an inconspicuous lower leaf and wait 48 hours to see how the plant reacts.
Can I use cinnamon to treat black spots on succulents? You might have seen viral plant hacks touting cinnamon as a miracle cure. While cinnamon does possess fantastic, scientifically backed natural antifungal properties, it is best used as a preventative powder rather than a cure for existing black spots on leaves. Where cinnamon truly shines is in wound care. When you prune off a diseased leaf or behead a rotting stem, lightly dusting the fresh, open cut with standard ground cinnamon helps dry the wound quickly and creates a protective barrier against fungal spores while the plant callouses.
Why is my succulent turning yellow AND getting black spots? This specific combination of symptoms—yellowing, translucent, squishy leaves accompanied by dark spots—is the classic textbook presentation of severe overwatering and early-stage root rot. The yellowing occurs because the bursting plant cells are essentially drowning and breaking down from the inside out. If you see this, stop watering immediately, unpot the plant, and follow the emergency root rot intervention steps outlined above.
Can I use tap water on my succulents? While tap water doesn’t directly cause black spots, it can indirectly stress the plant. Depending on where you live, tap water can be heavily treated with chlorine, fluoride, and hard minerals. Over time, these minerals build up in the soil and can burn the sensitive root tips, weakening the plant’s immune system and making it more susceptible to the fungal infections that do cause black spots. If your tap water is particularly hard, try using filtered water or collecting rainwater for your indoor jungle.
Conclusion: You Can Save Your Succulent! 🎉
Seeing your favorite desert plant struggling can be incredibly stressful, but as we’ve learned, those alarming dark blemishes are simply a way for your plant to communicate with you.
Whether you are dealing with the aftermath of an accidental overwatering session, a sudden fungal outbreak, or a sneaky spider mite invasion, you now have the expert knowledge and the exact protocols required for effectively treating black spots on succulent leaves.
Remember the golden rules of succulent care:
-
When in doubt, wait it out: It is always easier to revive an underwatered succulent than an overwatered one. Master the “Soak and Dry” method!
-
Drainage is non-negotiable: Ditch the cute glass terrariums and upgrade to gritty soil and terra cotta pots with large drainage holes.
-
Act quickly: Quarantine sick plants at the first sign of trouble to protect your wider collection.
Gardening is a constant learning curve, and even the most seasoned experts occasionally lose a plant to rot or pests. The most important thing is that you are paying attention, learning, and trying your best. Your succulents are incredibly lucky to have such a dedicated plant parent looking out for them.
Happy Planting! 🌵💚











