
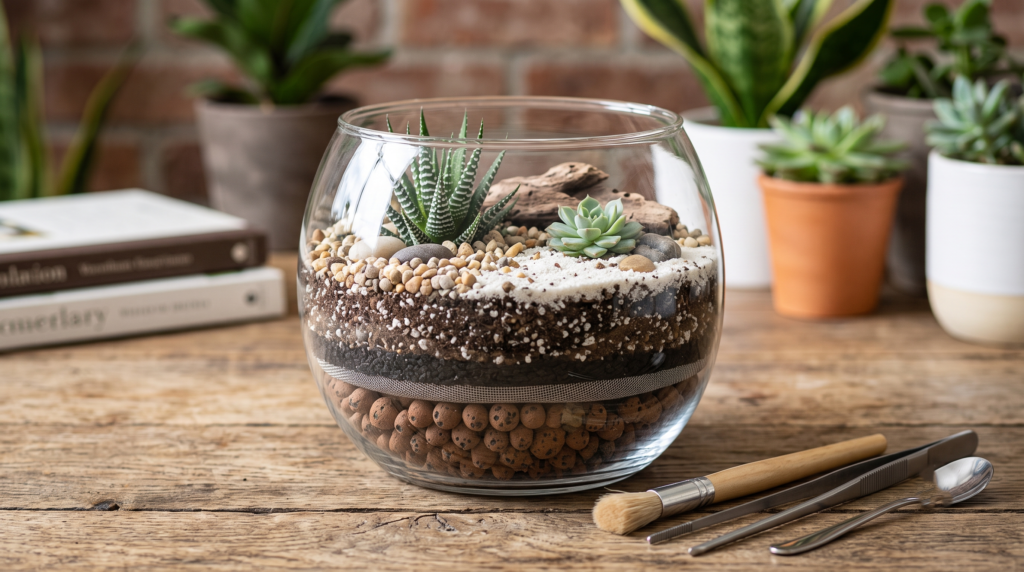
Have you ever fallen in love with a stunning, tiny glass succulent garden at a boutique or garden center, only to watch it turn to a sad, squishy mush a few weeks after bringing it home? 🥀 If so, you are definitely not alone. It is the most common heartbreak in the houseplant world. The primary reason this happens is a fundamental clash between a succulent’s natural desert habitat and the enclosed, humid environment of a glass jar. However, mastering proper mini succulent terrarium layering techniques is the ultimate secret to bridging this gap and ensuring your tiny arid plants don’t just survive, but truly thrive.
Author’s Note: As a plant care specialist who has designed and rescued hundreds of terrariums over the last decade, I can tell you that 90% of terrarium failures come down to one missing element: a properly engineered internal ecosystem. When you build the foundation correctly, you completely eliminate the risk of root rot.
In this comprehensive guide, we are going to dive deep into the exact science and step-by-step layering methods required to build a fail-proof mini succulent terrarium. You will learn about the best materials to use, how to scale them for tiny containers, and the watering secrets that will keep your glass garden beautiful for years to come. 🪴✨
🔬 Why Succulents Struggle in Glass: The Root Rot Dilemma
Before we can build a thriving terrarium, we need to understand the enemy. To grasp why layering is so critical, we have to look at the biology of succulents and how they interact with glass containers.
The Biology of Desert Survivors 🏜️
Succulents, by their very nature, are drought-resistant survivors. In their native habitats—from the rocky outcrops of South Africa to the arid deserts of the Americas—their roots are designed to do two things rapidly: absorb massive amounts of water during rare, heavy rainfalls, and then dry out completely and breathe. Their roots require high levels of oxygen (soil aeration) to function properly. When succulent roots are deprived of oxygen, the plant effectively begins to suffocate.
The “No Drainage” Trap 🫙
Herein lies the problem with glass terrariums: they do not have drainage holes. When you water a succulent in a standard terracotta pot, gravity pulls the excess moisture down and out through the bottom hole. In a glass bowl or jar, that water has nowhere to go. It pools at the very bottom, creating a stagnant, swampy environment.
When soil sits in this pooled water, it displaces all the oxygen. This creates an anaerobic environment—the perfect breeding ground for destructive bacteria and fungi. Within days, these pathogens attack the roots, turning them black and mushy. This condition, known as root rot, travels quickly up the stem of the plant, causing the leaves to yellow, turn translucent, and eventually fall off. By the time you notice the damage above the soil, it is usually too late to save the plant.
The Golden Rule: Open vs. Closed Terrariums 🛑
Crucial Expert Tip: Succulents must always be planted in open-air terrariums. Closed terrariums (the ones with a lid or cork) create a miniature greenhouse effect. They trap heat and recycle humidity. While tropical plants like ferns and fittonias love this humid jungle vibe, a closed terrarium is a swift death sentence for arid plants. Always choose a glass container with a wide, open top to allow for maximum airflow and rapid evaporation. 🌬️
🏗️ Step-by-Step Mini Succulent Terrarium Layering Techniques
Creating a terrarium is essentially building a functional plumbing system and water-filtration plant on a micro-scale. Because we don’t have a drainage hole, we must create a “false bottom” to manage the water.
Here is the exact, fail-proof layering formula, starting from the bottom of your glass container and working our way up.
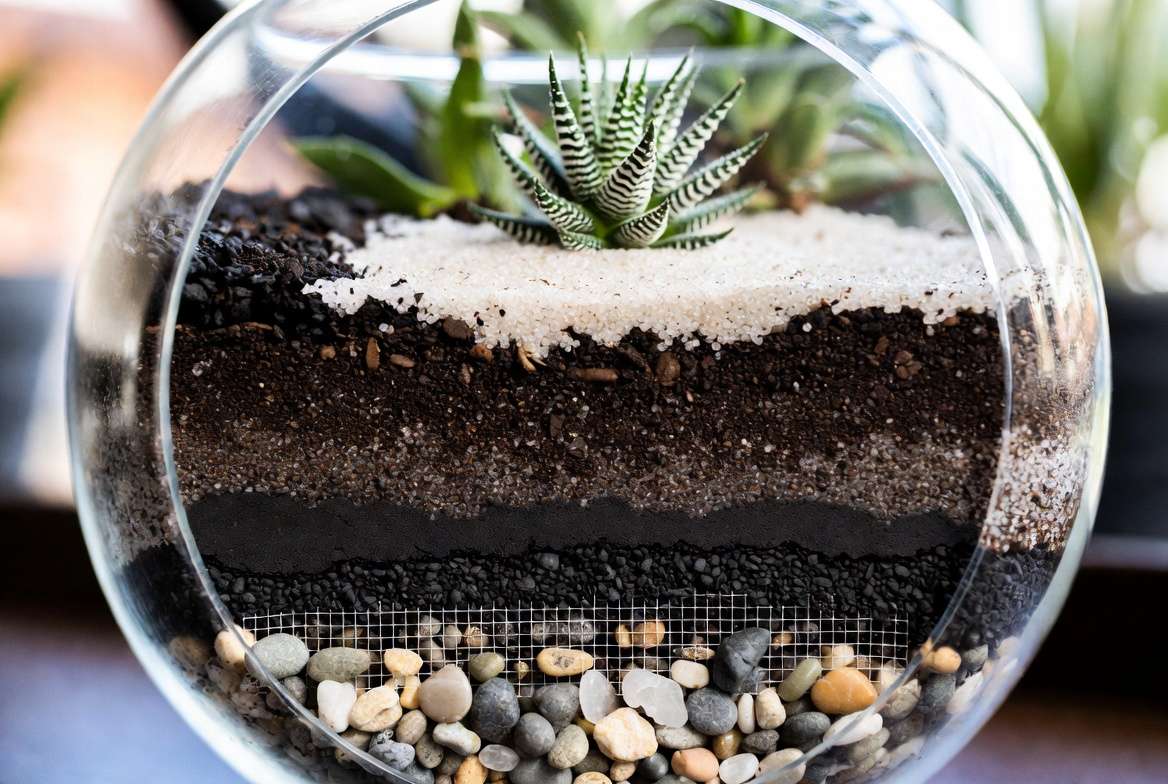
Layer 1: The Drainage Foundation (The False Bottom) 🪨
The Purpose: This is the most critical layer in your terrarium. The drainage layer acts as a reservoir. Its job is to catch any excess water that flows through the soil, holding it safely away from the fragile succulent roots until it can naturally evaporate back up into the air.
The Best Materials:
-
LECA (Lightweight Expanded Clay Aggregate): These baked clay pebbles are incredibly porous, absorbing some moisture while leaving plenty of air pockets.
-
Pumice or Lava Rock: Highly porous volcanic rocks that provide excellent aeration and drainage.
-
Small River Pebbles or Gravel: While not porous, they create great structural gaps for water to pool into.
Sizing for Mini Terrariums: Proportion is everything when working with small containers. If your glass container is only 4 inches tall, using massive decorative river stones will look absurd and take up too much valuable real estate. Stick to small gravel, crushed pumice, or micro-LECA (roughly 2-4mm in size).
Application: Pour a clean, even layer at the bottom of your glass. For a mini terrarium, aim for a ½-inch to 1-inch deep layer.
Layer 2: The Filtration Barrier 🕸️
The Purpose: Imagine pouring fine sand over a pile of large rocks; the sand immediately falls through the cracks and settles at the bottom. The same thing happens in a terrarium. Every time you water it, the fine potting soil will slowly wash down into your drainage layer. Eventually, the soil fills all the air gaps between the rocks, turning your false bottom into a thick layer of mud, which completely defeats the purpose of having a drainage layer. The filtration barrier prevents this.
The Best Materials:
-
Fiberglass Window Screen Mesh: This is the absolute gold standard for terrariums. It won’t rot over time, allows water to pass through effortlessly, and completely blocks soil.
-
Long-Fibered Sphagnum Moss: A natural alternative. You soak the moss, wring it out, and press a thin layer over the rocks.
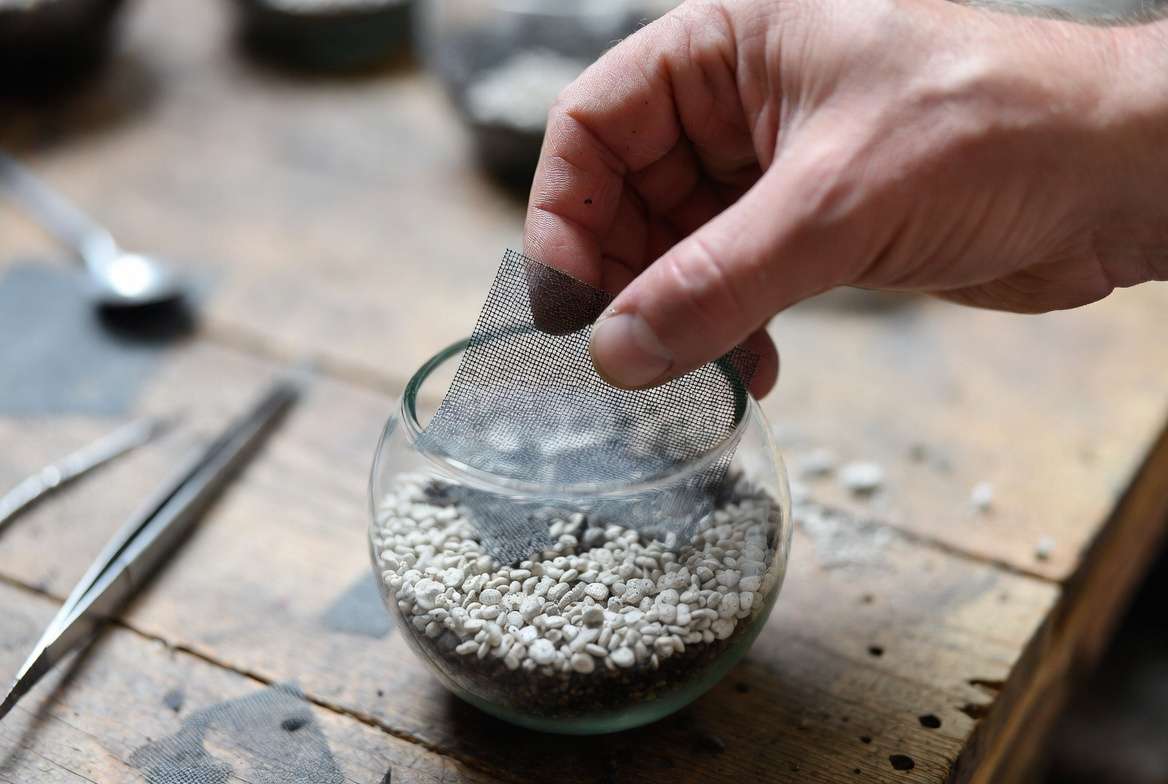
Expert Tip for Mini Terrariums 💡: Space is a premium in a tiny glass bowl. Sphagnum moss can take up a ½ inch of vertical space. Therefore, window screen mesh is the vastly superior choice for mini terrariums. Cut a circle of mesh slightly larger than the diameter of your container’s base, push it down over the rocks, and let the edges curl up slightly against the glass to form a cup shape.
Layer 3: The Purifier (Activated Charcoal) 🖤
The Purpose: Because the water in the false bottom sits stagnant until it evaporates, it can sometimes harbor bacteria, grow algae, or produce an unpleasant “swampy” smell. Horticultural activated charcoal acts as a natural chemical filter. It is highly porous and binds to toxins, absorbs odors, and helps prevent the buildup of harmful mold and bacteria.
Application: You do not need a massive amount of charcoal. Simply sprinkle a very thin, even layer (about ¼ inch thick) directly on top of your filtration barrier.
Layer 4: The Growing Medium (Succulent Soil) 🪴
The Purpose: This layer serves as the primary home for your plant’s root system. It anchors the succulent in place, provides essential micro and macro-nutrients for growth, and must offer superb soil aeration to keep the roots oxygenated and healthy.
The Perfect Mix: Using standard indoor potting soil is the most common mistake beginners make when building a terrarium. Regular potting soil is heavily peat-based, meaning it is specifically designed to retain moisture like a sponge. In a glass environment without drainage holes, peat-based soil will stay wet for weeks, virtually guaranteeing root rot.
Instead, you need a highly porous, well-draining “gritty mix.” You can purchase specialized succulent and cactus soils, but as an expert, I highly recommend mixing your own to ensure maximum aeration. A fail-proof terrarium recipe is:
-
50% High-quality succulent soil (sifted to remove large chunks of bark)
-
25% Perlite (for lightweight aeration)
-
25% Coarse sand, pumice, or poultry grit (to facilitate rapid water movement)
Application: Carefully spoon your gritty mix over the activated charcoal layer. You need this layer to be deep enough to fully accommodate and cover the plant’s root ball. For mini terrariums, this usually means a depth of 1.5 to 3 inches, depending on the height of your glass container.
Layer 5: Top Dressing and Hardscaping ✨
The Purpose: The final layer is often seen as purely decorative, but it serves a vital horticultural function! A top dressing prevents the lightweight perlite and soil from shifting around when you water the terrarium. More importantly, it acts as a dry barrier between the moist soil and the fleshy lower leaves of your succulent, preventing stem rot.
The Best Materials:
-
Decorative coarse sand or crushed quartz
-
Small, polished river stones or pea gravel
-
Tumbled sea glass
Adding Hardscape: This is where you bring the mini terrarium ecosystem to life visually! You can add small pieces of sterilized driftwood, a beautiful chunk of amethyst, or tiny ceramic figurines.
Application: Use a small spoon or tweezers to carefully layer the top dressing around the base of the plant, ensuring no bare soil is visible. Aim for a depth of roughly ¼ to ½ inch.
⚖️ Proportion and Scale: Adapting Layers for Mini Containers
When dealing with miniature glass vessels—like small fishbowls, geometric glass prisms, or upcycled jam jars—cramming five distinct layers into a 4-inch space can easily look messy and disproportionate.
The Visual Rule of Thirds 📐
To ensure your mini terrarium looks like a professional, balanced piece of living art, follow the classic “Rule of Thirds”:
-
The Bottom Third: This should encompass your drainage layer, filtration mesh, and charcoal. Keep the stones small so they don’t overpower the aesthetic.
-
The Middle Third: This is purely for your growing medium (the gritty succulent soil).
-
The Top Third: This space belongs entirely to the succulent itself, the top dressing, and the open air above it. The plant should never extend completely past the rim of the glass; it needs to look like it belongs inside a miniature world.
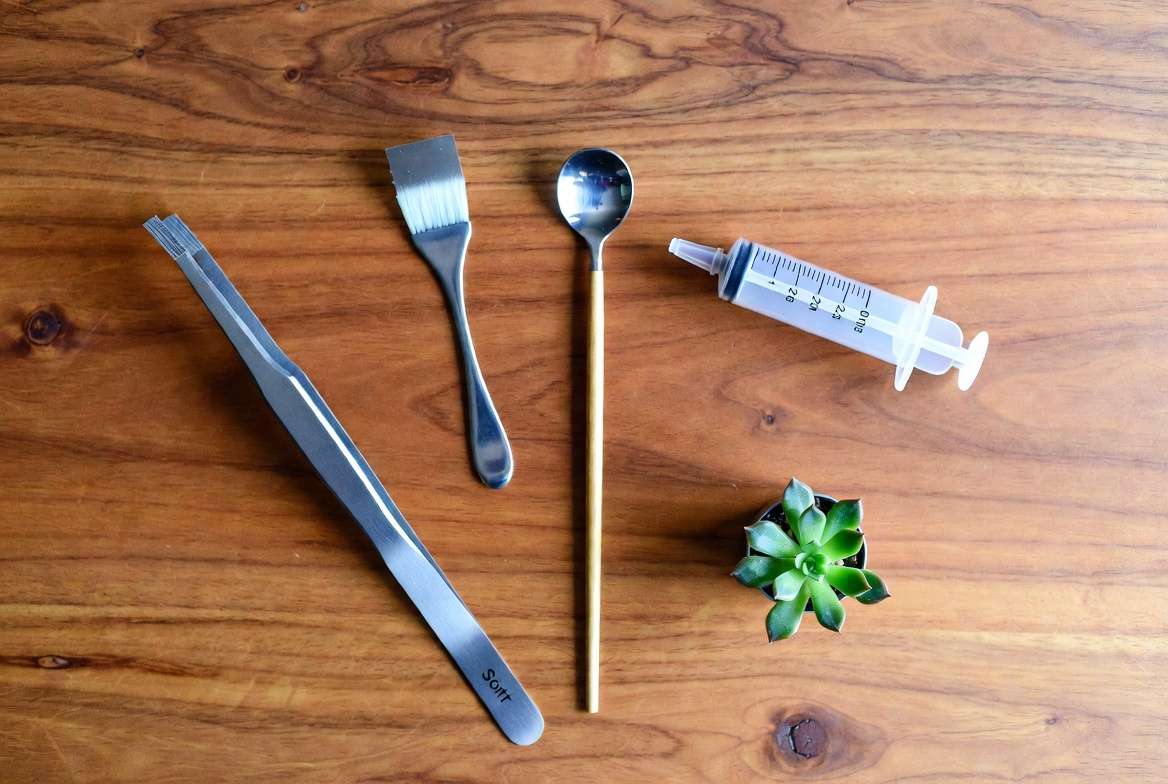
Essential Mini-Terrarium Tools 🛠️
Working in a narrow-necked glass container requires precision. Forget the garden trowel! Here are the best tools for mini layering:
-
Long-handled aquascaping tweezers: Perfect for lowering delicate plants into small holes.
-
A rolled-up paper funnel: The absolute best way to pour soil and gravel exactly where you want it without getting dust all over the glass walls.
-
A long espresso spoon: Ideal for patting down soil and smoothing out your top dressing.
-
A soft makeup brush: Use this to gently brush loose dirt off the succulent leaves and the inside walls of the glass once you finish planting.
🌱 Best Succulents for Mini Glass Environments
Not all succulents are created equal, and not all of them belong in a terrarium. Choosing the wrong plant will quickly undo all your perfect layering work. When shopping, look for slow-growing, compact varieties that share the exact same light and water requirements.
The Best Picks for Glass 🏆
-
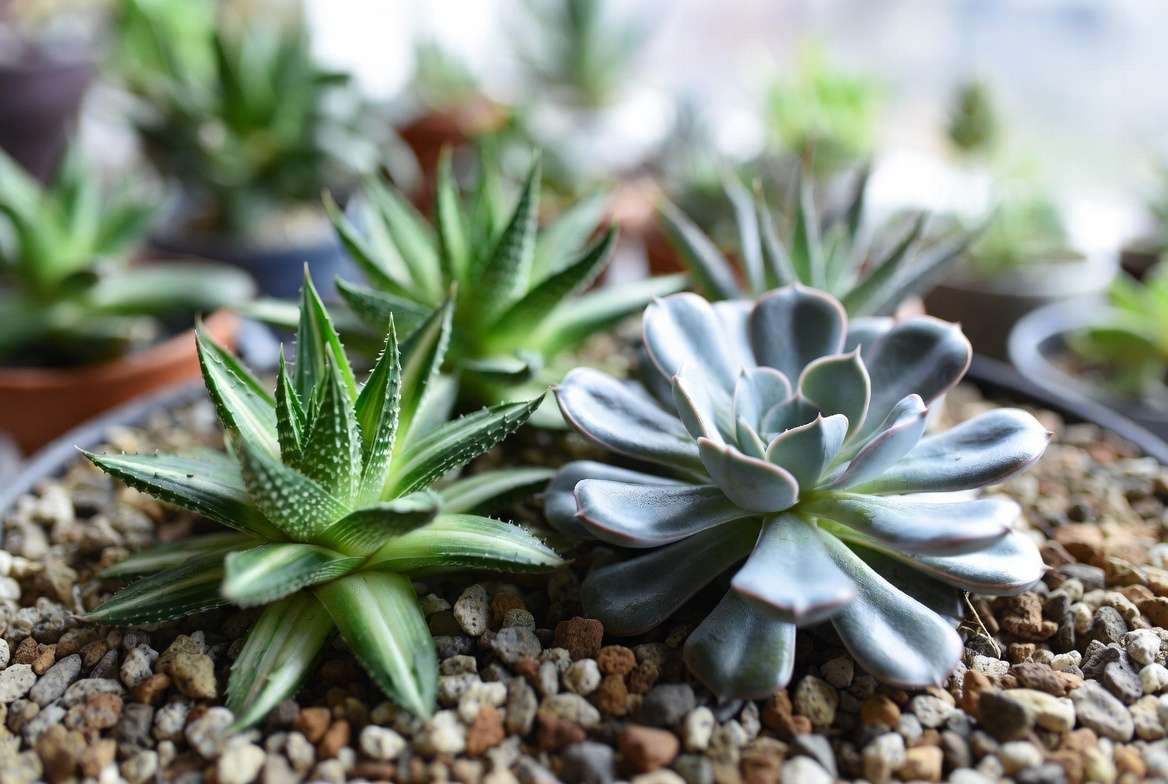
Haworthia (Zebra Plant): These are the absolute kings of the terrarium. They tolerate the lower light levels found indoors, grow incredibly slowly, and have small, shallow root systems that thrive in constrained spaces.
-
Gasteria: Closely related to Haworthia, these are incredibly tough, shade-tolerant, and stay beautifully compact.
-
Small Echeveria: Their beautiful rosette shape looks stunning in a glass bowl. Just be aware they require extremely bright, direct light to keep their tight shape and vibrant colors.
-
Sedum japonicum (Tokyo Sun): A fantastic, bright green/yellow miniature succulent that works beautifully as a vibrant accent plant in tiny spaces.
What to Avoid 🚫
-
Fast-growing Cacti: Cacti require even less water and more intense sun than fleshy succulents. They are highly prone to rotting in glass.
-
Moisture-loving Plants: Never mix ferns, mosses, or fittonias with succulents. Their water requirements are completely incompatible.
-
Trailing Succulents: Plants like “String of Pearls” or “Burro’s Tail” will quickly outgrow a mini terrarium and look messy within a few months.
💧 The Golden Rules of Watering a Terrarium Without Drainage
You have perfectly executed the mini succulent terrarium layering techniques. The false bottom is set, the barrier is in place, and the gritty soil looks amazing. Now, you must master the art of watering.
Because the glass has no drainage holes, you have to change the way you think about watering completely.
The “Sip, Don’t Chug” Method 🥄
Never hold a terrarium under a running faucet, and avoid using a traditional watering can. If you pour water over the top, you risk flooding the false bottom. Instead, use a precision squeeze bottle, a large pipette, or a plastic oral syringe. This allows you to apply water drop-by-drop directly to the base of the plant, completely avoiding the leaves (which can rot if left wet).
Rely on Visual Cues 👀
Your glass container is a window into the root zone—use it to your advantage! Before you even think about watering, look closely at the drainage layer at the bottom.
-
If you see condensation on the glass below the soil line? Do not water.
-
If there is a tiny pool of water in the pebbles? Do not water.
-
Only water when the soil looks bone dry all the way to the bottom.

The Wrinkle Test 🤏
Succulents store water in their fleshy leaves. They will literally tell you when they are thirsty. Wait until the lowest leaves on the plant begin to look slightly wrinkled, puckered, or feel soft and pliable when gently squeezed. This is your green light. Give the plant a precise “sip” of water with your syringe (usually no more than 1-2 tablespoons for a mini terrarium), and watch the leaves plump back up over the next 24 hours.
❓ Frequently Asked Questions (FAQs)
Do I really need activated charcoal for a succulent terrarium? While you can technically build a terrarium without it, skipping the charcoal highly increases the risk of foul odors, bacterial growth, and mold. Given how cheap horticultural charcoal is, it acts as an essential insurance policy for the long-term health of your closed-glass ecosystem.
How long do mini succulent terrariums last? If you follow proper layering techniques to prevent root rot and provide adequate bright sunlight, a well-built mini terrarium can thrive for 2 to 5 years. Eventually, the succulent may outgrow its tiny home and need to be repotted, but the terrarium itself will remain perfectly healthy.
Can I use fine sand as the bottom drainage layer? Absolutely not. Fine sand is the worst possible material for a drainage layer. When water hits sand, it compacts tightly, trapping moisture and eliminating all oxygen. Always use coarse, porous materials like LECA, pumice, or small gravel for the bottom layer.
How do I fix an overwatered terrarium? If you accidentally added too much water and see a large pool sitting in the drainage layer, act quickly! Take a rolled-up paper towel or a long cotton swab and gently push it down the side of the glass past the soil until it reaches the water. Let the paper towel act as a wick to suck up the excess moisture. Leave it in a sunny, warm spot to encourage rapid evaporation.
🏁 Conclusion
Building a gorgeous, long-lasting glass garden doesn’t require a degree in horticulture—it just requires an understanding of basic plumbing and plant biology! By mastering these fail-proof mini succulent terrarium layering techniques, you are effectively recreating the arid, well-draining desert environment these resilient little plants crave, right inside a beautiful glass vessel.
Remember the golden sequence: Drainage ➔ Barrier ➔ Charcoal ➔ Soil ➔ Plant.
If you respect the layers, scale your materials appropriately for a mini container, and water with strict precision, you will completely banish the heartbreak of root rot. Your succulents will reward you with years of vibrant, structural beauty on your desk, windowsill, or coffee table.
Now, grab your tweezers, find the perfect glass jar, and start layering!











