
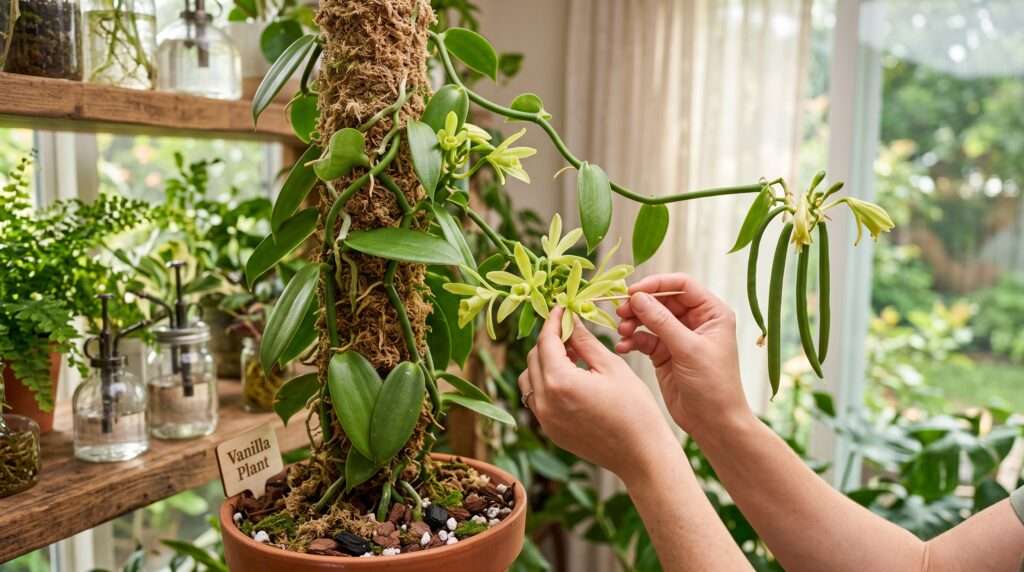
Imagine the rich, intoxicating aroma of real, fresh vanilla wafting through your kitchen. Now, picture the staggering price tag on a single, shriveled store-bought vanilla pod. It’s enough to make any plant enthusiast wonder: can I just grow this myself? The short answer is yes. While many claim that growing a vanilla plant indoors is an impossible feat reserved for tropical greenhouses, that simply isn’t true. With the right environment, specific care strategies, and a little bit of patience, home growers can absolutely cultivate this stunning vining orchid right in their living rooms.
This guide isn’t just about keeping leaves green. As someone who has spent years navigating the complexities of indoor orchid care, I’m going to share the exact expert steps required to replicate their native habitat, trigger stunning blooms, hand-pollinate the delicate flowers, and cure your very own gourmet vanilla beans at home. Let’s turn that impossible myth into your most rewarding houseplant achievement. 🌿
🌿 1. Meet the Vanilla Plant (Vanilla planifolia)
Before we can master vanilla planifolia care, we need to understand exactly what this fascinating specimen is. The vanilla plant is actually an orchid—in fact, it holds the prestigious title of being the only orchid in the world that produces an edible, agricultural crop. Native to the lush, humid forests of Mesoamerica, this plant evolved as a climbing epiphyte.
Understanding Its Growth Habit Unlike your typical potted houseplant, the vanilla orchid is a vigorous vine. In the wild, it starts its life on the forest floor before latching onto a host tree and climbing toward the canopy. Because of this, the plant has two distinct types of roots:
-
Terrestrial Roots: These sit in the soil at the base of the plant, absorbing primary nutrients and moisture.
-
Aerial Roots: These emerge from the nodes along the stem. They act as the plant’s hands, anchoring it to its climbing support while also absorbing moisture directly from the humid air.
The Timeline Expectation If you are starting your journey with a small cutting, you need to set realistic expectations. Growing vanilla orchids indoors is a marathon, not a sprint. A healthy cutting typically takes 3 to 5 years of consistent growth to reach maturity (usually measuring 10 to 15 feet in length) before it is physically capable of producing its first flower spikes. ⏳

🌡️ 2. Recreating the Tropics: Ideal Indoor Conditions
To coax a vanilla plant into vigorous growth and eventual blooming, you must trick it into believing it is thriving in a Central American jungle. This comes down to mastering two environmental pillars: light and humidity.
☀️ Light Requirements: The “Dappled Sun” Sweet Spot
In its natural habitat, the vanilla vine grows under the canopy of massive tropical trees. It never receives harsh, direct sunlight, which will quickly scorch its fleshy green leaves and cause permanent yellowing. However, deep shade will stall its growth entirely.
You want to achieve bright, indirect light—often referred to as “dappled sun.”
-
Best Window Placement: An East-facing window is ideal, providing gentle, cool morning sun and shade during the harsh afternoon hours. South or West-facing windows can work, provided you filter the light with sheer curtains.
-
Grow Lights: For the most consistent indoor orchid care, especially during short winter days, full-spectrum LED grow lights are a game-changer. Position them 12 to 18 inches above the vine and run them for 12-14 hours a day to simulate tropical daylight hours. 💡
💧 Temperature & Humidity: Avoiding the Dry-Air Trap
Vanilla orchids despise the cold and will suffer damage if exposed to drafts or temperatures below 60°F (15°C). Aim to maintain a daytime temperature between 75°F to 85°F (24°C to 29°C), with a slight nighttime drop that mimics natural tropical cooling.
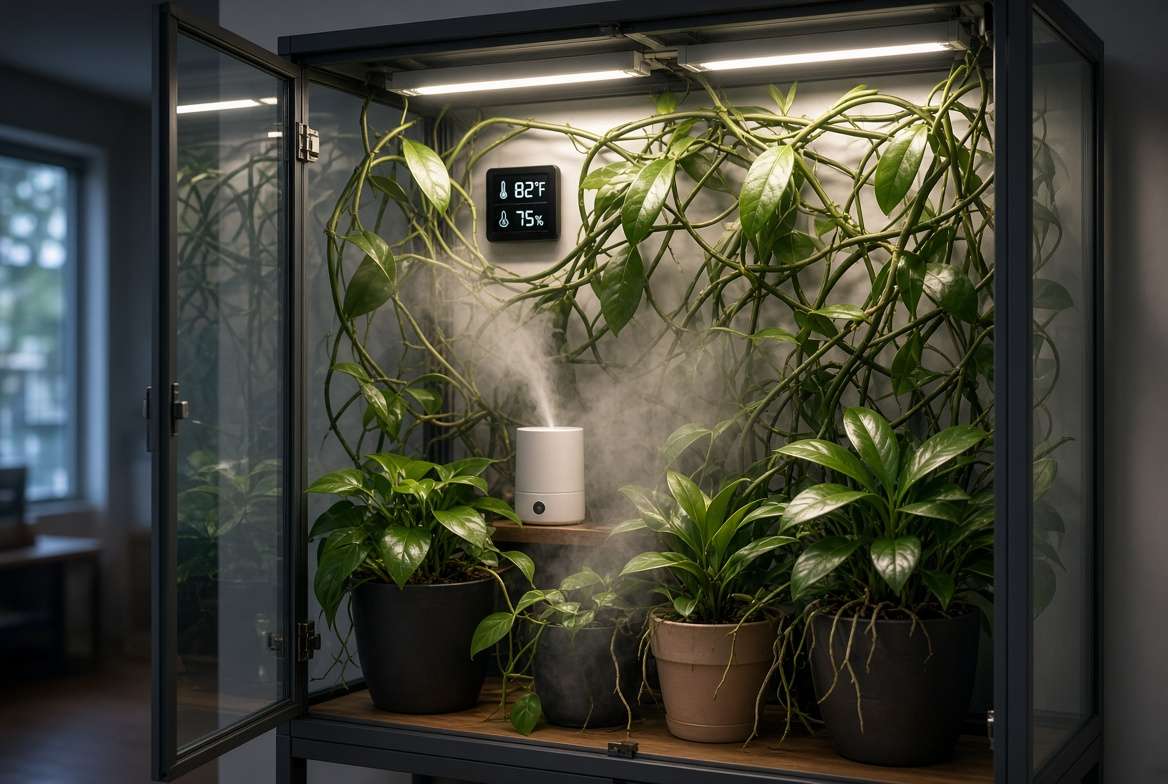
Humidity is where most indoor growers fail. Central heating and air conditioning strip moisture from the air, but your vanilla plant needs ambient humidity levels of 60% to 80% to thrive and keep its aerial roots plump.
-
Actionable Advice: Do not rely on misting alone; the water evaporates too quickly to make a lasting difference. Instead, invest in a warm-mist humidifier placed near the plant. Alternatively, growing the vine inside a modified glass greenhouse cabinet (like a converted IKEA cabinet) is an incredible way to lock in that essential jungle moisture. 🌫️
🥥 3. Soil, Potting, and the Secret to Climbing
The foundation of a healthy vanilla vine lies in its root system. Because they are epiphytic by nature, suffocating them in standard potting soil is a guaranteed death sentence.
🪵 Formulating the Perfect Orchid Mix
Standard potting soil retains far too much water and lacks the airflow necessary for orchid roots. Planting your vanilla in dense dirt will lead directly to vanilla plant root rot—a smelly, mushy condition that destroys the terrestrial roots.
Instead, you need a chunky, well-aerating, and fast-draining medium. Here is a foolproof DIY soil recipe for vanilla orchids:
-
40% Medium-grade Fir Bark: Provides structure and massive air pockets.
-
30% Sphagnum Moss: Retains the perfect amount of moisture without becoming soggy.
-
20% Coarse Perlite or Pumice: Ensures rapid drainage.
-
10% Horticultural Charcoal: Keeps the mixture “sweet” by filtering impurities and preventing bacterial build-up.

🧗♂️ Why You Must Provide a Climbing Support
You cannot grow a vanilla plant in a hanging basket and expect it to flower. Biology dictates that the vine must climb vertically. As it climbs, the changing gravity and distance from the soil trigger hormonal shifts within the plant, signaling that it is maturing and preparing to bloom.
-
The Best Support System: While a wooden trellis works, a moist sphagnum moss pole is the absolute gold standard. A moss pole mimics a damp tree trunk. As the vine climbs, its aerial roots will actively burrow into the damp moss, anchoring the plant and absorbing secondary water and nutrients. You must keep the moss pole consistently damp (but not dripping) to encourage this climbing behavior. 🪵
🚿 4. Watering and Fertilizing Strategies for Vigorous Growth
Once your lighting, humidity, and soil are dialed in, mastering the watering and feeding schedule is the final key to lush, rapid vegetative growth.
🚫 Watering: The Fine Line Between Thirsty and Drowning
Vanilla plants love water, but they demand rapid drainage. You want to mimic heavy tropical rainfall followed by brief drying periods.
When watering, take the plant to the sink or shower and flush the pot thoroughly with room-temperature, filtered water (or rainwater, if possible). Let the water pour freely through the drainage holes. Never let the pot sit in a saucer of standing water. Before watering again, allow the top two inches of the potting medium to dry out completely. If you overwater, the terrestrial roots will suffocate, turning to mush. 💧
🧪 Feeding Your Vanilla Orchid
Because their potting mix is virtually devoid of natural soil nutrients, you must provide the food. Vanilla orchids are heavy feeders during their active growing season (spring through early fall).
Adopt the famous orchid grower’s mantra: “Weakly, weekly.” Use a balanced, high-quality, water-soluble orchid fertilizer (such as a 20-20-20 formula). Dilute it to 1/4 or 1/2 of the recommended strength on the label, and apply it every time you water. This provides a steady, gentle stream of nutrients that mimics the constant trickle of decaying organic matter they receive in the wild canopy, without risking chemical root burn.
🌸 5. The Blooming Phase: Triggers and Timing
If you’ve successfully provided the right light, humidity, and climbing support, your vanilla vine will reward you with vigorous, leafy growth. But how do you get it to actually flower?
Size Matters First, recognize that a juvenile plant will not bloom, no matter how perfect the conditions are. As a general botanical rule, a vanilla plant needs a vine length of at least 10 to 15 feet (about 3 to 4.5 meters) before it has the maturity and stored energy required to produce flowers. By looping the vine up and down a sturdy trellis or tall moss pole, you can manage this impressive length indoors without it taking over your entire room.
The Dry Spell Stressor: A Botanical Secret In their native tropical environment, vanilla orchids bloom in the spring, triggered by the stress of the winter dry season. To encourage your indoor plant to push out flower spikes, you need to simulate this seasonal shift.
During late winter (usually around January or February), intentionally induce a mild drought. Reduce your watering frequency, allowing the moss pole and potting mix to dry out slightly more than usual. Concurrently, lower the nighttime temperatures by a few degrees if possible (aiming for the mid-60s°F or around 18°C). Keep this up for about four to six weeks. This mild environmental stress signals to the plant that it’s time to reproduce, prompting the development of gorgeous, pale yellow-green orchid clusters by early spring. 🌼

🐝 6. The 24-Hour Window: How to Hand-Pollinate Vanilla Flowers
This is the most critical hurdle in vanilla planifolia care. Even if you get your plant to bloom, it will never produce a vanilla bean on its own indoors.
The Melipona Bee Absence In the wild forests of Mexico, vanilla flowers are exclusively pollinated by a specific, tiny species of stingless bee known as the Melipona bee. Because this bee doesn’t exist outside of Mesoamerica—and certainly not in your living room—you must step in and play the role of the bee. You have to hand-pollinate vanilla flowers.
The Morning Rush Vanilla flowers are incredibly fleeting. A single bloom opens in the early morning and wilts by late afternoon. If it is not pollinated within that brief 12-hour window, the flower drops off the vine, and the chance for a bean is lost forever. You must check your plant daily during blooming season! ⏰
🛠️ Step-by-Step Pollination Guide Hand-pollinating sounds intimidating, but it’s actually a simple mechanical process once you understand the anatomy of the flower. The flower contains both male parts (the anther, which holds the pollen) and female parts (the stigma). However, they are separated by a tiny fleshy flap called the rostellum, which prevents self-pollination.
-
Gather Your Tool: You only need one tool—a clean wooden toothpick or a sharpened bamboo skewer.
-
Expose the Anatomy: Gently peel back the trumpet-like lip (the labellum) of the flower to reveal the central column.
-
Locate the Rostellum: Look for the small, protective flap separating the top pollen mass from the sticky surface directly beneath it.
-
Lift the Flap: Using your toothpick, gently slide it under the rostellum and lift it up and out of the way.
-
Make the Match: With the flap lifted, use your thumb (or the side of the toothpick) to gently press the top part of the column (the anther containing the pollen) firmly down onto the sticky stigma below.
-
Release: Slide the toothpick out. The pollen and stigma should now be pressed firmly together.
If successful, the flower will not drop off the next day. Instead, it will remain attached and slowly wither, while the stem behind it begins to swell. Congratulations, you’ve just created a vanilla bean! 🎉
🤎 7. From Green Pod to Gourmet Spice: Harvesting and Curing
Creating the bean is only half the battle. Now comes the waiting game, followed by the magical vanilla bean curing process.
Patience is Key Do not pick the green pods! A vanilla bean must remain attached to the vine for a grueling 7 to 9 months to fully mature and develop its complex aromatic compounds. You will know it is ready to harvest when the very tip of the dark green pod begins to turn a pale yellow. Snip it off carefully with sterilized shears.
At this stage, the pod has absolutely no vanilla scent or flavor. To transform it into the dark, fragrant, wrinkly spice we love, it must undergo a rigorous 4-step home curing process:
🔥 The 4-Step Home Curing Process
-
Dipping (Blanching): To stop the bean from continuing to grow and to trigger the enzymatic reactions that create vanillin, you must plunge the green beans into hot water (around 150°F or 65°C) for exactly 3 minutes.
-
Sweating: Immediately after dipping, quickly wrap the hot beans in dark, heavy towels or blankets and place them in a closed container (like a cooler). Keep them wrapped for 48 hours to “sweat.” When you open them, they will have turned a light brown and begun to smell faintly of vanilla.
-
Drying: For the next two to four weeks, place the beans in the sun for an hour each day, then re-wrap them in towels to sweat overnight. Once they become pliable and wrinkled, transition them to a well-ventilated, shaded rack to slowly air-dry until their moisture content drops significantly, preventing mold.
-
Conditioning: Place the dried, dark brown beans into an airtight glass jar and store them in a cool, dark cupboard. Over the next 2 to 3 months, the flavor profile will deepen, age, and mature. Finally, your homegrown vanilla is ready to use! 🍨
🐛 8. Troubleshooting Common Vanilla Plant Problems
Even the most attentive indoor gardeners run into hiccups. Here is how to diagnose and fix the most common issues:
-
Brown, Mushy Roots or Stems: This is the dreaded vanilla plant root rot. It is caused by overwatering, poor drainage, or potting in dense soil. The Fix: Unpot the plant immediately, trim away any black or mushy roots with sterile scissors, treat with a fungicide, and repot in fresh, chunky orchid bark.
-
Crispy, Bleached, or Yellowing Leaves: This indicates severe sunburn from direct light exposure. The Fix: Move the plant away from the window or install sheer curtains to diffuse the harsh rays.
-
Common Pests: Spider mites love the dry air of modern homes, and mealybugs often hide in the crevices of the vine. The Fix: Keep humidity high to deter spider mites. If an infestation occurs, wipe the leaves with a damp cloth and treat the vine thoroughly with a high-quality, organic neem oil spray every 7 days until the pests are eradicated. 🕷️

❓ 9. Frequently Asked Questions (FAQs)
How fast does a vanilla plant grow? Once a vanilla vine establishes a strong root system and latches onto a climbing support, it is an incredibly vigorous grower. In optimal tropical indoor conditions, it can grow several feet in a single year!
Can I grow a vanilla plant from a grocery store vanilla bean? No, you absolutely cannot. The vanilla beans sold in grocery stores have been blanched in hot water and cured over several months. Any seeds inside are completely unviable. To grow a vanilla orchid, you must purchase a live cutting or an established potted plant from a reputable nursery.
Are vanilla plants toxic to pets? Vanilla orchids are considered non-toxic and safe for both cats and dogs. However, like any houseplant, ingesting the tough, fibrous leaves can cause mild stomach upset in pets, so it’s always best to keep them out of reach of curious chewers. 🐾
✨ 10. Conclusion: The Sweet Reward of Patience
Learning how to grow a vanilla plant indoors is not a weekend project—it is a long-term botanical relationship. From formulating the perfect chunky orchid mix and mastering the dappled light, to executing the delicate morning rush of hand-pollination, every step requires intention and care.
While it may take years of nurturing before you see that first elusive pale green flower, the reward is unmatched. The day you finally open a glass jar to reveal the intoxicating, sweet aroma of vanilla beans you grew, pollinated, and cured with your own two hands, makes every single second of the wait entirely worth it.
Now it’s your turn! Are you ready to take on the ultimate houseplant challenge? Share your current indoor greenhouse setup in the comments below, or check out our complete buyer’s guide for the best warm-mist humidifiers and moss poles to get your vanilla orchid journey started right! 🌱✨











